Getting Materials Into Families and Between Projects
Materials drive your drawings, renderings and quantities — but working with them in Revit involves more friction than you'd expect. This article walks through how materials are assigned to families and how to move them between projects.
Getting Materials Into Families and Between Projects
Materials drive your drawings, renderings and quantities — but working with them in Revit involves more friction than you'd expect. This article walks through how materials are assigned to families and how to move them between projects.

A couple of weeks ago, we introduced Kinship's new materials management tools and how they help you build a materials library your team will love to use.
In this article, we'll look at the technical side of working with materials in Revit — how to apply them to different kinds of families, how to move them between projects, and how Kinship can help overcome some of the pain points along the way.
Adding Materials to Families
How you apply materials to families affects everything downstream — your drawings, your renderings, and whether material quantities report correctly in takeoffs. The process works differently depending on the type of family you're working with.
System Families
For layered system families like walls, floors and ceilings, materials are assigned through the structure dialog in the family’s type properties.
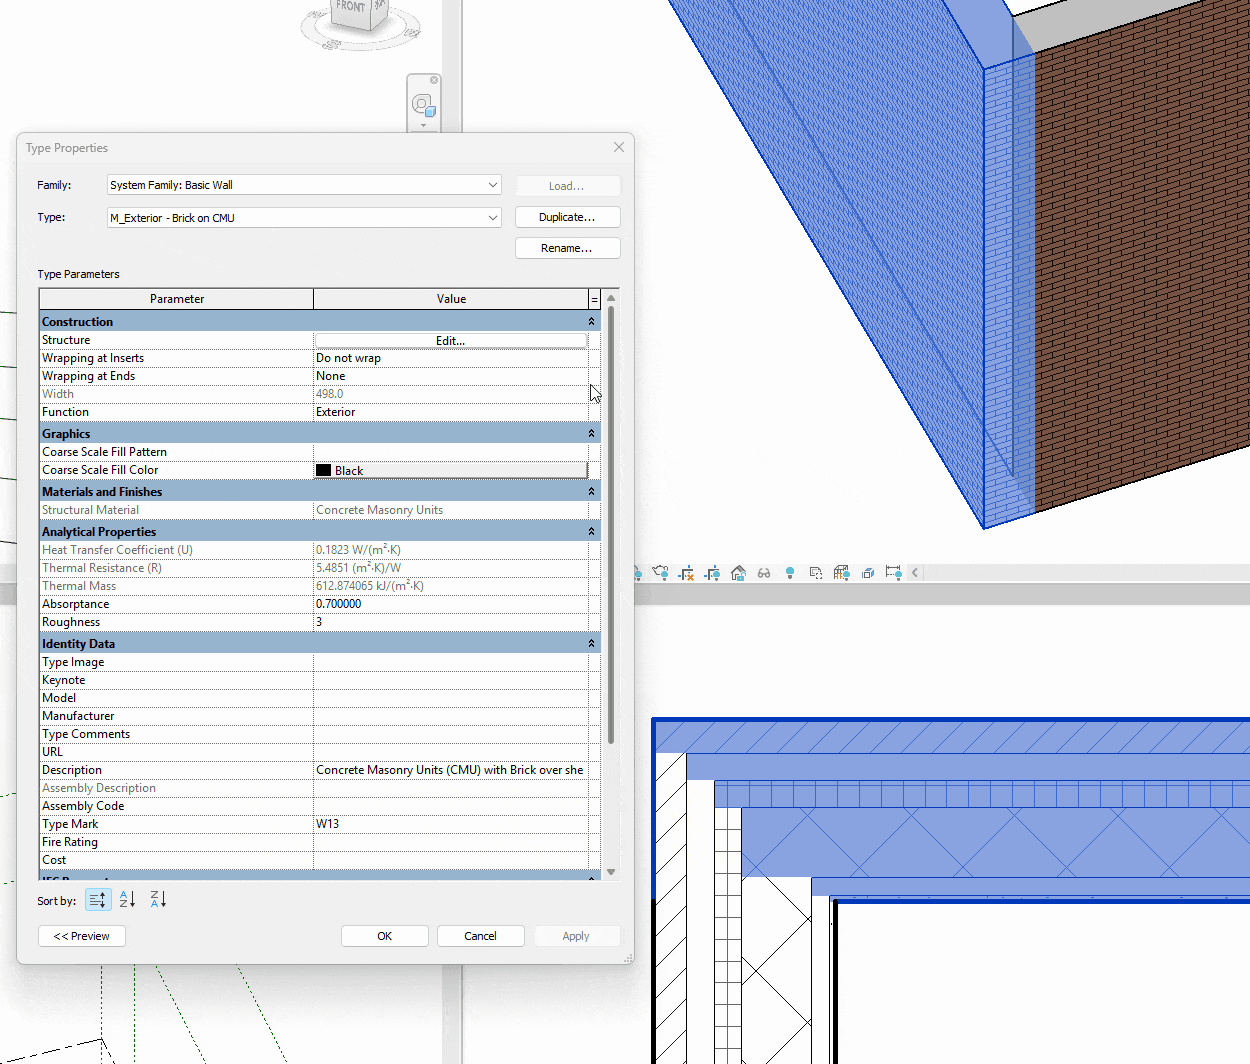
The materials used in each wall layer can be adjusted in the ‘Edit Assembly’ menu in the wall’s type properties.
Each layer represents a part of the assembly — e.g. the structure, insulation and finishes of a wall — and each can carry its own material.
The materials in the outermost wall layers are what displays in renderings, and so often get the most attention.
Beyond determining surface appearance, materials carry important embedded data — so the inner layers deserve just as much consideration.
The area and volume of a material within each layer can be extracted through material takeoffs, vital for environmental analysis. You can calculate just the volume of brickwork in a composite wall, for instance.
Materials are also important for correct documentation. The Keynote parameter is often used to link to project specifications, allowing individual parts within an assembly to be tagged in drawings.
Kinship makes it easy to keep annotation data accurate in your material library, allowing Keynote and Mark to be edited directly on the web without having to open the material in Revit.
Assembled System Families
For system families with nested or child elements, materials may need to be assigned at different levels. Stairs are a good example of this — the treads, risers and stringers are separate child elements within the stair family, each requiring their own material assignment.
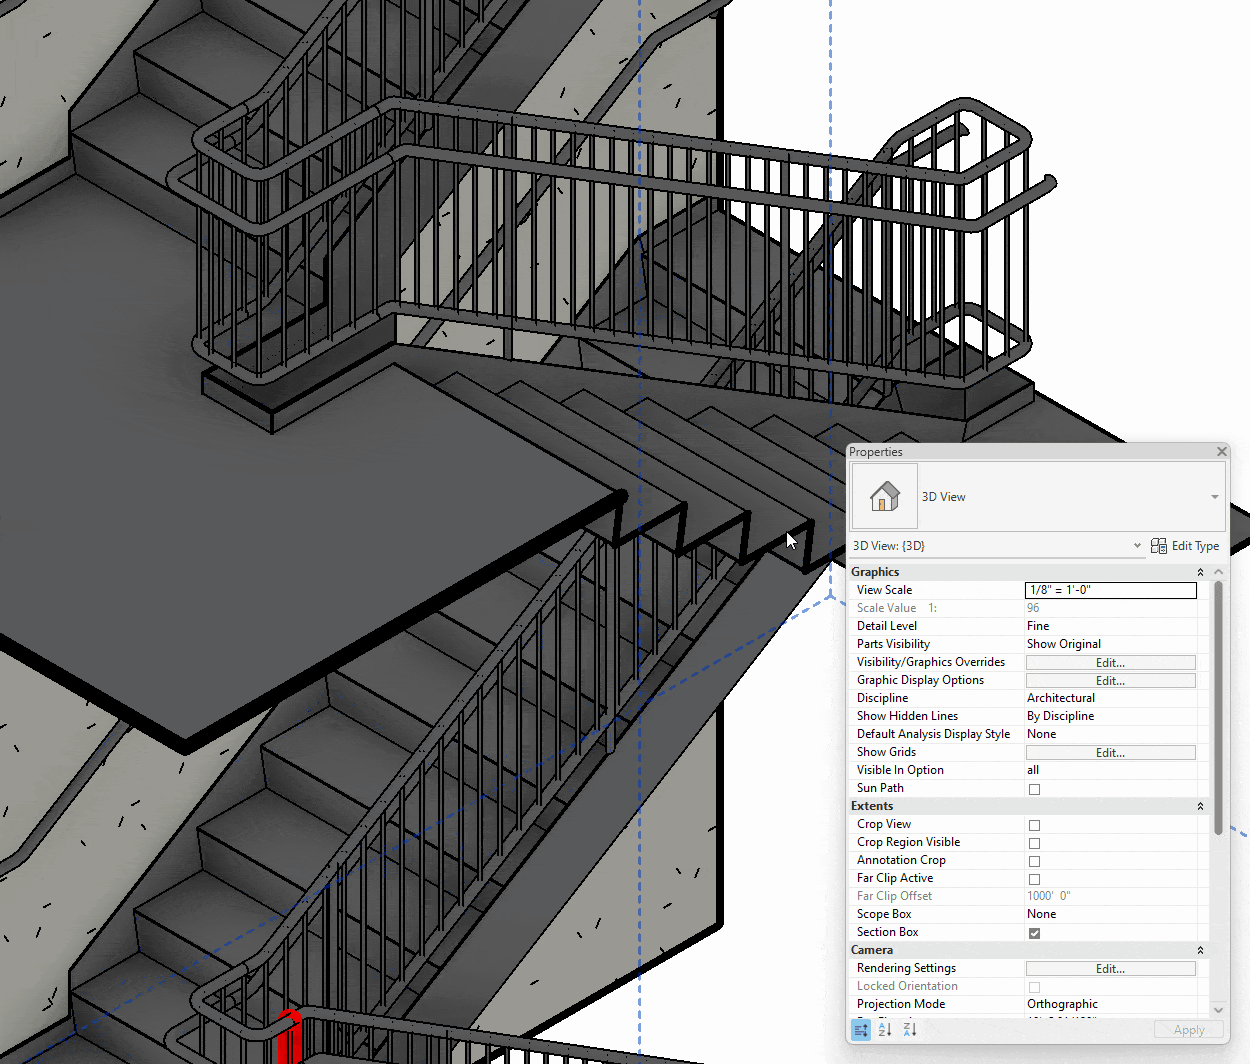
The materials used in the stringers and other sub-components of the stairs need to be adjusted in the type properties of those individual elements.
Component Families
In component families (.rfas), materials are controlled through material parameters. These can be set up as either type or instance parameters, giving you flexibility in how materials are assigned to different instances of the same family.
A door family, for example, might have separate material parameters for the frame, panel and glazing — allowing you to swap finishes and create variations without needing to edit the family itself.

In this chair family, separate parameters have been set up to adjust the seat upholstery and chair legs.
Materials for Content Builders
If you're building component families, it's good practice to add a material parameter to any geometry where the material might need to change.
It’s also important to understand how material parameters can be used in combination with family subcategories to standardize materials across your project.
Sometimes, you need to bake in specific, pre-set materials with your families. Our free content collections, for instance, come pre-loaded with beautiful, ready-to-use materials.
More often though, you will want to tinker with the material later, in the project. A common case is glass used within window families. You can change between various glass materials by adjusting parameters in the families. But what if you have 20 window families, each with multiple types, all requiring a new glass material? That’s a lot of material parameters to adjust.
This is where Object Styles and subcategories come in. Subcategories divide family geometry into logical parts — e.g. frame, panel, glazing for windows — and are shared across all families within the same category. Each subcategory can have its own material, controlled through Object Styles in the project.
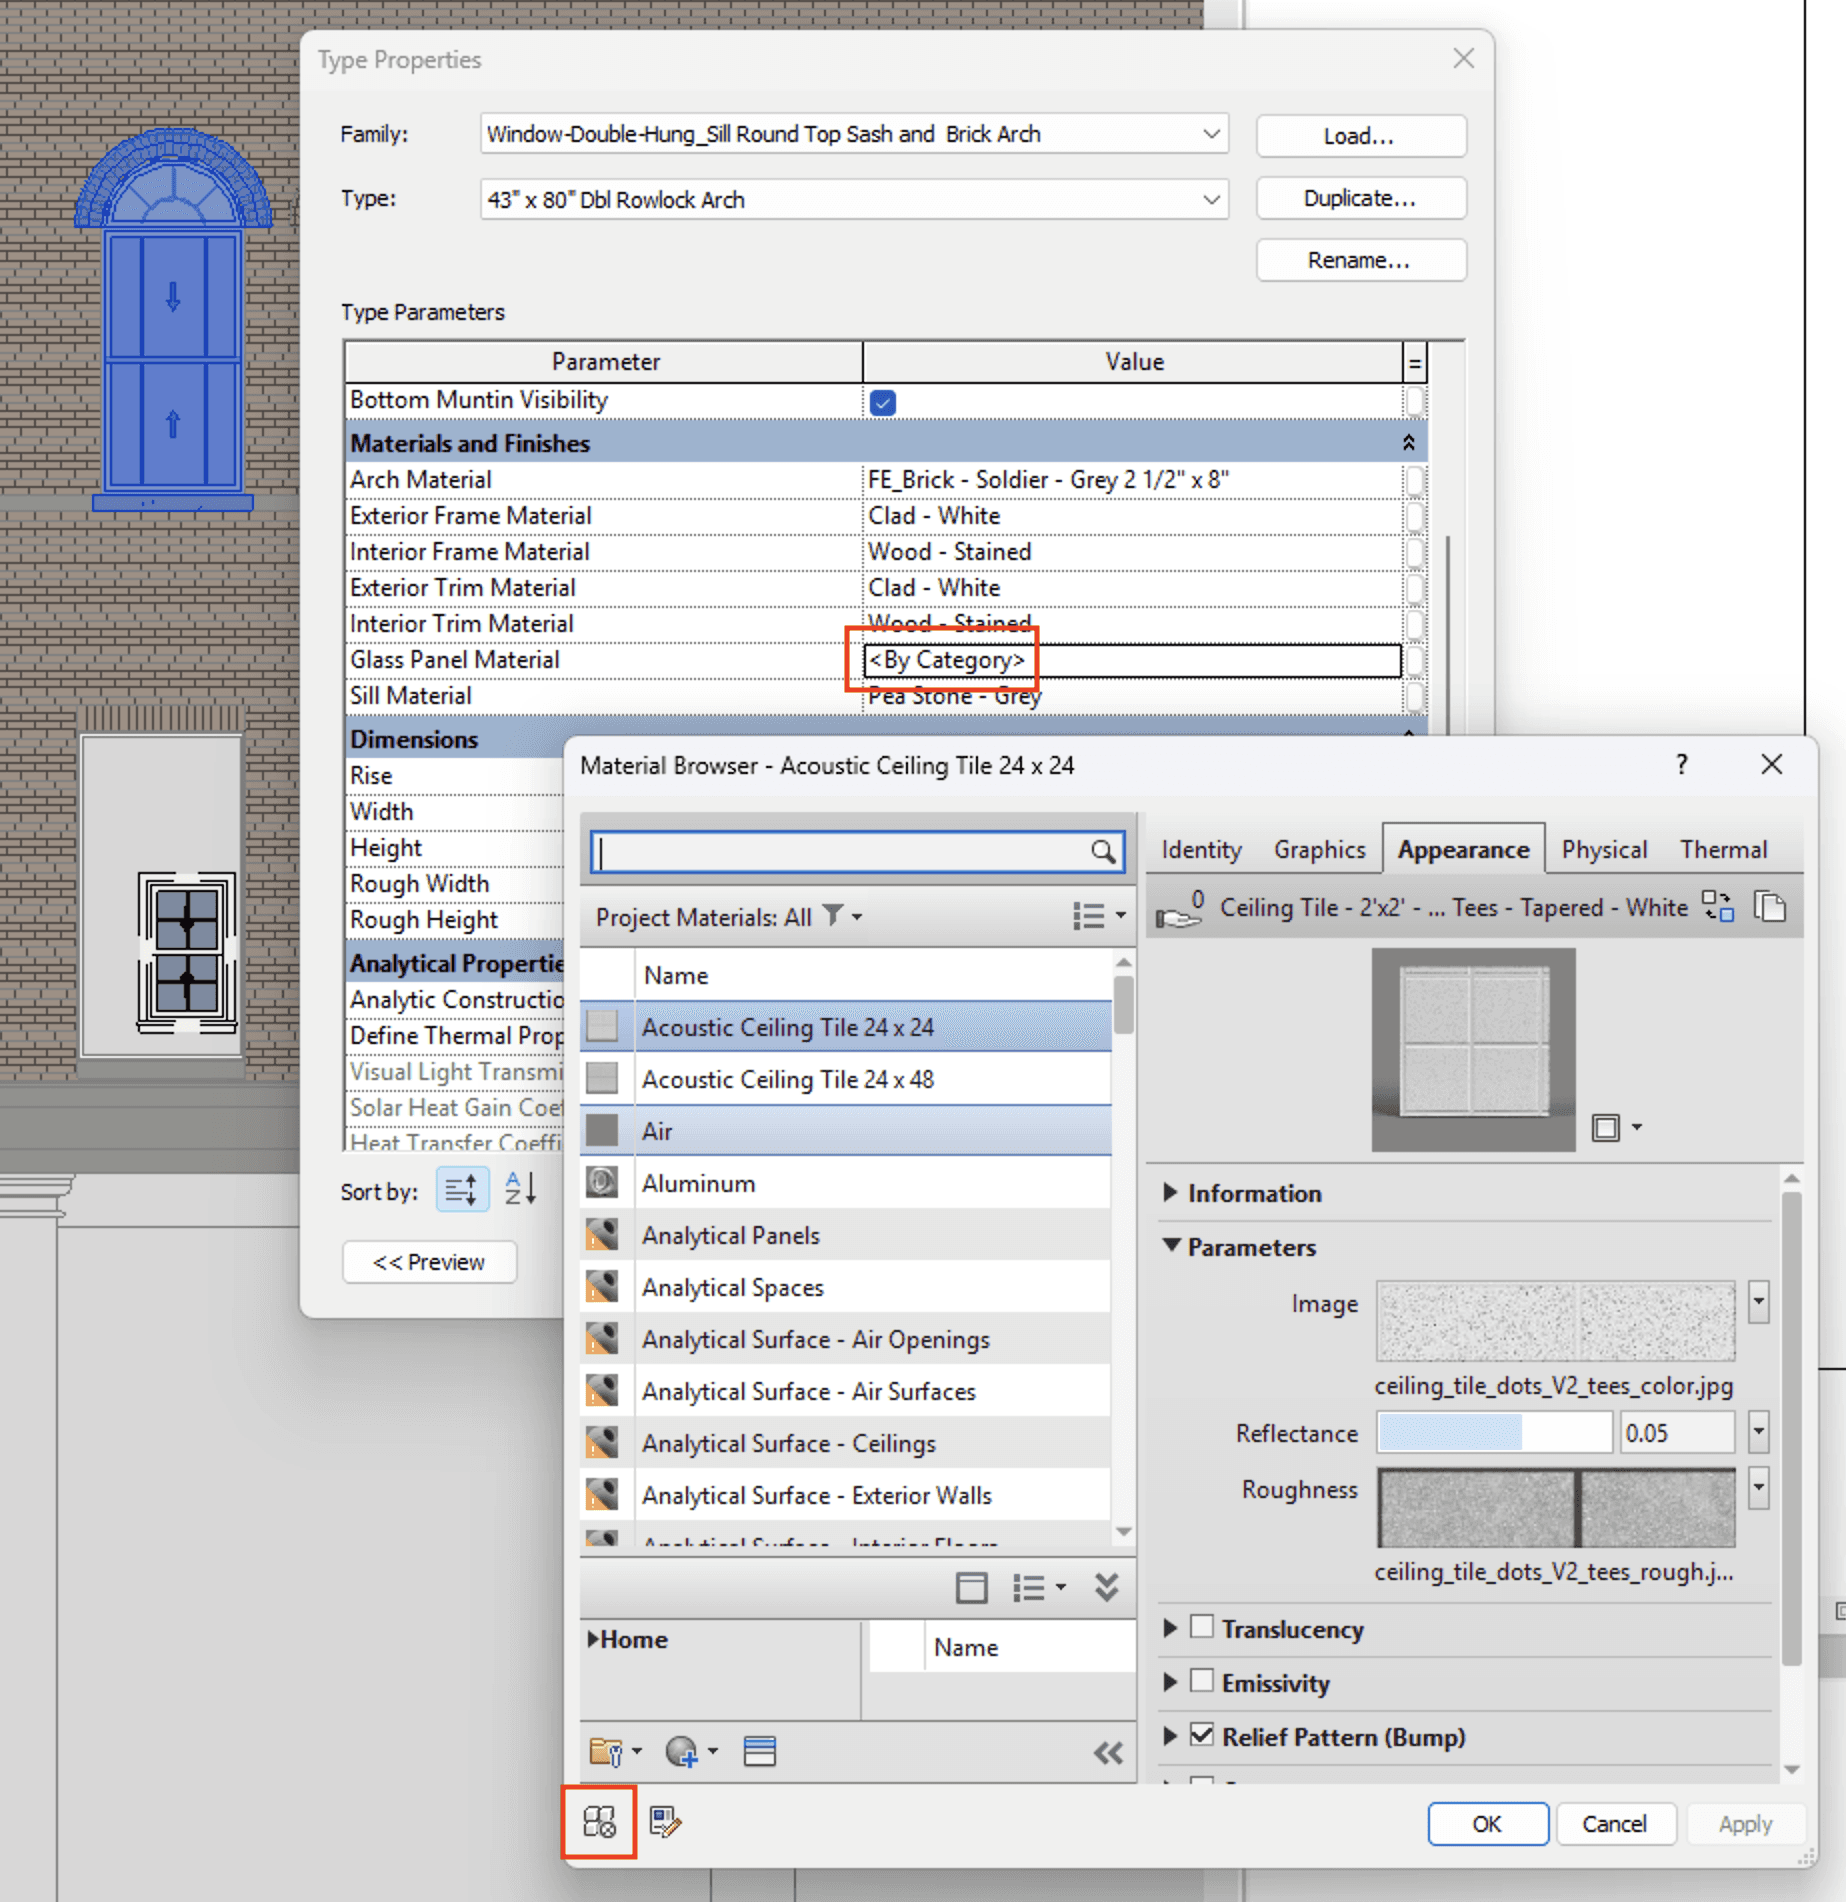
Any material parameter can be set to <By Category>, inheriting the material assigned to the category or subcategory in the model’s Object Styles settings.
In the example below, by setting the material for glass panels in our window families to <By Category>, you can change the material for all glass in the project at once — as long as the glass geometry in each family is assigned to the same subcategory.

Because the glass panes in these window families use a common subcategory and their material is set to <By Category>, the glass material used across the model can be adjusted in one action.
The Paint Tool (use with caution…)
Revit’s Paint tool lets you apply a material directly to an individual face of a system family. This can be useful for quick visual adjustments — applying a different finish to one instance of a wall, for example. It can also be used in combination with the ‘Split Face’ command to assign materials to different regions on an element’s surface.

Materials can be painted on to the face of layered system families like walls and floors.
However, there are a couple of quirks to be aware of. First, painted materials are fragile — they can be lost when the underlying geometry is modified or updated.
Painted materials are also, as the name suggests, simply a veneer — they have no thickness and leave the material they are painted over intact. If you need to change the display of the family when cut through, or as-reflected in quantity takeoffs, it’s better to swap out the material in the family’s type properties.
Getting Materials Into Your Model
Unlike component families, which can be saved as .rfa files and loaded independently, materials are locked inside the models and families they belong to. Getting them out and into other projects has always required workarounds.
Copy / Paste a Family
The most common approach is to copy and paste a family that contains the material you want. When you place or paste a family into a model, all of the materials it uses come with it. You'll notice that as you load families into a model, the number of materials in the browser starts to stack up.
The downside is that you get everything — the family itself and all of its materials, not just the one you were after. You'll often need to purge the family and any unwanted materials afterwards.
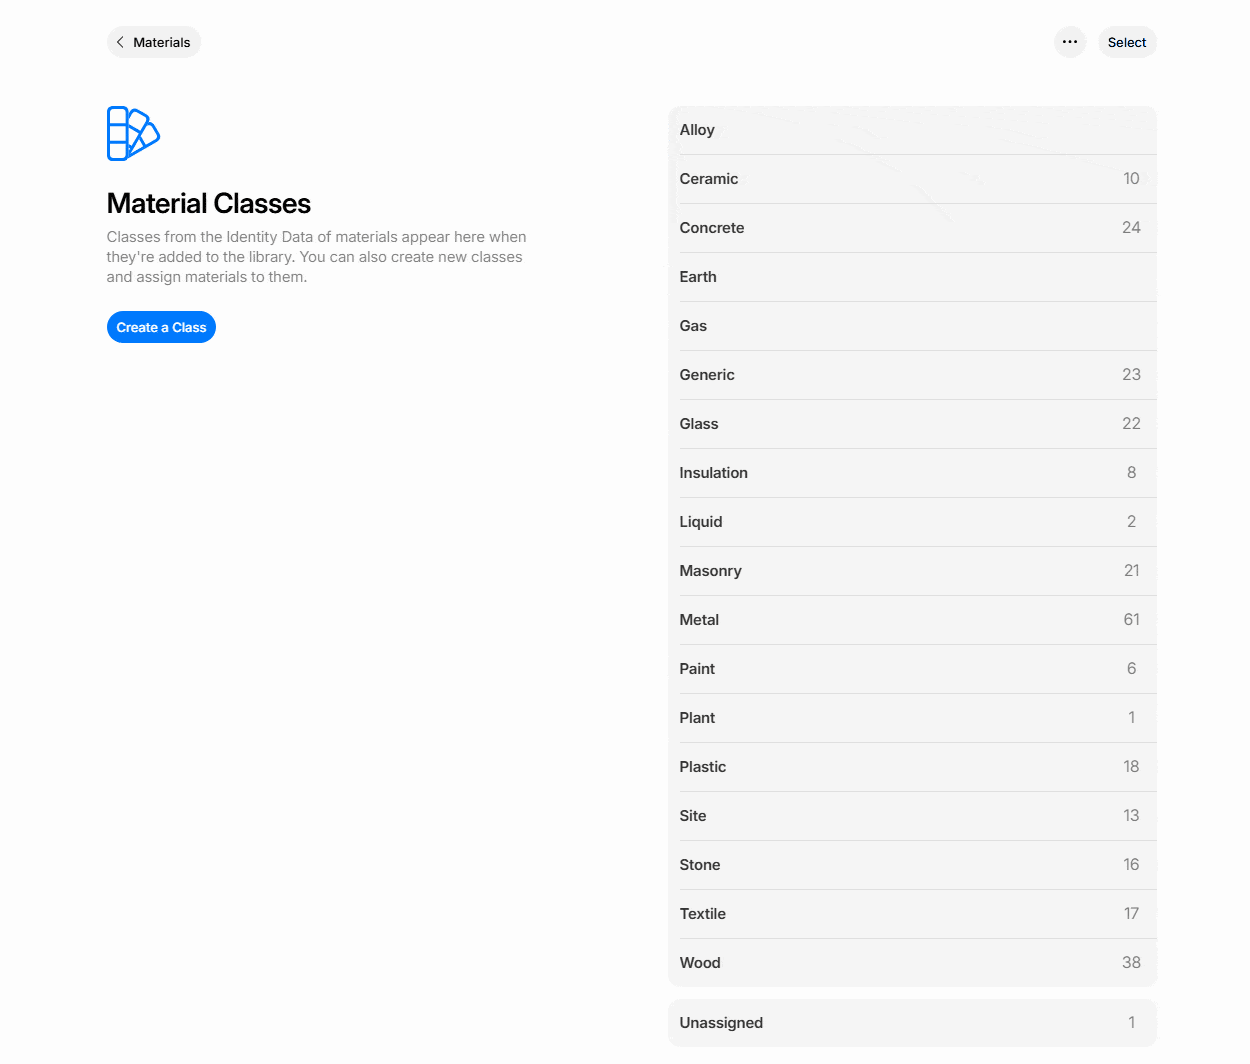
The material class is useful to filter large lists of materials down to more useful chunks — just the concrete materials for instance. You can select any of the classes you have in your model at the top of the materials dialog. Kinship allows you to quickly organize the materials in your library into classes, making hunting for them in Revit later much quicker.

The material class can be used to filter the materials list (left of screen), useful in models with hundreds of materials.
Transfer Project Standards
Revit's Transfer Project Standards command copies all materials from a source model into the current model. It's effective, but blunt — you'll bring in every material from the source, which is likely to include many you didn't need.
This can quickly bloat a model with unused materials and create clutter in the materials browser. It also requires the source and target models to be the same Revit version and open in the same session.
Transfer Project Standards is most commonly used when trying to bring materials from an existing project into a new one.

Transfer Project Standards can bring across all materials from another model or family open in the same Revit session.
Custom Material Libraries (.adsklib)
There's a lesser-known third option tucked into the bottom corner of the Materials dialog. Revit allows you to create custom material libraries, which can be saved as a file and stored in a shared location.
You may have already seen this feature in action without realizing it — Autodesk ships a built-in material library with Revit, visible in the same panel, which is itself an .adsklib library. You can create your own in the same way, dragging and dropping materials from your current model into a custom library, and then importing from that library into other models. This has the advantage of working across Revit versions.
However, the interface is limited, and these libraries don't manage the image maps associated with materials. If the image files aren't accessible from the destination machine, renderings and realistic views won't display correctly.

The ‘AEC Materials’ material library comes pre-installed with Revit.
Loading Materials With Kinship
Kinship replaces these workarounds with a straightforward workflow. You can load just the materials you need from a cloud-hosted library directly into a model or family through the Kinship Revit add-in, or from our web app. As with other content, you can also easily load individual materials from other projects, as well as add the best ones to your library.
Materials can be searched by name, class or appearance asset type, previewed with their full graphics and appearance data, and loaded individually — no placeholder families, no transferring everything just to get one material.
Whether loading materials from your library or other projects, linked image map files are handled automatically, meaning your renderings always look right.
In this example, a brick material is loaded from the web interface directly into an open Revit session. Once loaded, you can apply to families and view in the material browser.
Wrapping Up
Materials touch every part of a Revit project — from how your drawings look to whether your quantities add up. Understanding how they're applied to families and how they move between projects is fundamental to getting good results.
In future articles, we’ll go deeper into appearance assets and how to create materials that look great in renderings. We’ll also cover how material graphics and annotation parameters are critical for drawing production and tagging.
A couple of weeks ago, we introduced Kinship's new materials management tools and how they help you build a materials library your team will love to use.
In this article, we'll look at the technical side of working with materials in Revit — how to apply them to different kinds of families, how to move them between projects, and how Kinship can help overcome some of the pain points along the way.
Adding Materials to Families
How you apply materials to families affects everything downstream — your drawings, your renderings, and whether material quantities report correctly in takeoffs. The process works differently depending on the type of family you're working with.
System Families
For layered system families like walls, floors and ceilings, materials are assigned through the structure dialog in the family’s type properties.
The materials used in each wall layer can be adjusted in the ‘Edit Assembly’ menu in the wall’s type properties.
Each layer represents a part of the assembly — e.g. the structure, insulation and finishes of a wall — and each can carry its own material.
The materials in the outermost wall layers are what displays in renderings, and so often get the most attention.
Beyond determining surface appearance, materials carry important embedded data — so the inner layers deserve just as much consideration.
The area and volume of a material within each layer can be extracted through material takeoffs, vital for environmental analysis. You can calculate just the volume of brickwork in a composite wall, for instance.
Materials are also important for correct documentation. The Keynote parameter is often used to link to project specifications, allowing individual parts within an assembly to be tagged in drawings.
Kinship makes it easy to keep annotation data accurate in your material library, allowing Keynote and Mark to be edited directly on the web without having to open the material in Revit.
Assembled System Families
For system families with nested or child elements, materials may need to be assigned at different levels. Stairs are a good example of this — the treads, risers and stringers are separate child elements within the stair family, each requiring their own material assignment.
The materials used in the stringers and other sub-components of the stairs need to be adjusted in the type properties of those individual elements.
Component Families
In component families (.rfas), materials are controlled through material parameters. These can be set up as either type or instance parameters, giving you flexibility in how materials are assigned to different instances of the same family.
A door family, for example, might have separate material parameters for the frame, panel and glazing — allowing you to swap finishes and create variations without needing to edit the family itself.
In this chair family, separate parameters have been set up to adjust the seat upholstery and chair legs.
Materials for Content Builders
If you're building component families, it's good practice to add a material parameter to any geometry where the material might need to change.
It’s also important to understand how material parameters can be used in combination with family subcategories to standardize materials across your project.
Sometimes, you need to bake in specific, pre-set materials with your families. Our free content collections, for instance, come pre-loaded with beautiful, ready-to-use materials.
More often though, you will want to tinker with the material later, in the project. A common case is glass used within window families. You can change between various glass materials by adjusting parameters in the families. But what if you have 20 window families, each with multiple types, all requiring a new glass material? That’s a lot of material parameters to adjust.
This is where Object Styles and subcategories come in. Subcategories divide family geometry into logical parts — e.g. frame, panel, glazing for windows — and are shared across all families within the same category. Each subcategory can have its own material, controlled through Object Styles in the project.
Any material parameter can be set to <By Category>, inheriting the material assigned to the category or subcategory in the model’s Object Styles settings.
In the example below, by setting the material for glass panels in our window families to <By Category>, you can change the material for all glass in the project at once — as long as the glass geometry in each family is assigned to the same subcategory.
Because the glass panes in these window families use a common subcategory and their material is set to <By Category>, the glass material used across the model can be adjusted in one action.
The Paint Tool (use with caution…)
Revit’s Paint tool lets you apply a material directly to an individual face of a system family. This can be useful for quick visual adjustments — applying a different finish to one instance of a wall, for example. It can also be used in combination with the ‘Split Face’ command to assign materials to different regions on an element’s surface.
Materials can be painted on to the face of layered system families like walls and floors.
However, there are a couple of quirks to be aware of. First, painted materials are fragile — they can be lost when the underlying geometry is modified or updated.
Painted materials are also, as the name suggests, simply a veneer — they have no thickness and leave the material they are painted over intact. If you need to change the display of the family when cut through, or as-reflected in quantity takeoffs, it’s better to swap out the material in the family’s type properties.
Getting Materials Into Your Model
Unlike component families, which can be saved as .rfa files and loaded independently, materials are locked inside the models and families they belong to. Getting them out and into other projects has always required workarounds.
Copy / Paste a Family
The most common approach is to copy and paste a family that contains the material you want. When you place or paste a family into a model, all of the materials it uses come with it. You'll notice that as you load families into a model, the number of materials in the browser starts to stack up.
The downside is that you get everything — the family itself and all of its materials, not just the one you were after. You'll often need to purge the family and any unwanted materials afterwards.
The material class is useful to filter large lists of materials down to more useful chunks — just the concrete materials for instance. You can select any of the classes you have in your model at the top of the materials dialog. Kinship allows you to quickly organize the materials in your library into classes, making hunting for them in Revit later much quicker.
The material class can be used to filter the materials list (left of screen), useful in models with hundreds of materials.
Transfer Project Standards
Revit's Transfer Project Standards command copies all materials from a source model into the current model. It's effective, but blunt — you'll bring in every material from the source, which is likely to include many you didn't need.
This can quickly bloat a model with unused materials and create clutter in the materials browser. It also requires the source and target models to be the same Revit version and open in the same session.
Transfer Project Standards is most commonly used when trying to bring materials from an existing project into a new one.
Transfer Project Standards can bring across all materials from another model or family open in the same Revit session.
Custom Material Libraries (.adsklib)
There's a lesser-known third option tucked into the bottom corner of the Materials dialog. Revit allows you to create custom material libraries, which can be saved as a file and stored in a shared location.
You may have already seen this feature in action without realizing it — Autodesk ships a built-in material library with Revit, visible in the same panel, which is itself an .adsklib library. You can create your own in the same way, dragging and dropping materials from your current model into a custom library, and then importing from that library into other models. This has the advantage of working across Revit versions.
However, the interface is limited, and these libraries don't manage the image maps associated with materials. If the image files aren't accessible from the destination machine, renderings and realistic views won't display correctly.
The ‘AEC Materials’ material library comes pre-installed with Revit.
Loading Materials With Kinship
Kinship replaces these workarounds with a straightforward workflow. You can load just the materials you need from a cloud-hosted library directly into a model or family through the Kinship Revit add-in, or from our web app. As with other content, you can also easily load individual materials from other projects, as well as add the best ones to your library.
Materials can be searched by name, class or appearance asset type, previewed with their full graphics and appearance data, and loaded individually — no placeholder families, no transferring everything just to get one material.
Whether loading materials from your library or other projects, linked image map files are handled automatically, meaning your renderings always look right.
In this example, a brick material is loaded from the web interface directly into an open Revit session. Once loaded, you can apply to families and view in the material browser.
Wrapping Up
Materials touch every part of a Revit project — from how your drawings look to whether your quantities add up. Understanding how they're applied to families and how they move between projects is fundamental to getting good results.
In future articles, we’ll go deeper into appearance assets and how to create materials that look great in renderings. We’ll also cover how material graphics and annotation parameters are critical for drawing production and tagging.


Kinship
The best way to manage Revit content
Kinship
The best way to manage Revit content
Kinship
The best way to manage Revit content
Similar Articles


Never miss an update with our monthly newsletter
Get the latest company news, product updates, blog posts and free Revit content from Kinship. Delivered directly to your inbox no more than once a month.
By submitting your email, you agree to receive newsletter emails.
Support
Never miss an update with our monthly newsletter
Get the latest company news, product updates, blog posts and free Revit content from Kinship. Delivered directly to your inbox no more than once a month.
By submitting your email, you agree to receive newsletter emails.
Support
Never miss an update with our monthly newsletter
Get the latest company news, product updates, blog posts and free Revit content from Kinship. Delivered directly to your inbox no more than once a month.
By submitting your email, you agree to receive newsletter emails.
Support