Getting to Grips with Revit Family Grips
Learn how to manage the visibility of shape handles, grips or “grippies” when working with highly flexible Revit families.
Getting to Grips with Revit Family Grips
Learn how to manage the visibility of shape handles, grips or “grippies” when working with highly flexible Revit families.

What are grips or “grippies” in Revit? Officially known as shape handles, they allow you to resize a component in the drawing area.
For content that might be manufactured in any size you want, adding all the possible types would be impractical. But with shape handles, there is a more visual, if less precise, method to update the geometry—using an instance parameter to drive the change.
Instance-based control allows the same family type to serve various ceiling heights.
To display shape handles, we need a dimension attached to a reference with an instance parameter label. This will produce a grip when the family instance is selected in the project. Dragging the grip will move the reference and adjust the dimension.
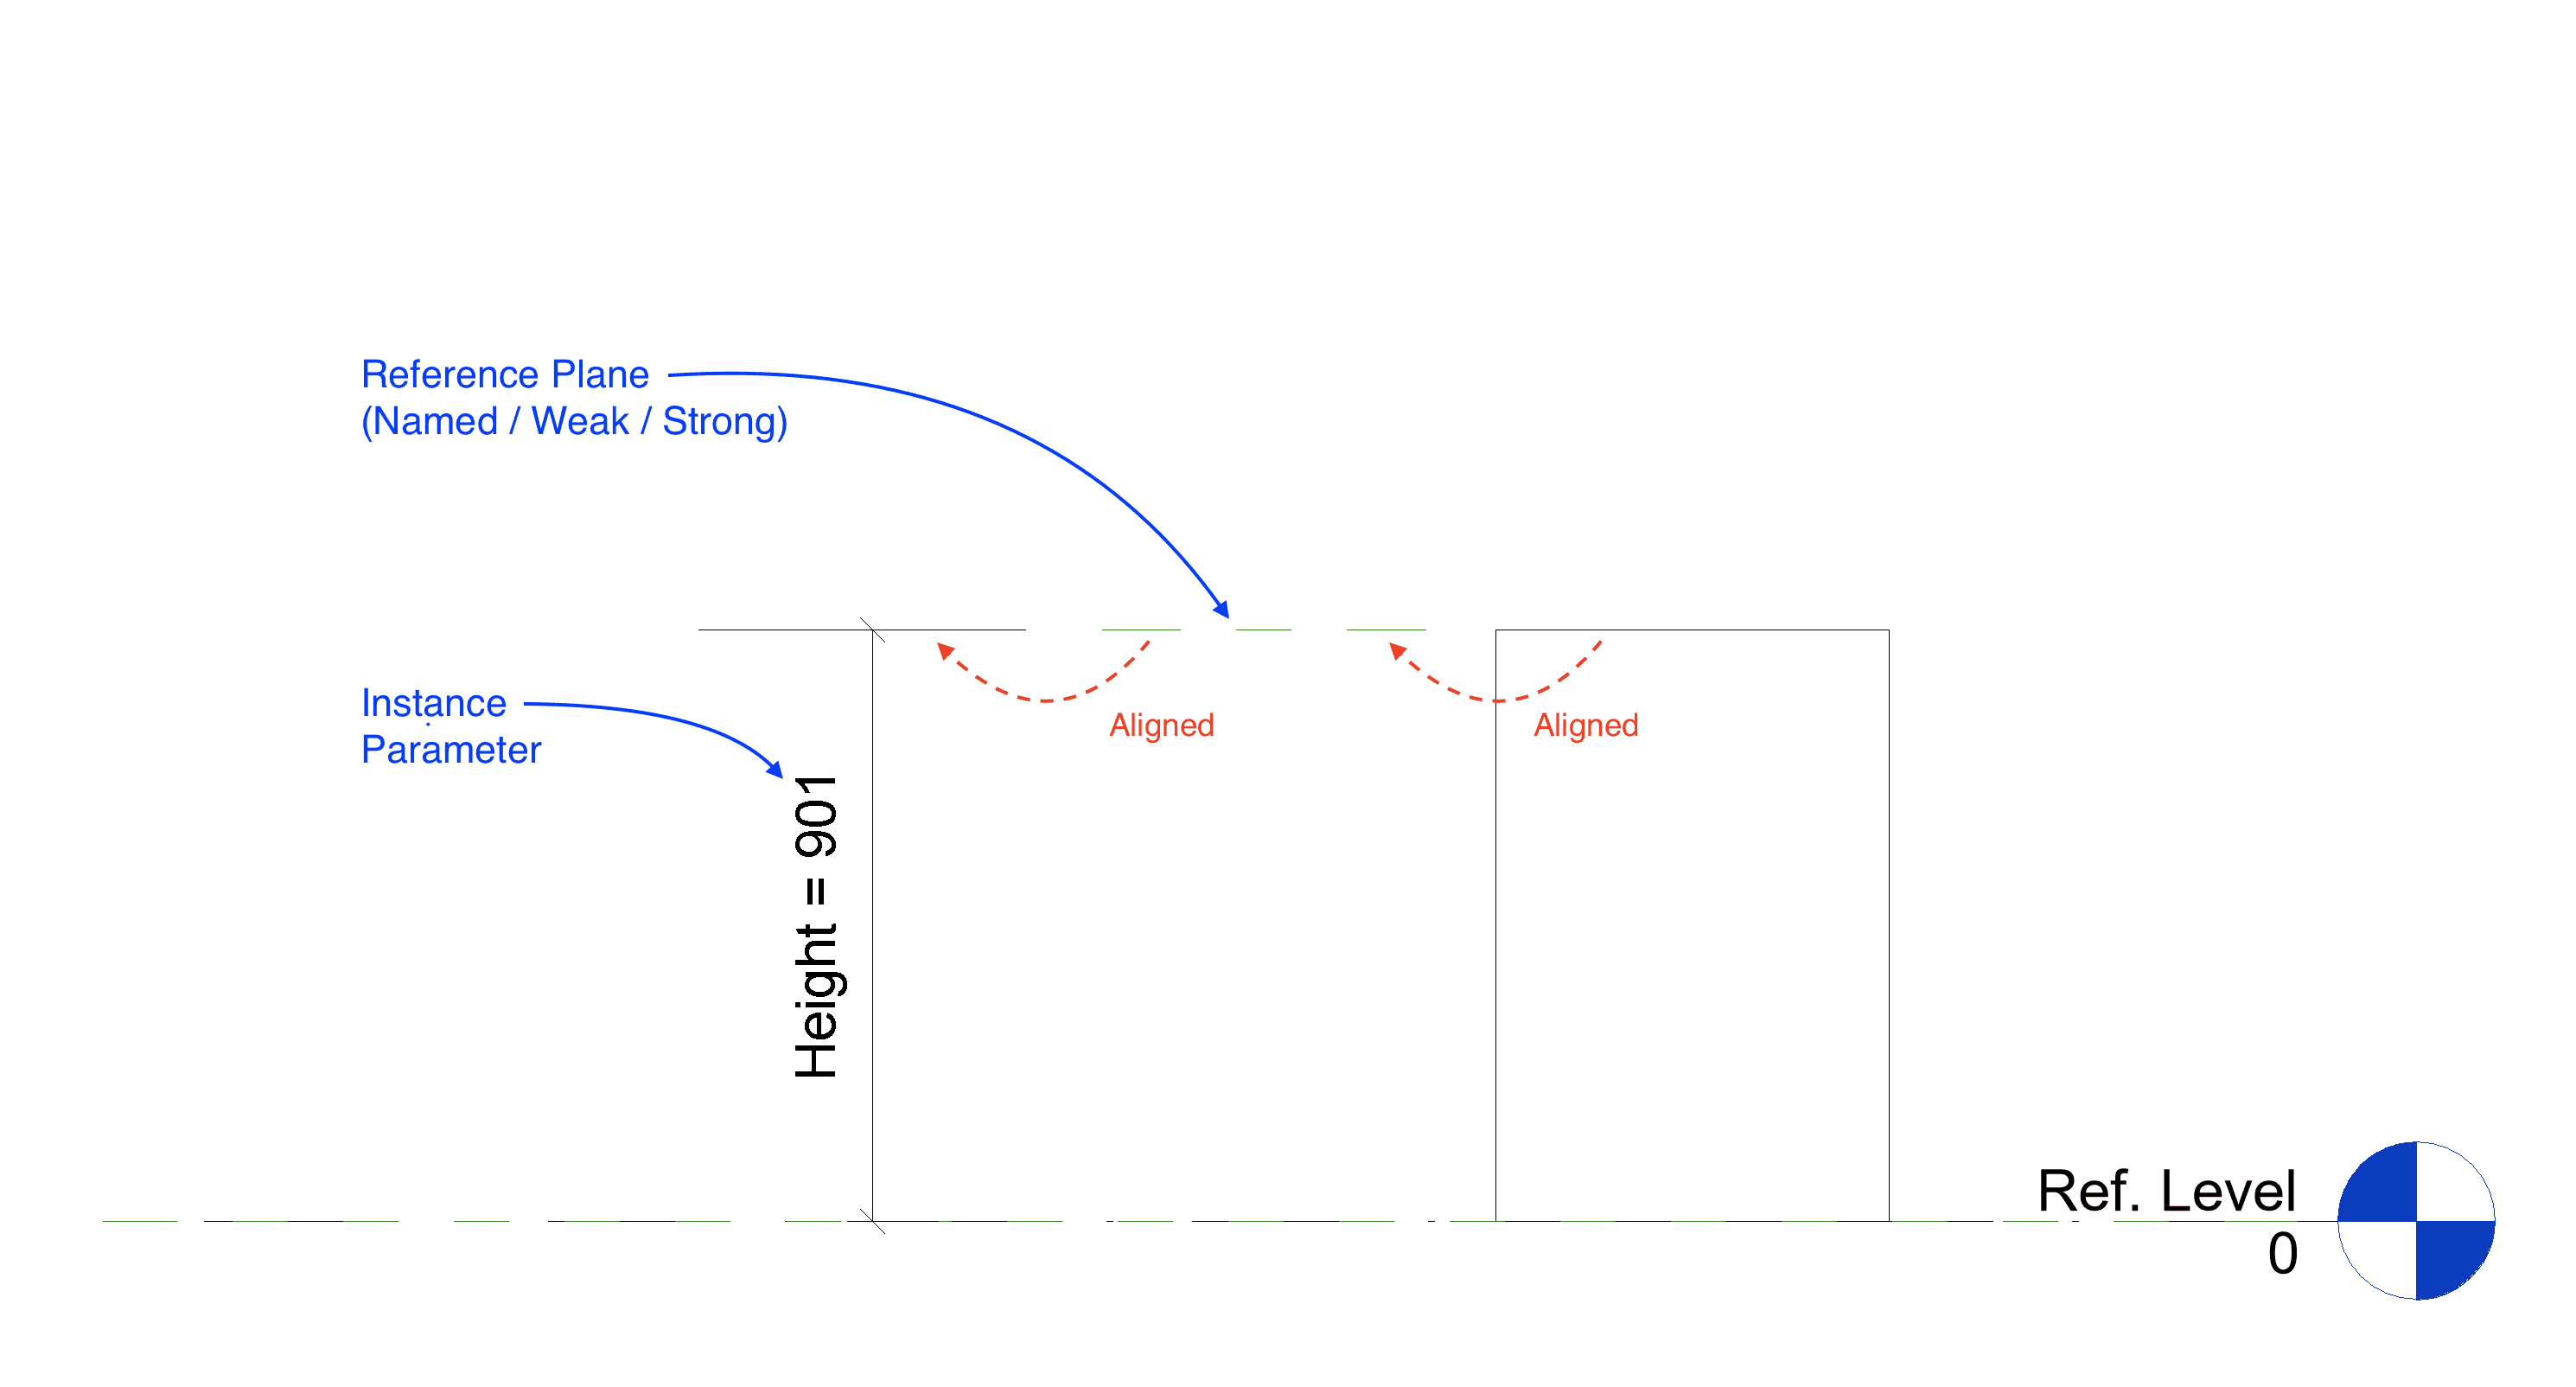
Dimension, with an instance parameter label, between a reference plane and the Ref. Level.
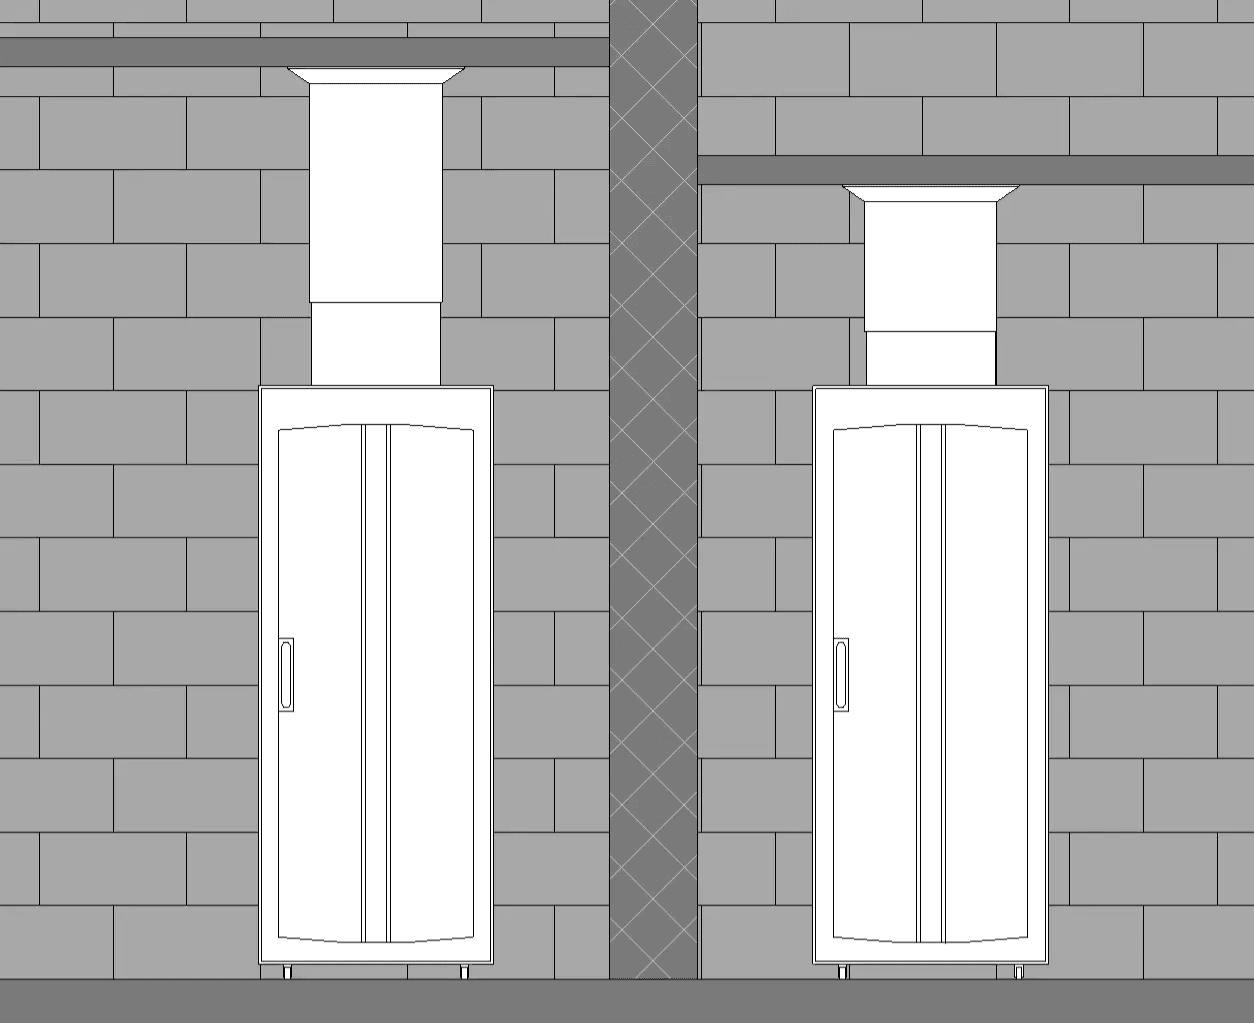
You can then constrain geometry to the reference so that the geometry flexes alongside it. In the image below, you can easily adjust the duct height by selecting the component and dragging the grip until it snaps to the ceiling.
Duct can be easily adjusted by selecting the component and dragging the grip up or down.
Stuck in the grip of Revit grips.
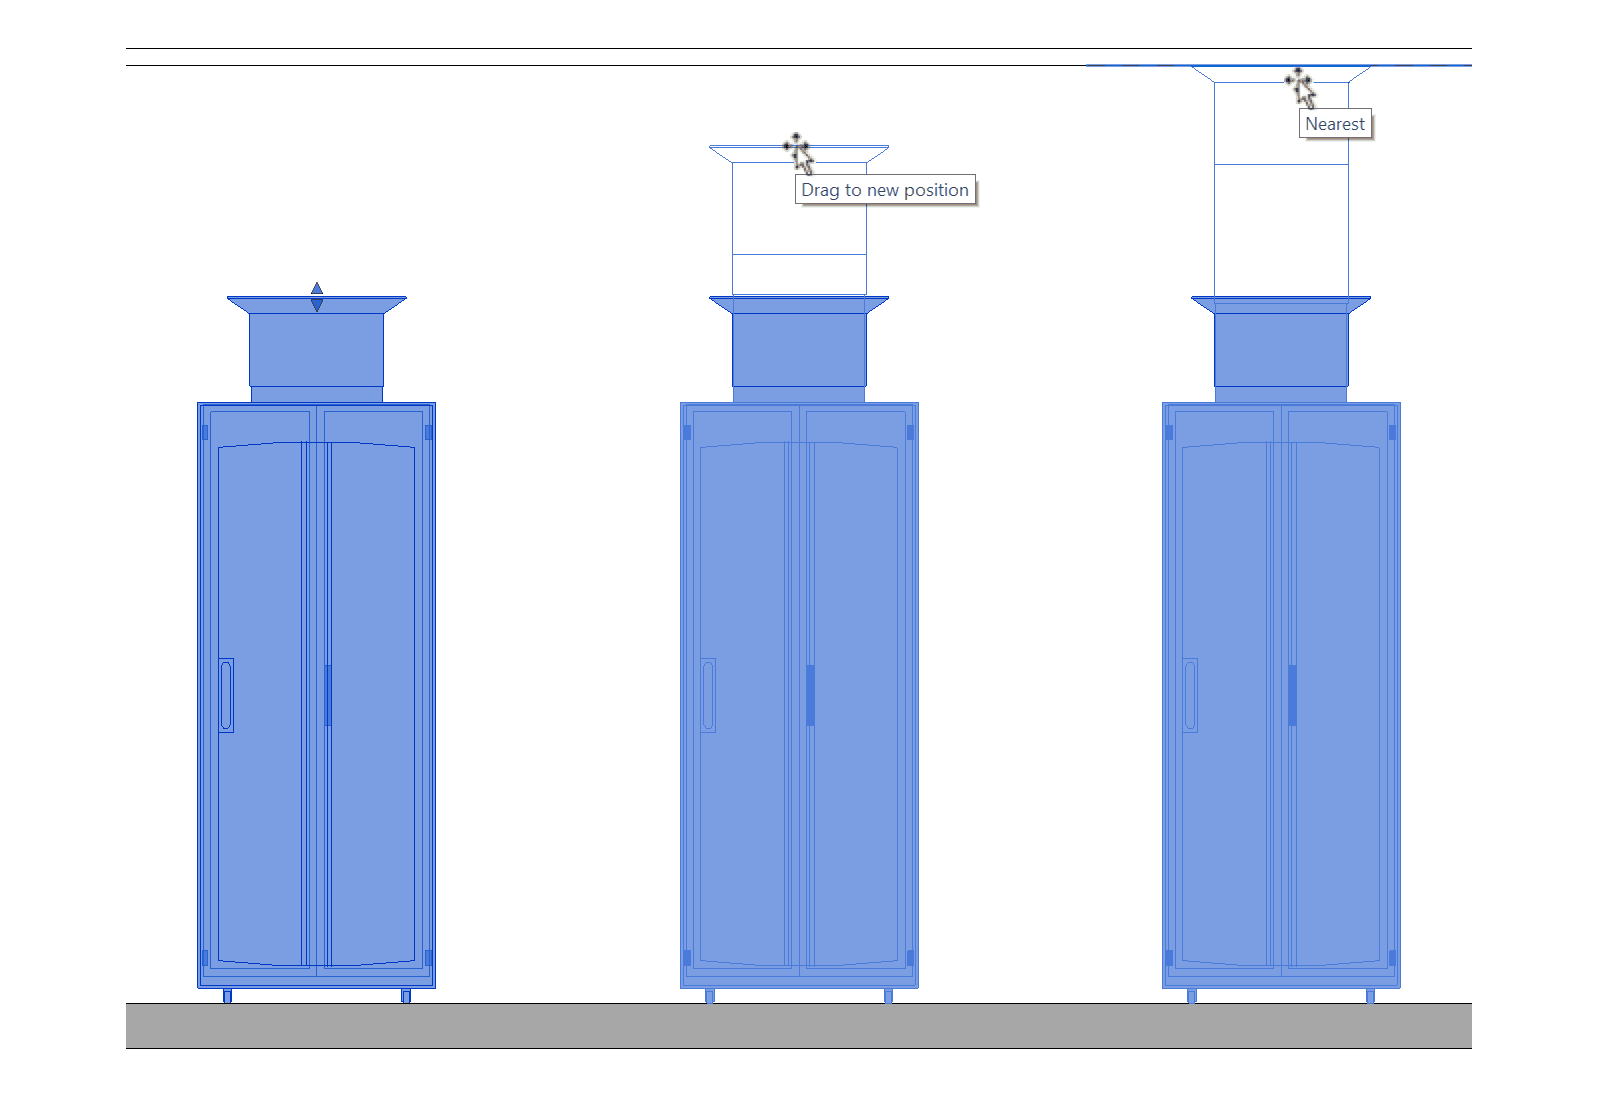
In our example above, the duct is an optional accessory that we can turn on or off in the family. However, turning it off will leave the shape handles floating mid-air. See image below. So how can we fix this and hide shape handles when we don’t need them?
We could hide the shape handles by setting the reference plane to “Not a reference”. But we can only do that from the family editor, so that’s not a practical solution.
We could instead hide the reference plane, except that there is no such option for reference planes. Model lines, on the other hand, do have an option to hide them.
Model lines to the rescue!
While using a model line will work for hiding the shape handle, we still want to constrain the geometry to a plane. There are things we do with reference planes that we can’t do with model lines.
To solve this, we draw a model line on top of our plane, aligning and locking it to the plane. We still constrain our geometries to the plane, but our labeled dimension—Height in our example—is dimensioned to the model line instead.
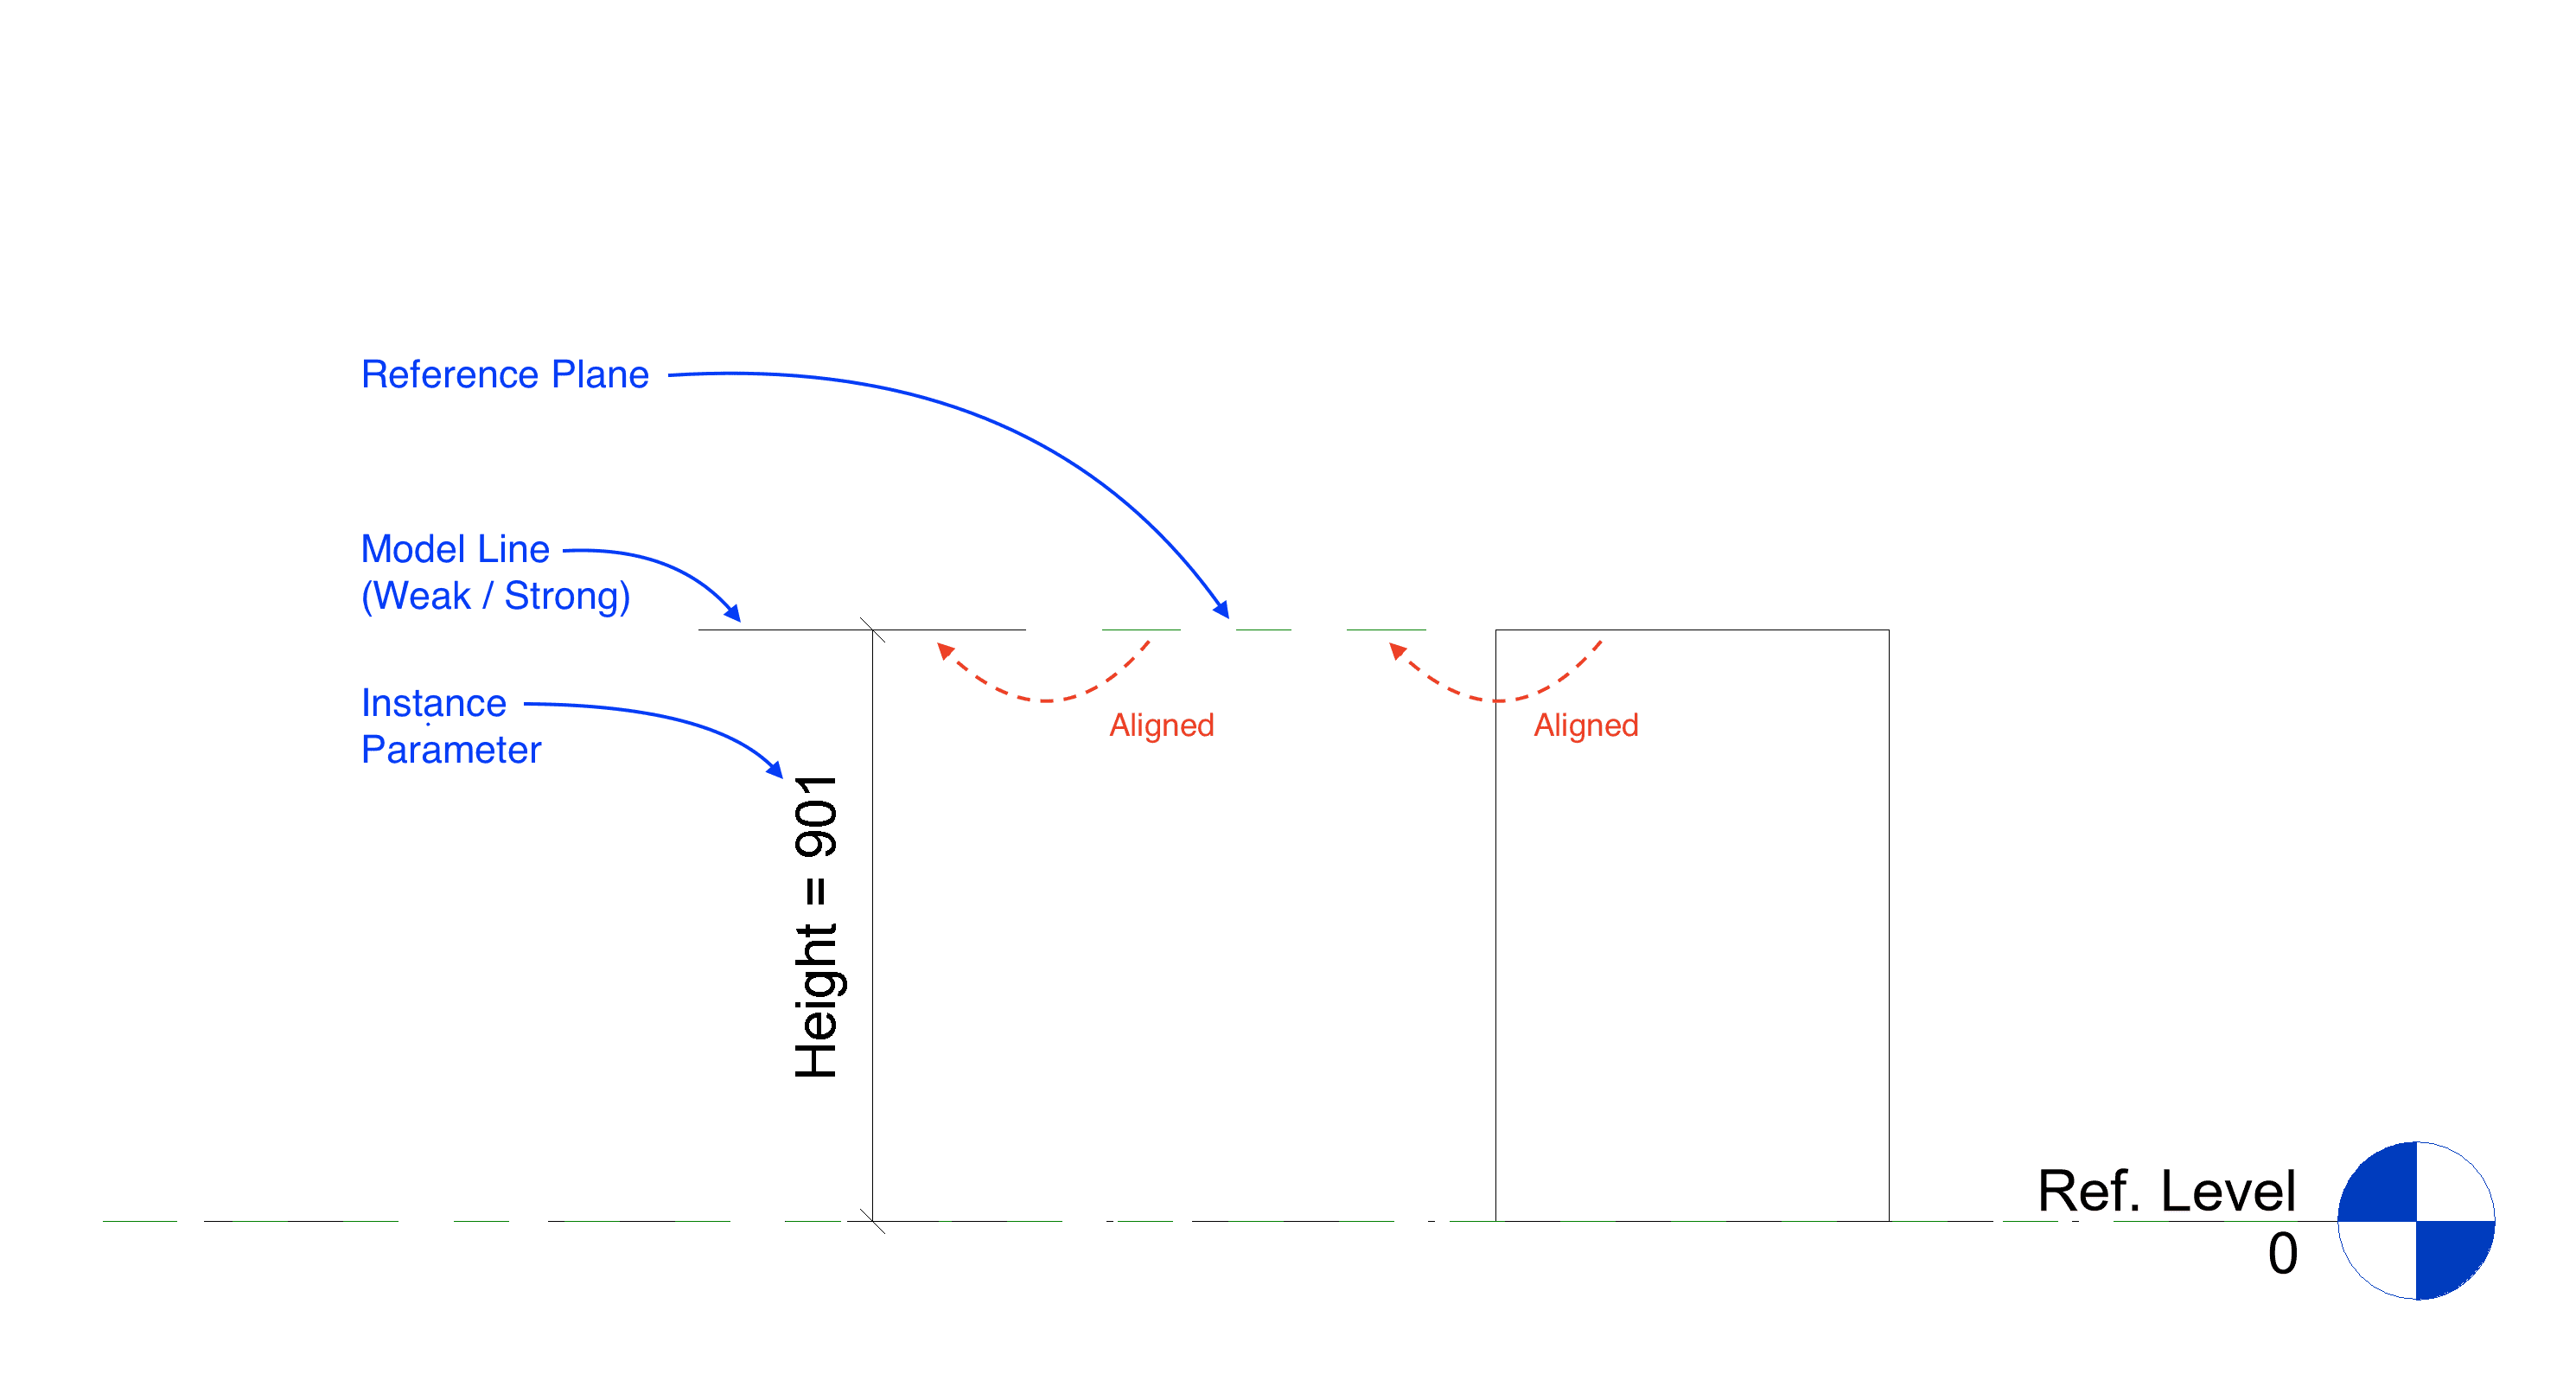
Align the geometry to the plane, then the plane to the line. Place a dimension to that line, and label with an Instance Parameter – “Height” in this case.
The shape handle visibility is tied to the visibility of the reference—now a model line. Making use of the model line’s “Visible” parameter allows us to control the visibility of the shape handles in our family.
In addition, we can tie the model line’s Visible parameter to any yes/no family parameter. In this case, we can tie it to the yes/no parameter for “Duct Accessory”. This way, when we uncheck the “Duct Accessory” parameter, the shape handle disappears along with the geometry for the duct accessory itself.
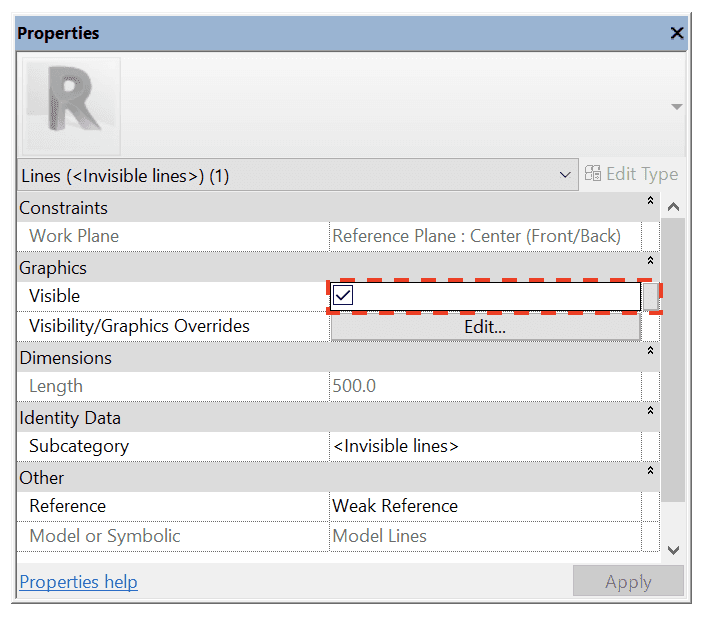
The “Visible” property of the model line can be tied to any Yes/No family parameter.

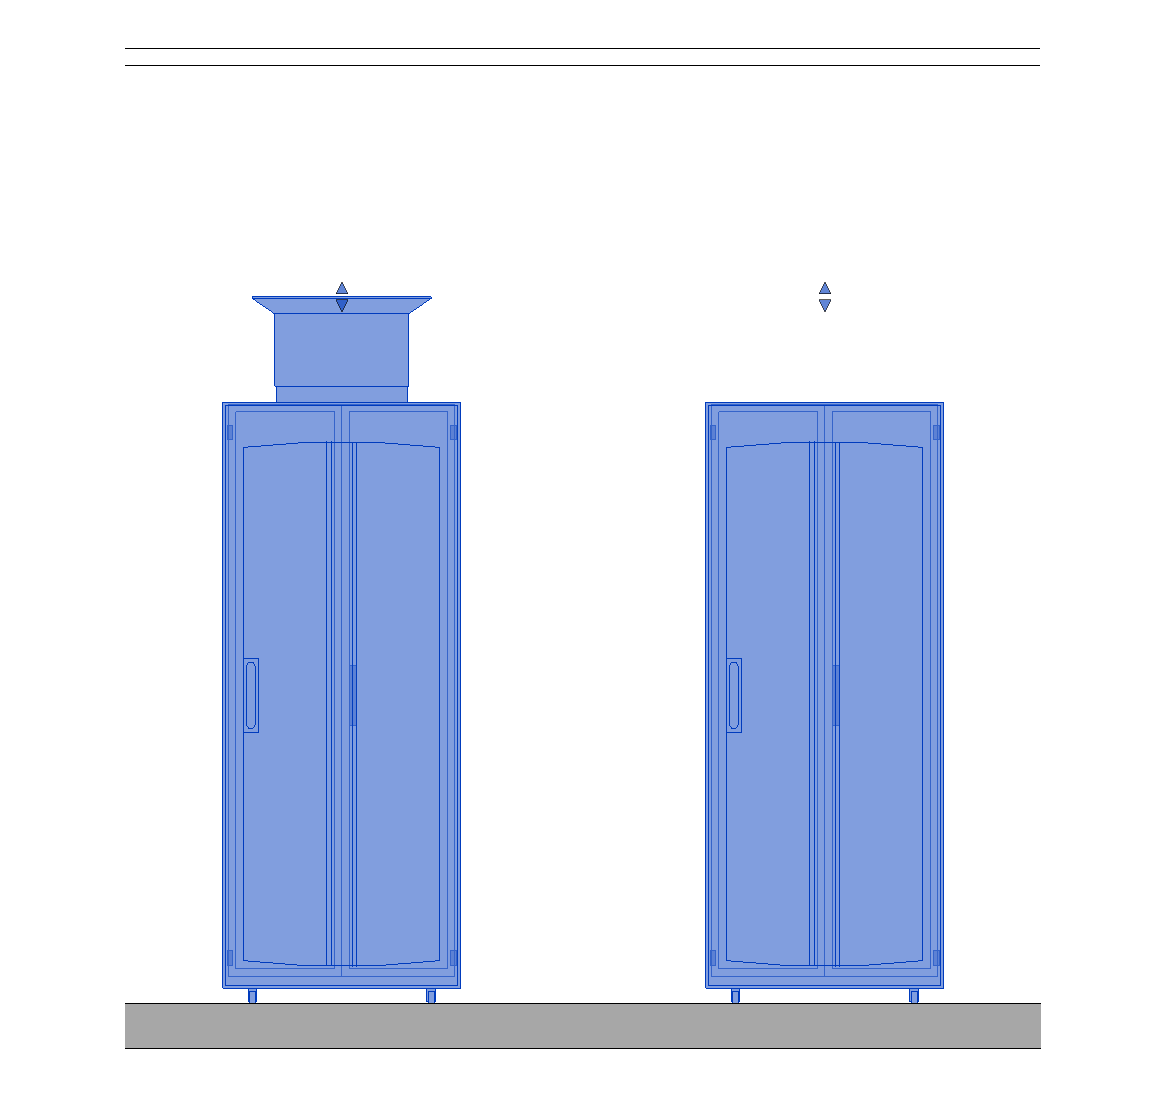
There is one final detail. Since we are making use of the model line’s Visible parameter to display the shape handles, the model line itself will also display at the same time. See image above. So how can we hide the model line? We’ve had our cake, and now we want to eat it, too.
To turn off the display of the model line without turning off its visibility, we will make use of a subcategory. We’ll set the model line’s subcategory to . is a built-in category—hence the < and > symbols around the name. This subcategory does not turn off the model line and its “referenceness”. Instead, it simply hides the line from view.
With that last tweak, we’ve got ourselves a nice family that will display shape handles only when required.

Shape handles, grips or “grippies” can be a very useful feature for families where at least some part of the geometry should be very flexible. But without taking the steps above, they can end up causing confusion with unwanted visibility. Hopefully this walkthrough of how to effectively hide them has helped you get a better handle on shape handles.
What are grips or “grippies” in Revit? Officially known as shape handles, they allow you to resize a component in the drawing area.
For content that might be manufactured in any size you want, adding all the possible types would be impractical. But with shape handles, there is a more visual, if less precise, method to update the geometry—using an instance parameter to drive the change.
Instance-based control allows the same family type to serve various ceiling heights.
To display shape handles, we need a dimension attached to a reference with an instance parameter label. This will produce a grip when the family instance is selected in the project. Dragging the grip will move the reference and adjust the dimension.
Dimension, with an instance parameter label, between a reference plane and the Ref. Level.
You can then constrain geometry to the reference so that the geometry flexes alongside it. In the image below, you can easily adjust the duct height by selecting the component and dragging the grip until it snaps to the ceiling.
Duct can be easily adjusted by selecting the component and dragging the grip up or down.
Stuck in the grip of Revit grips.
In our example above, the duct is an optional accessory that we can turn on or off in the family. However, turning it off will leave the shape handles floating mid-air. See image below. So how can we fix this and hide shape handles when we don’t need them?
We could hide the shape handles by setting the reference plane to “Not a reference”. But we can only do that from the family editor, so that’s not a practical solution.
We could instead hide the reference plane, except that there is no such option for reference planes. Model lines, on the other hand, do have an option to hide them.
Model lines to the rescue!
While using a model line will work for hiding the shape handle, we still want to constrain the geometry to a plane. There are things we do with reference planes that we can’t do with model lines.
To solve this, we draw a model line on top of our plane, aligning and locking it to the plane. We still constrain our geometries to the plane, but our labeled dimension—Height in our example—is dimensioned to the model line instead.
Align the geometry to the plane, then the plane to the line. Place a dimension to that line, and label with an Instance Parameter – “Height” in this case.
The shape handle visibility is tied to the visibility of the reference—now a model line. Making use of the model line’s “Visible” parameter allows us to control the visibility of the shape handles in our family.
In addition, we can tie the model line’s Visible parameter to any yes/no family parameter. In this case, we can tie it to the yes/no parameter for “Duct Accessory”. This way, when we uncheck the “Duct Accessory” parameter, the shape handle disappears along with the geometry for the duct accessory itself.
The “Visible” property of the model line can be tied to any Yes/No family parameter.
There is one final detail. Since we are making use of the model line’s Visible parameter to display the shape handles, the model line itself will also display at the same time. See image above. So how can we hide the model line? We’ve had our cake, and now we want to eat it, too.
To turn off the display of the model line without turning off its visibility, we will make use of a subcategory. We’ll set the model line’s subcategory to . is a built-in category—hence the < and > symbols around the name. This subcategory does not turn off the model line and its “referenceness”. Instead, it simply hides the line from view.
With that last tweak, we’ve got ourselves a nice family that will display shape handles only when required.
Shape handles, grips or “grippies” can be a very useful feature for families where at least some part of the geometry should be very flexible. But without taking the steps above, they can end up causing confusion with unwanted visibility. Hopefully this walkthrough of how to effectively hide them has helped you get a better handle on shape handles.


Kinship
The best way to manage Revit content
Kinship
The best way to manage Revit content
Kinship
The best way to manage Revit content
Similar Articles


Never miss an update with our monthly newsletter
Get the latest company news, product updates, blog posts and free Revit content from Kinship. Delivered directly to your inbox no more than once a month.
By submitting your email, you agree to receive newsletter emails.
Support
Never miss an update with our monthly newsletter
Get the latest company news, product updates, blog posts and free Revit content from Kinship. Delivered directly to your inbox no more than once a month.
By submitting your email, you agree to receive newsletter emails.
Support
Never miss an update with our monthly newsletter
Get the latest company news, product updates, blog posts and free Revit content from Kinship. Delivered directly to your inbox no more than once a month.
By submitting your email, you agree to receive newsletter emails.
Support