Nested Families: To Share or Not to Share?
A look at the behavior and benefits of shared nested families in Revit and when it makes sense to use them.
Nested Families: To Share or Not to Share?
A look at the behavior and benefits of shared nested families in Revit and when it makes sense to use them.

Nesting in Revit allows us to place families within other families in order to display their combined geometries and make them behave like a single unit within a project. There are many use cases for nesting content, such as use of repeated components or parametric elements in an array.
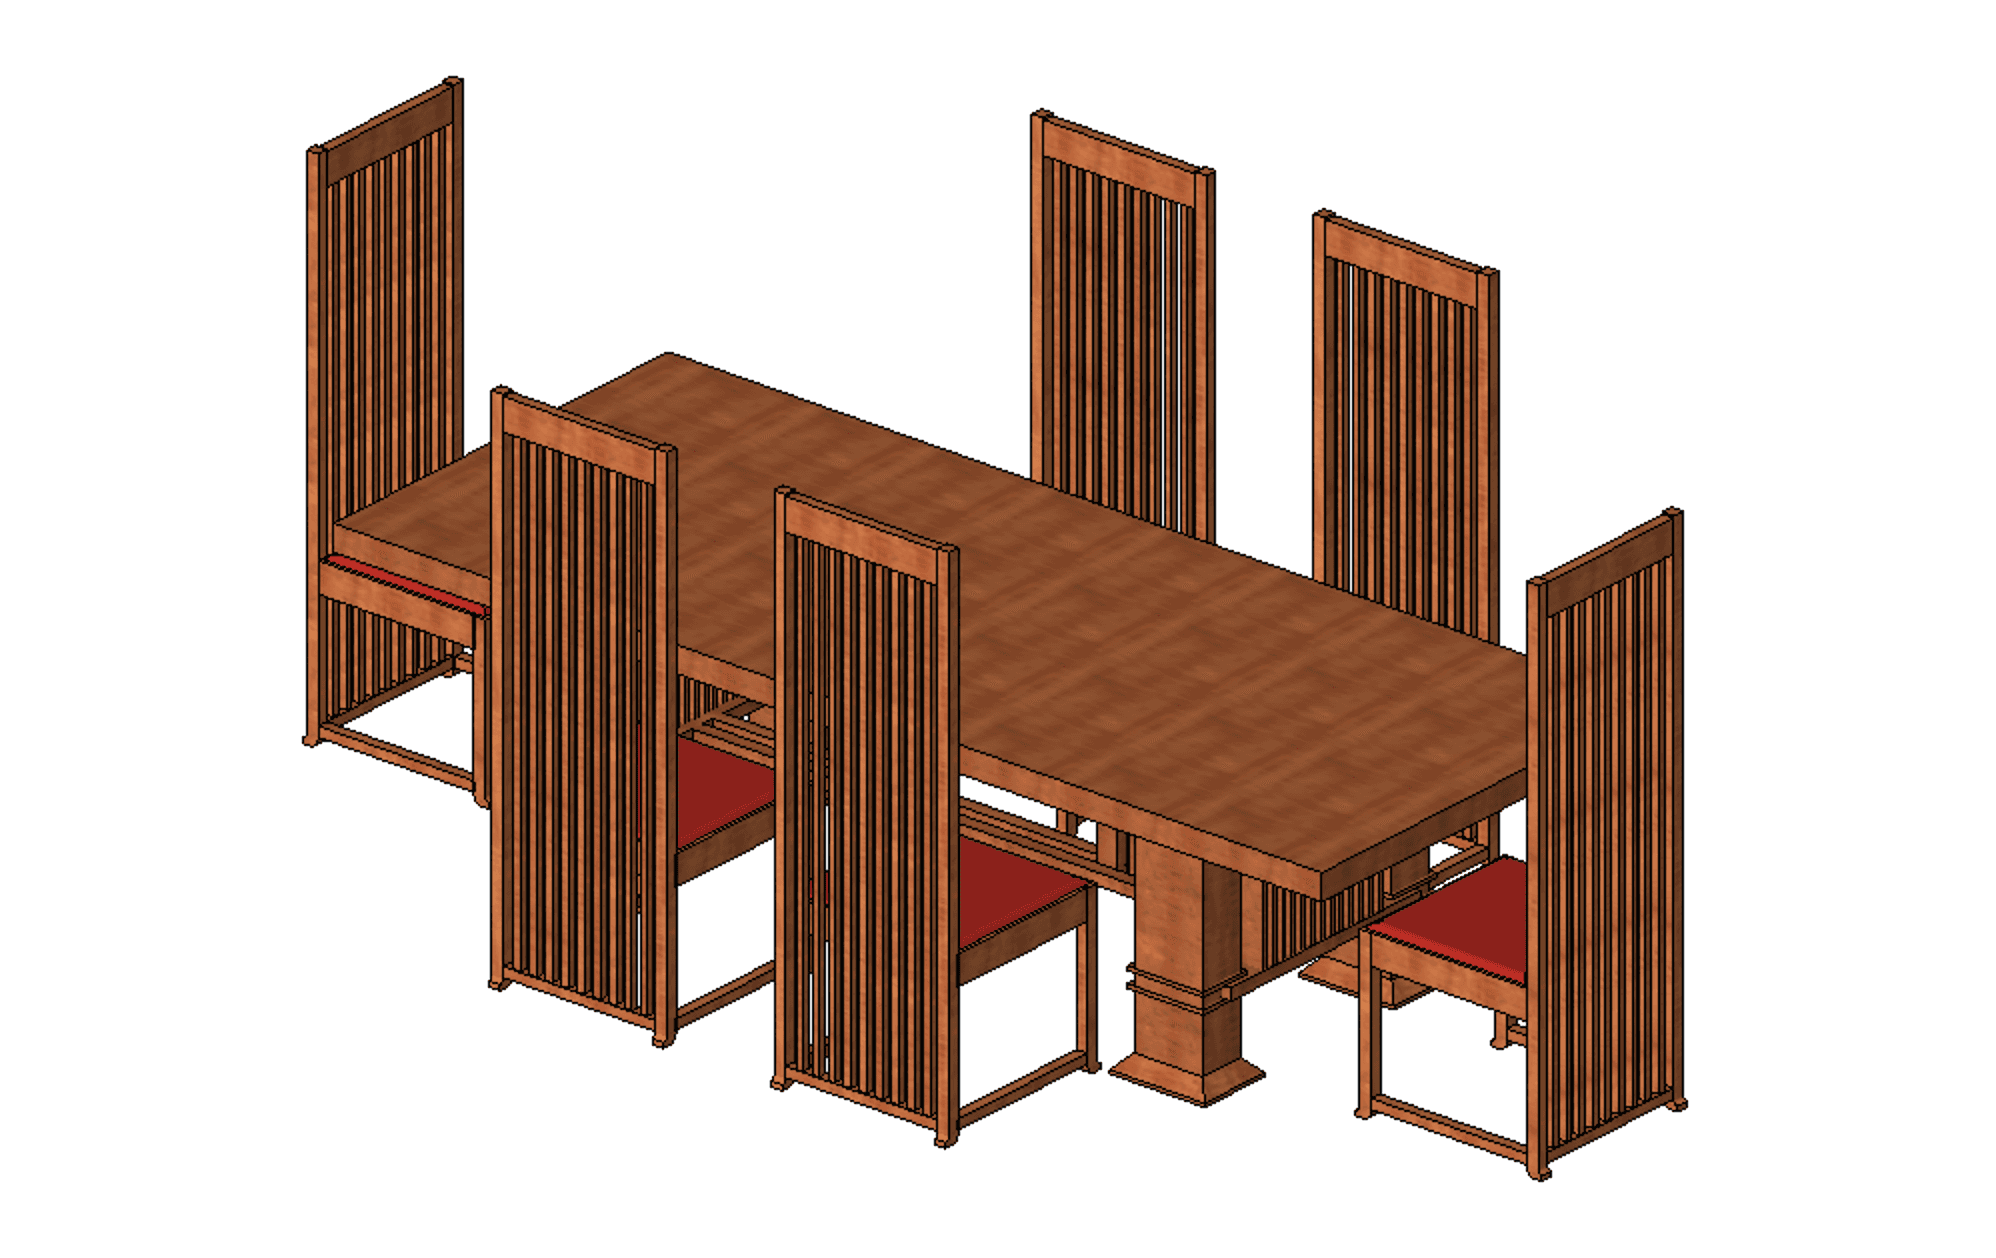
There are also situations where placing a set of families together would be very convenient, for example a table and its surrounding chairs. But if we do this by nesting chairs within the table family, we wouldn’t be able to count those chairs independently at a later stage.
This is where shared nested families come in. By making the chairs as shared nested elements, we get the best of both worlds: ease of placement within the project, and full functionality for the information contained within the nested families.
The best way to think about when to use shared nested elements is when those elements could also be used on their own within the project. On the other hand, regular (non-shared) nested families should be used to aid in the creation of repeated elements when creating content.
A good example of when it makes sense to use shared nested families is the one mentioned above: chairs being nested in a table family.
We can select the shared nested elements, tag them and schedule them. The shared nested elements also display in the project browser, while non-shared nested elements don’t appear at all. The shared nested elements can also be edited in the family editor and brought back to the model, updating all instances of the nested element.
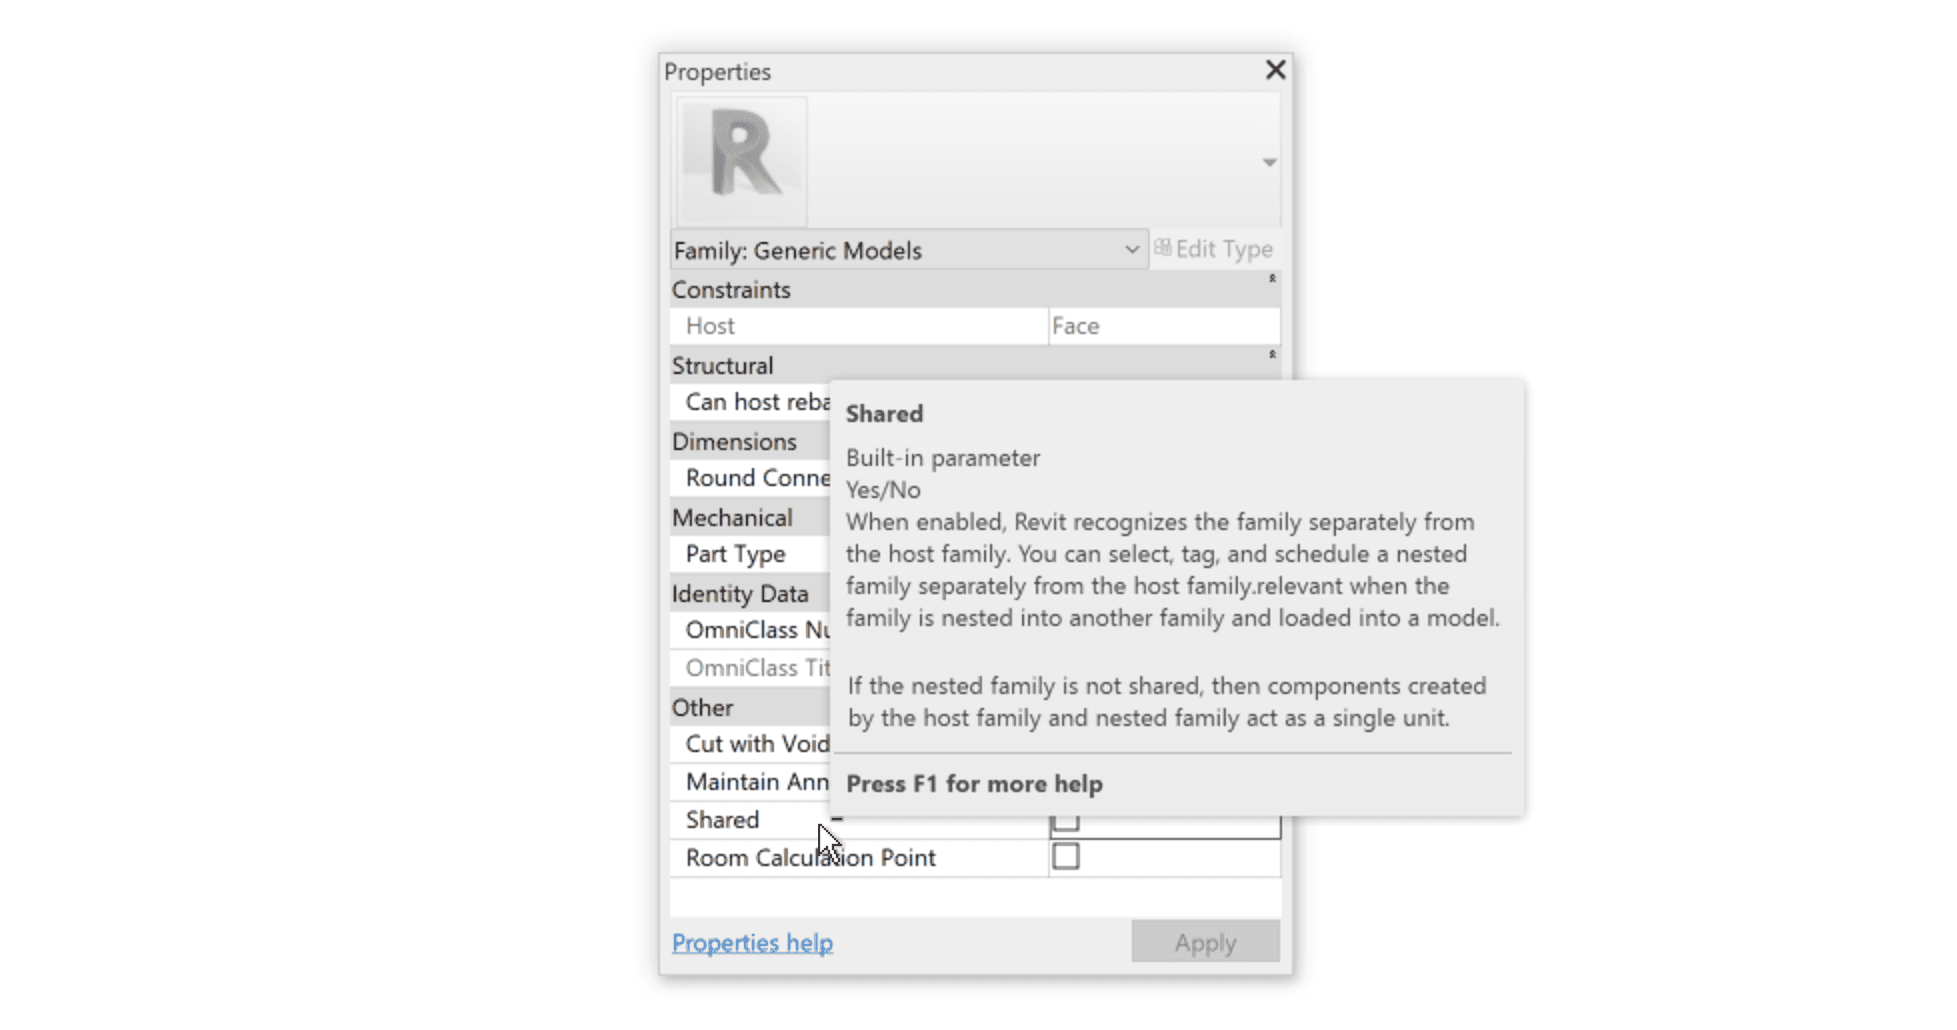
Shared nested families in Revit have a category that is independent of their host. This category will define how the shared nested families display in views.
Within a Revit project, all filters and visibility settings that apply to the category of the shared nested families will affect them independently of the host. At the same time, filters and visibility settings applied to the category of the host family won’t affect its shared nested families if they are of a different category. For example, hiding category of Furniture won’t hide shared nested casters of category Generic Models.
Depending on the types of content involved and their use within a project, there will be tradeoffs between the benefits of sharing nested families and the benefits of treating a host family and its nested elements as one single family.
MEP systems in Revit offer some more creative options for using shared nested families. But that’s material for another post.
Naming
Shared really means shared! Within a Revit model, a shared nested family is identical across all families into which it is nested.
This is great for maintaining consistency, because it ensures that one and the same version of the nested family is being used across the project. This is a luxury we don’t have with regular nesting, where modifications would have to be done separately in each host family. This feature, however, makes it critical to have a solid naming convention.
Names such as “desk”, “handrail” or “handle” for regular nested families don’t see the light of day when loaded into a Revit project, and different families can have a different nested “desk”, “handrail” or “handle”. This is not the case if the nested families are shared.
A shared nested family that is unique to one particular host family should have a unique name. For example, the name of the host family can be added before the name of the shared nested family. This way, it’s clear that it’s distinct from other such nested families that might get loaded and used with other host families.
If a shared family is not meant to be placed on its own within the model, and will only be loaded as a nested family, then it’s also good practice to indicate this in the name. For example, we can append “-to be nested” to the shared family’s name.
The ability to nest families is a useful tool for building Revit content, but that use is limited to the host family. By sharing nested families, Revit will bring them into the model on their own, which not only allows us to tag and schedule them, but also allows us to ensure consistency across all model families in which they are nested.
This means that standards applicable to families in models (such as naming conventions) need to be applied to shared nested families as well. We should be selective about what really needs to be shared and approach this setting with a particular use case in mind. In the majority of cases, it will be best to leave the Shared setting off.
In a follow-up post, we’ll take a look at a few tricks and workarounds in Revit that rely on shared nesting – in particular issues with cuttability when using masking regions and detail lines – as well as how to show generic annotations of vertically placed face-based families in plan views.
Nesting in Revit allows us to place families within other families in order to display their combined geometries and make them behave like a single unit within a project. There are many use cases for nesting content, such as use of repeated components or parametric elements in an array.
There are also situations where placing a set of families together would be very convenient, for example a table and its surrounding chairs. But if we do this by nesting chairs within the table family, we wouldn’t be able to count those chairs independently at a later stage.
This is where shared nested families come in. By making the chairs as shared nested elements, we get the best of both worlds: ease of placement within the project, and full functionality for the information contained within the nested families.
The best way to think about when to use shared nested elements is when those elements could also be used on their own within the project. On the other hand, regular (non-shared) nested families should be used to aid in the creation of repeated elements when creating content.
A good example of when it makes sense to use shared nested families is the one mentioned above: chairs being nested in a table family.
We can select the shared nested elements, tag them and schedule them. The shared nested elements also display in the project browser, while non-shared nested elements don’t appear at all. The shared nested elements can also be edited in the family editor and brought back to the model, updating all instances of the nested element.
Shared nested families in Revit have a category that is independent of their host. This category will define how the shared nested families display in views.
Within a Revit project, all filters and visibility settings that apply to the category of the shared nested families will affect them independently of the host. At the same time, filters and visibility settings applied to the category of the host family won’t affect its shared nested families if they are of a different category. For example, hiding category of Furniture won’t hide shared nested casters of category Generic Models.
Depending on the types of content involved and their use within a project, there will be tradeoffs between the benefits of sharing nested families and the benefits of treating a host family and its nested elements as one single family.
MEP systems in Revit offer some more creative options for using shared nested families. But that’s material for another post.
Naming
Shared really means shared! Within a Revit model, a shared nested family is identical across all families into which it is nested.
This is great for maintaining consistency, because it ensures that one and the same version of the nested family is being used across the project. This is a luxury we don’t have with regular nesting, where modifications would have to be done separately in each host family. This feature, however, makes it critical to have a solid naming convention.
Names such as “desk”, “handrail” or “handle” for regular nested families don’t see the light of day when loaded into a Revit project, and different families can have a different nested “desk”, “handrail” or “handle”. This is not the case if the nested families are shared.
A shared nested family that is unique to one particular host family should have a unique name. For example, the name of the host family can be added before the name of the shared nested family. This way, it’s clear that it’s distinct from other such nested families that might get loaded and used with other host families.
If a shared family is not meant to be placed on its own within the model, and will only be loaded as a nested family, then it’s also good practice to indicate this in the name. For example, we can append “-to be nested” to the shared family’s name.
The ability to nest families is a useful tool for building Revit content, but that use is limited to the host family. By sharing nested families, Revit will bring them into the model on their own, which not only allows us to tag and schedule them, but also allows us to ensure consistency across all model families in which they are nested.
This means that standards applicable to families in models (such as naming conventions) need to be applied to shared nested families as well. We should be selective about what really needs to be shared and approach this setting with a particular use case in mind. In the majority of cases, it will be best to leave the Shared setting off.
In a follow-up post, we’ll take a look at a few tricks and workarounds in Revit that rely on shared nesting – in particular issues with cuttability when using masking regions and detail lines – as well as how to show generic annotations of vertically placed face-based families in plan views.


Kinship
The best way to manage Revit content
Kinship
The best way to manage Revit content
Kinship
The best way to manage Revit content
Similar Articles


Never miss an update with our monthly newsletter
Get the latest company news, product updates, blog posts and free Revit content from Kinship. Delivered directly to your inbox no more than once a month.
By submitting your email, you agree to receive newsletter emails.
Support
Never miss an update with our monthly newsletter
Get the latest company news, product updates, blog posts and free Revit content from Kinship. Delivered directly to your inbox no more than once a month.
By submitting your email, you agree to receive newsletter emails.
Support
Never miss an update with our monthly newsletter
Get the latest company news, product updates, blog posts and free Revit content from Kinship. Delivered directly to your inbox no more than once a month.
By submitting your email, you agree to receive newsletter emails.
Support