Using Arrays in Revit Families
Arrays are a key part of creating flexible Revit content. But knowing when and how to use them makes all the difference between solving problems and creating new ones.
Using Arrays in Revit Families
Arrays are a key part of creating flexible Revit content. But knowing when and how to use them makes all the difference between solving problems and creating new ones.

There are different ways of approaching arrays in Revit. When it comes to using arrays within Revit families, often the quickest and easiest options will end up restricting your content’s flexibility and functionality within Revit projects.
Here we take a look at when it makes sense to use arrays in Revit content, how to avoid some common mistakes with arrays, and a behind-the-scenes view of some decisions we’ve made in the past when working with arrays in Revit families we’ve created.
When not to array.
First it’s important to consider when it actually makes sense to use an array within a Revit family.
The whole point of an array is to achieve flexibility in the count and spacing of an item. If you need the count of an item to match just one or two specific numbers, then it probably makes sense just to copy that item and use visibility settings rather than go to the trouble of creating an array.
Remember: You can’t have the value of an array count equal to one. The minimum value is two.
In addition, the justification for building an array is directly proportional to its frequency of use. If you make an array that’s only going to be used twice in five years, then you could argue whether it’s worth making it in the first place.
If you’re going to array, do it the right way.
It's often tempting to take a shortcut and try to array an in-place component. When doing this, the option for grouping is turned on by default.

Grouping option is selected by default when arraying an in-place component.
But be careful. If you group in-place components, you'll run into several problems. The main one is not having the option to add masking regions to the group, with symbolic lines left as the only option.
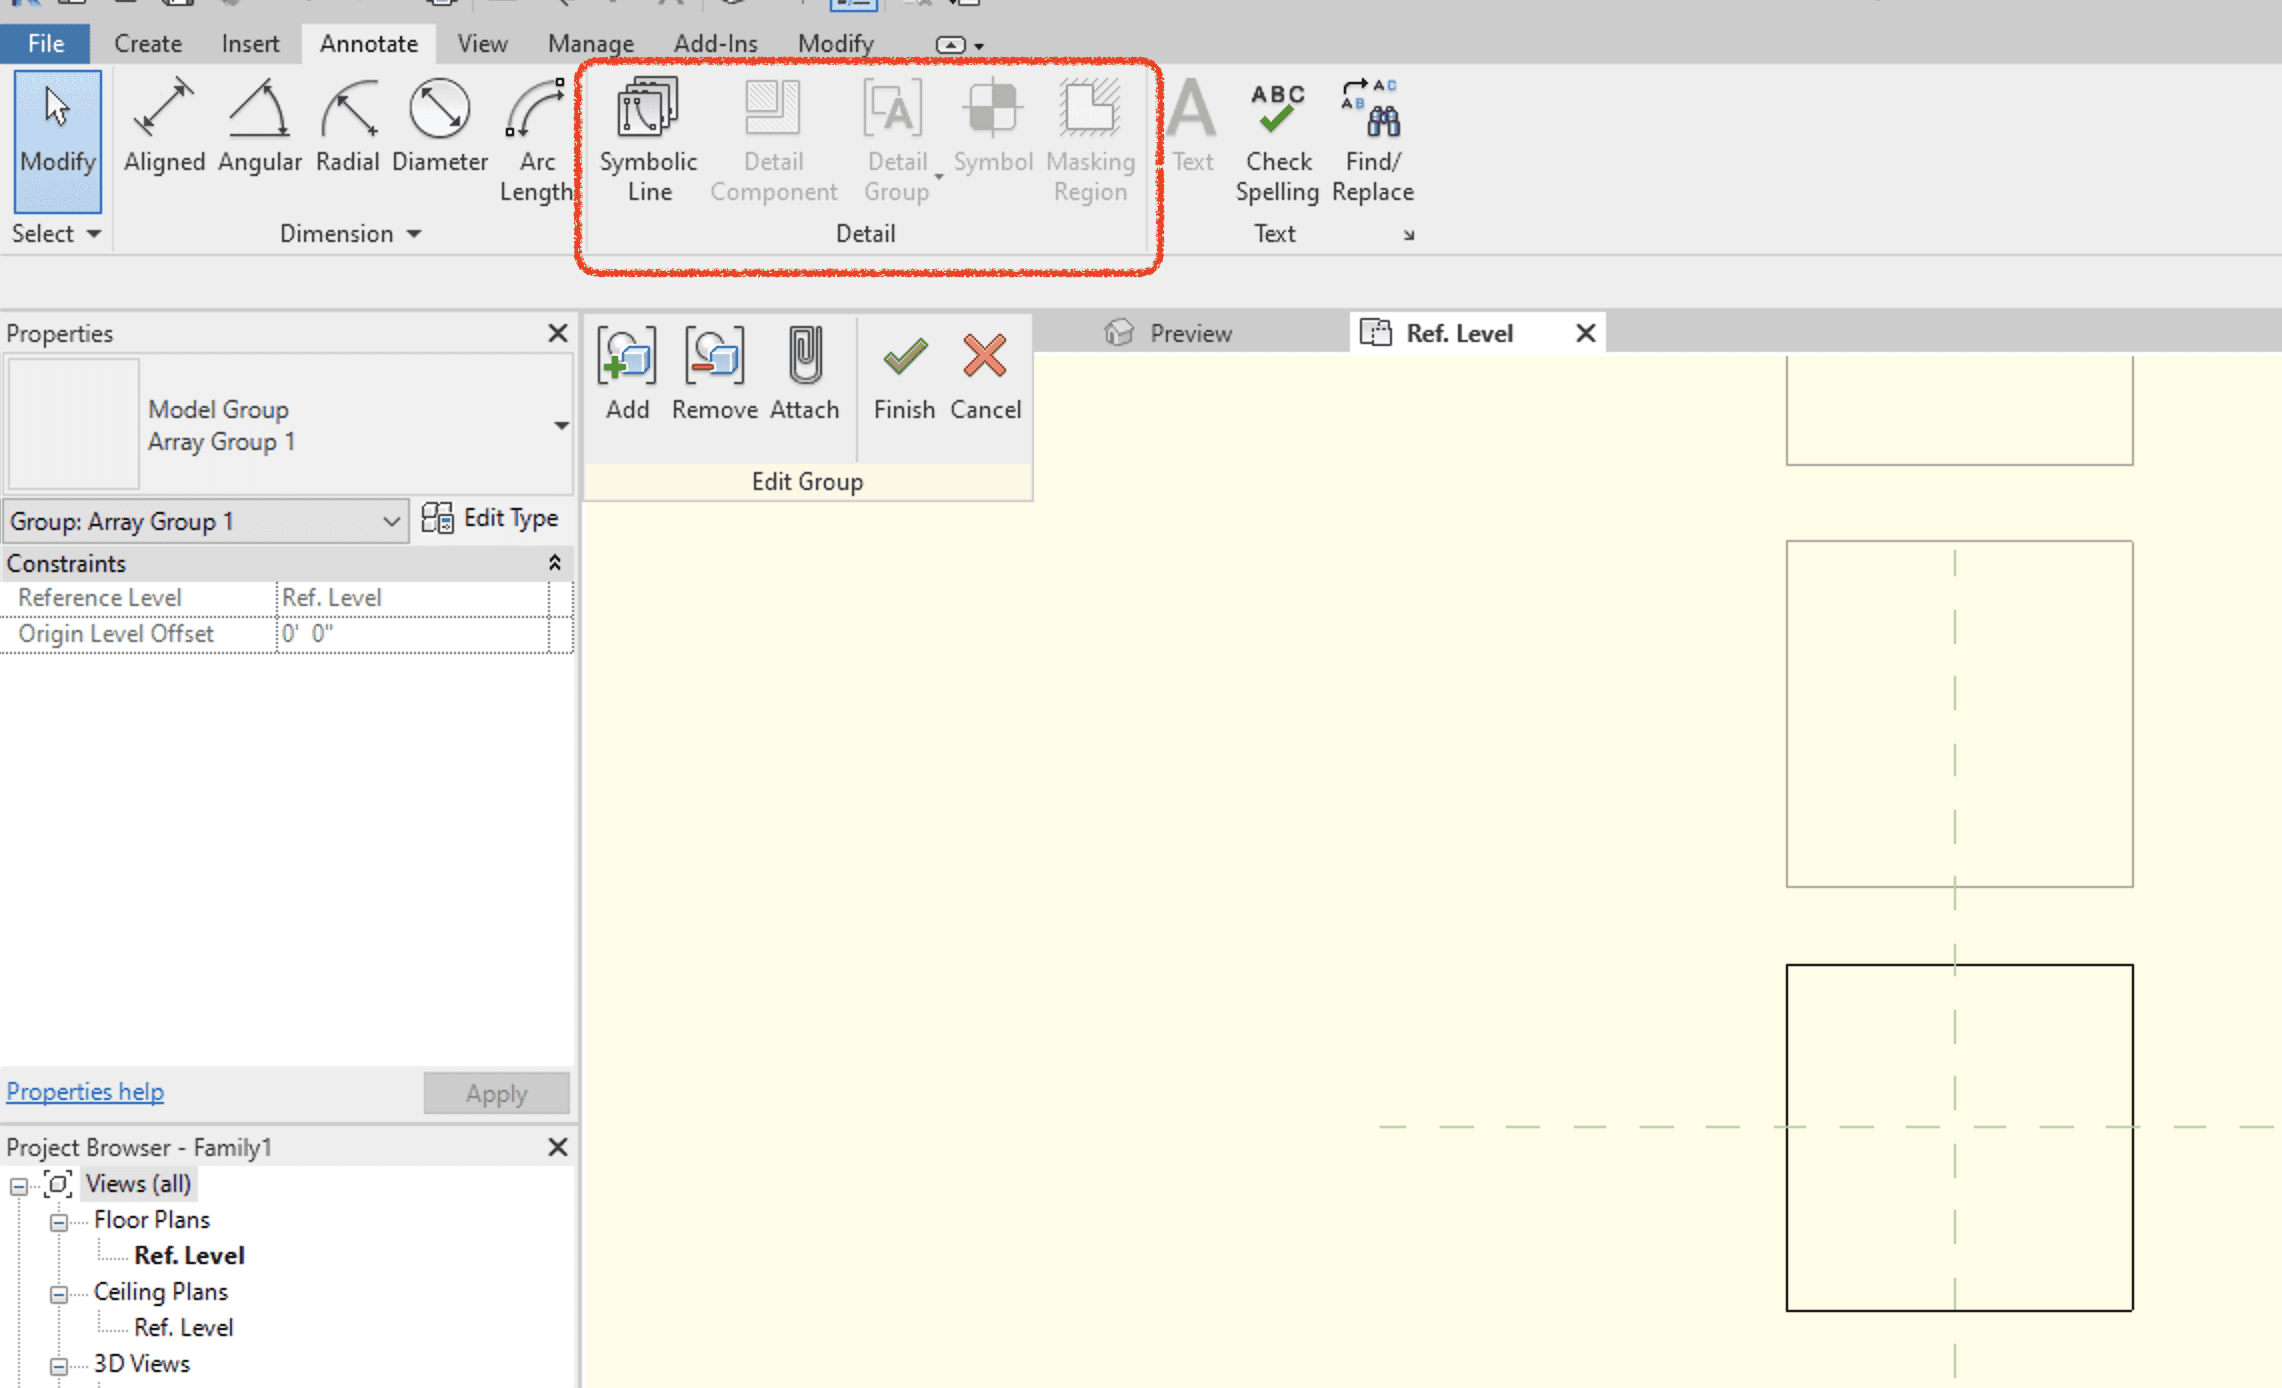
Plan view in family editor showing symbolic lines as the only available option for 2D geometry.
So if you want to have 2D geometry, you'll need to make additional arrays for front and side views. Before you know it, the family will start to get quite muddled. Then the more you flex (and possibly array in two directions), the more chance you'll have of losing association with reference planes and alignment. Instead of saving yourself time, you’ll end up wasting time trying to manage this mess.
If arrayed elements need to flex, use nested families.
Over the past 15 years of content creation, we've always tried hard to limit the use of nested elements.
However, arrays are one area where nesting is often the best approach. Nesting provides a “layer” where family attributes, such as rotating elements or 2D geometry, can live and function safely without the array breaking them.
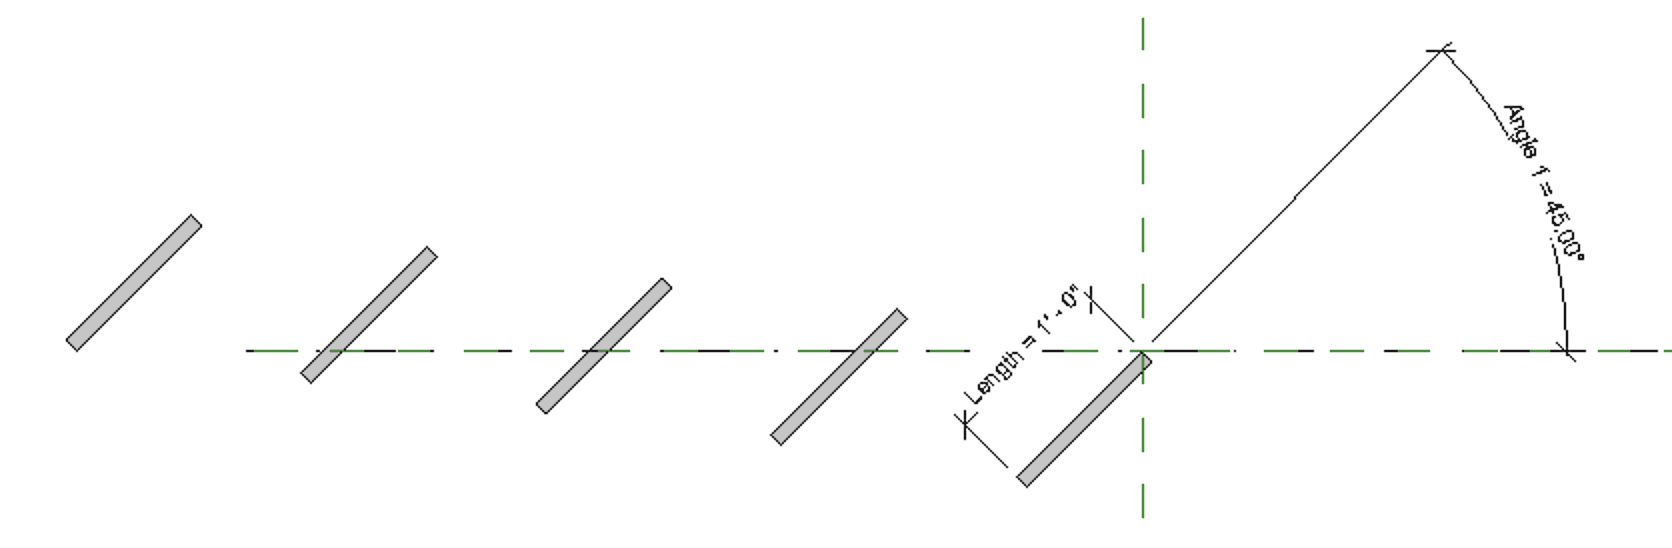
For example, see the basic rotating reference line below. The angle and length of this line are constrained by parameters and can flex easily. The line itself is locked to the reference planes so it will always rotate around the same point of origin.
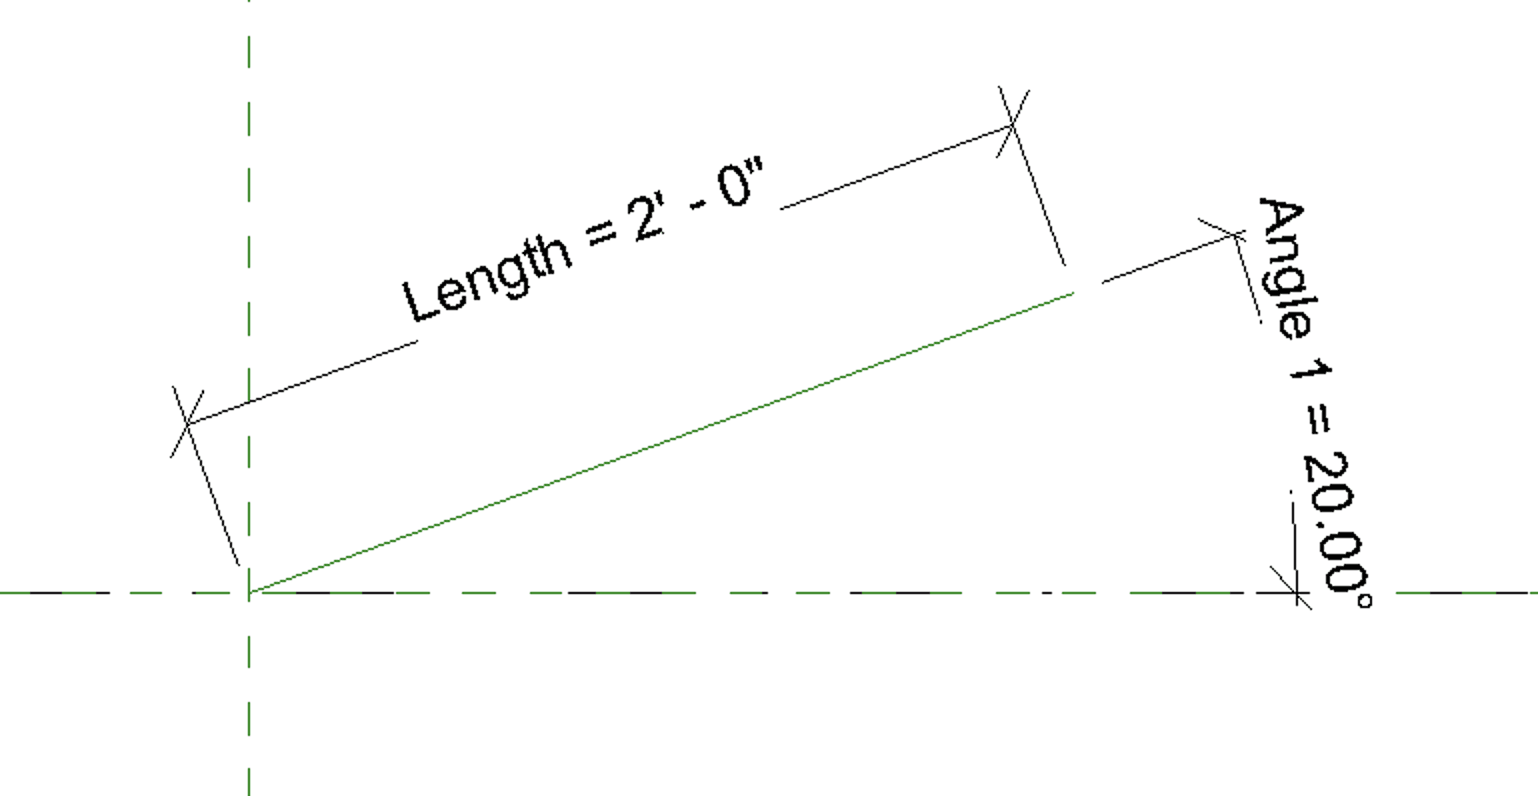
Reference line locked in position and constrained.
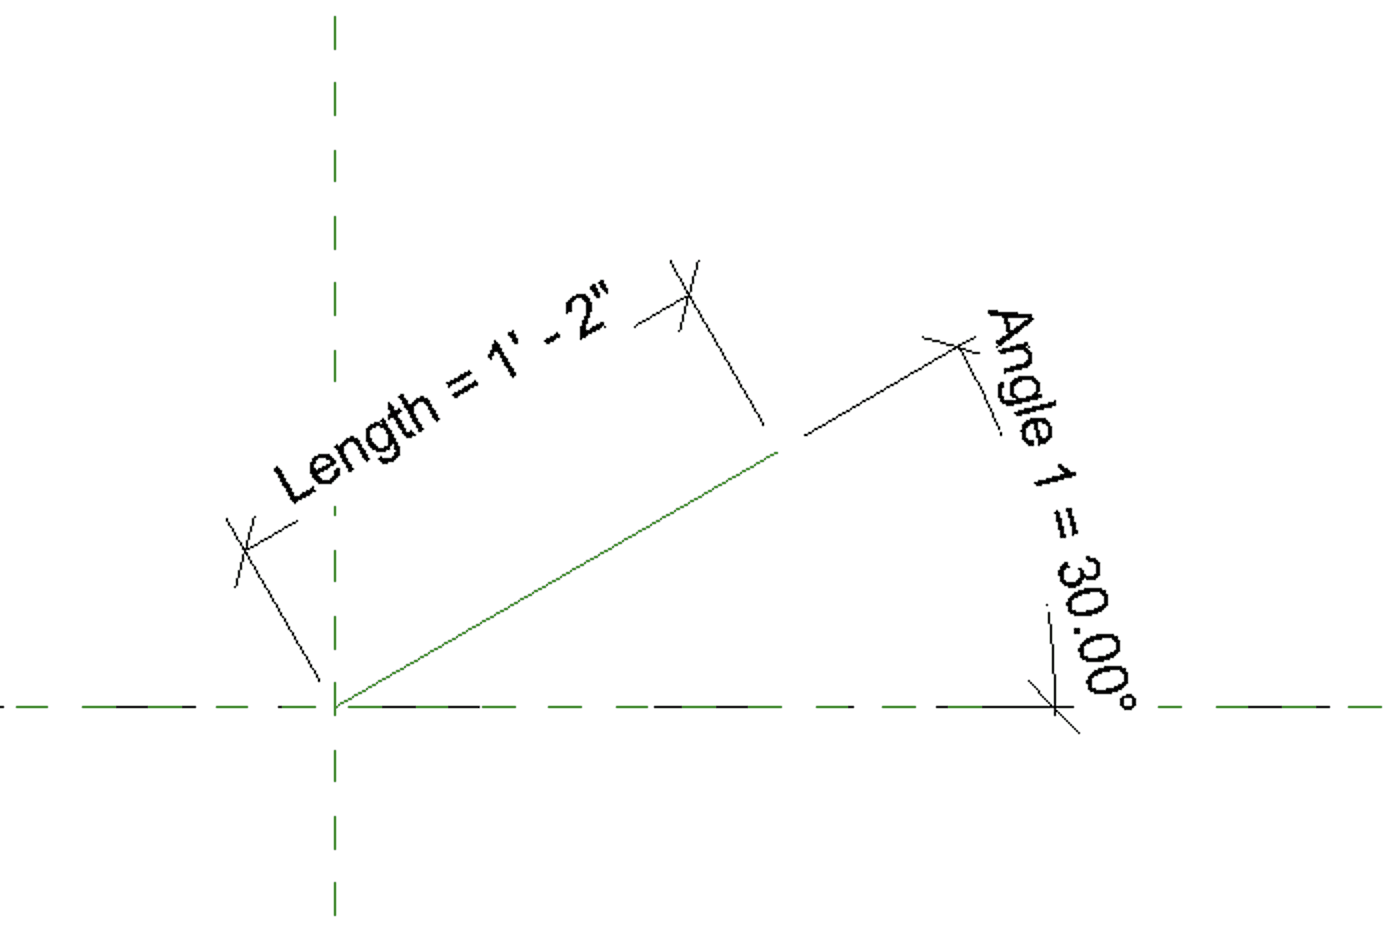
Reference line flexes in length and rotation.
Below we’ve added an extrusion hosted by the reference plane:

Geometry hosted by reference line.
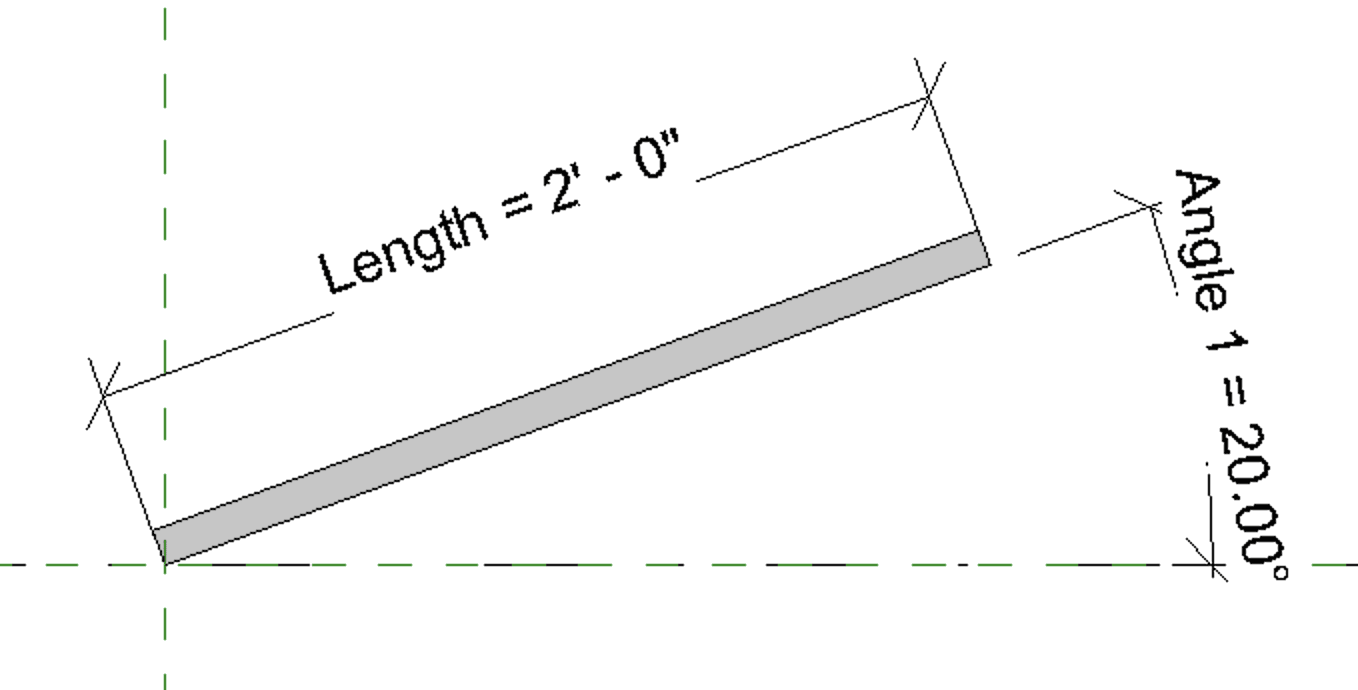
Geometry still flexes.
Everything flexes fine. Next, we turn to arraying this built-in-place item.
Without selecting the reference line in the array, you will get this error message.
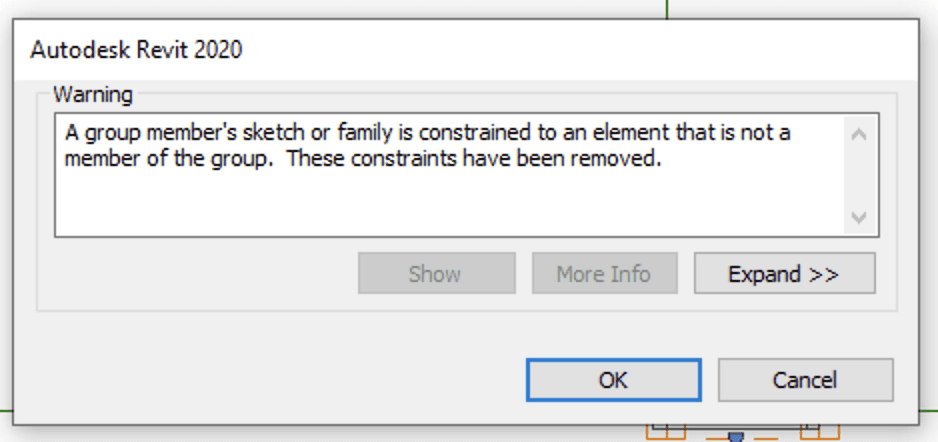
Error message when arraying an in-place element without its associated reference line.
This is happening because the geometry is hosted to the reference lines which are not part of the array, so the geometry loses its hosting and constraint.
Now we array both the reference line and geometry together.
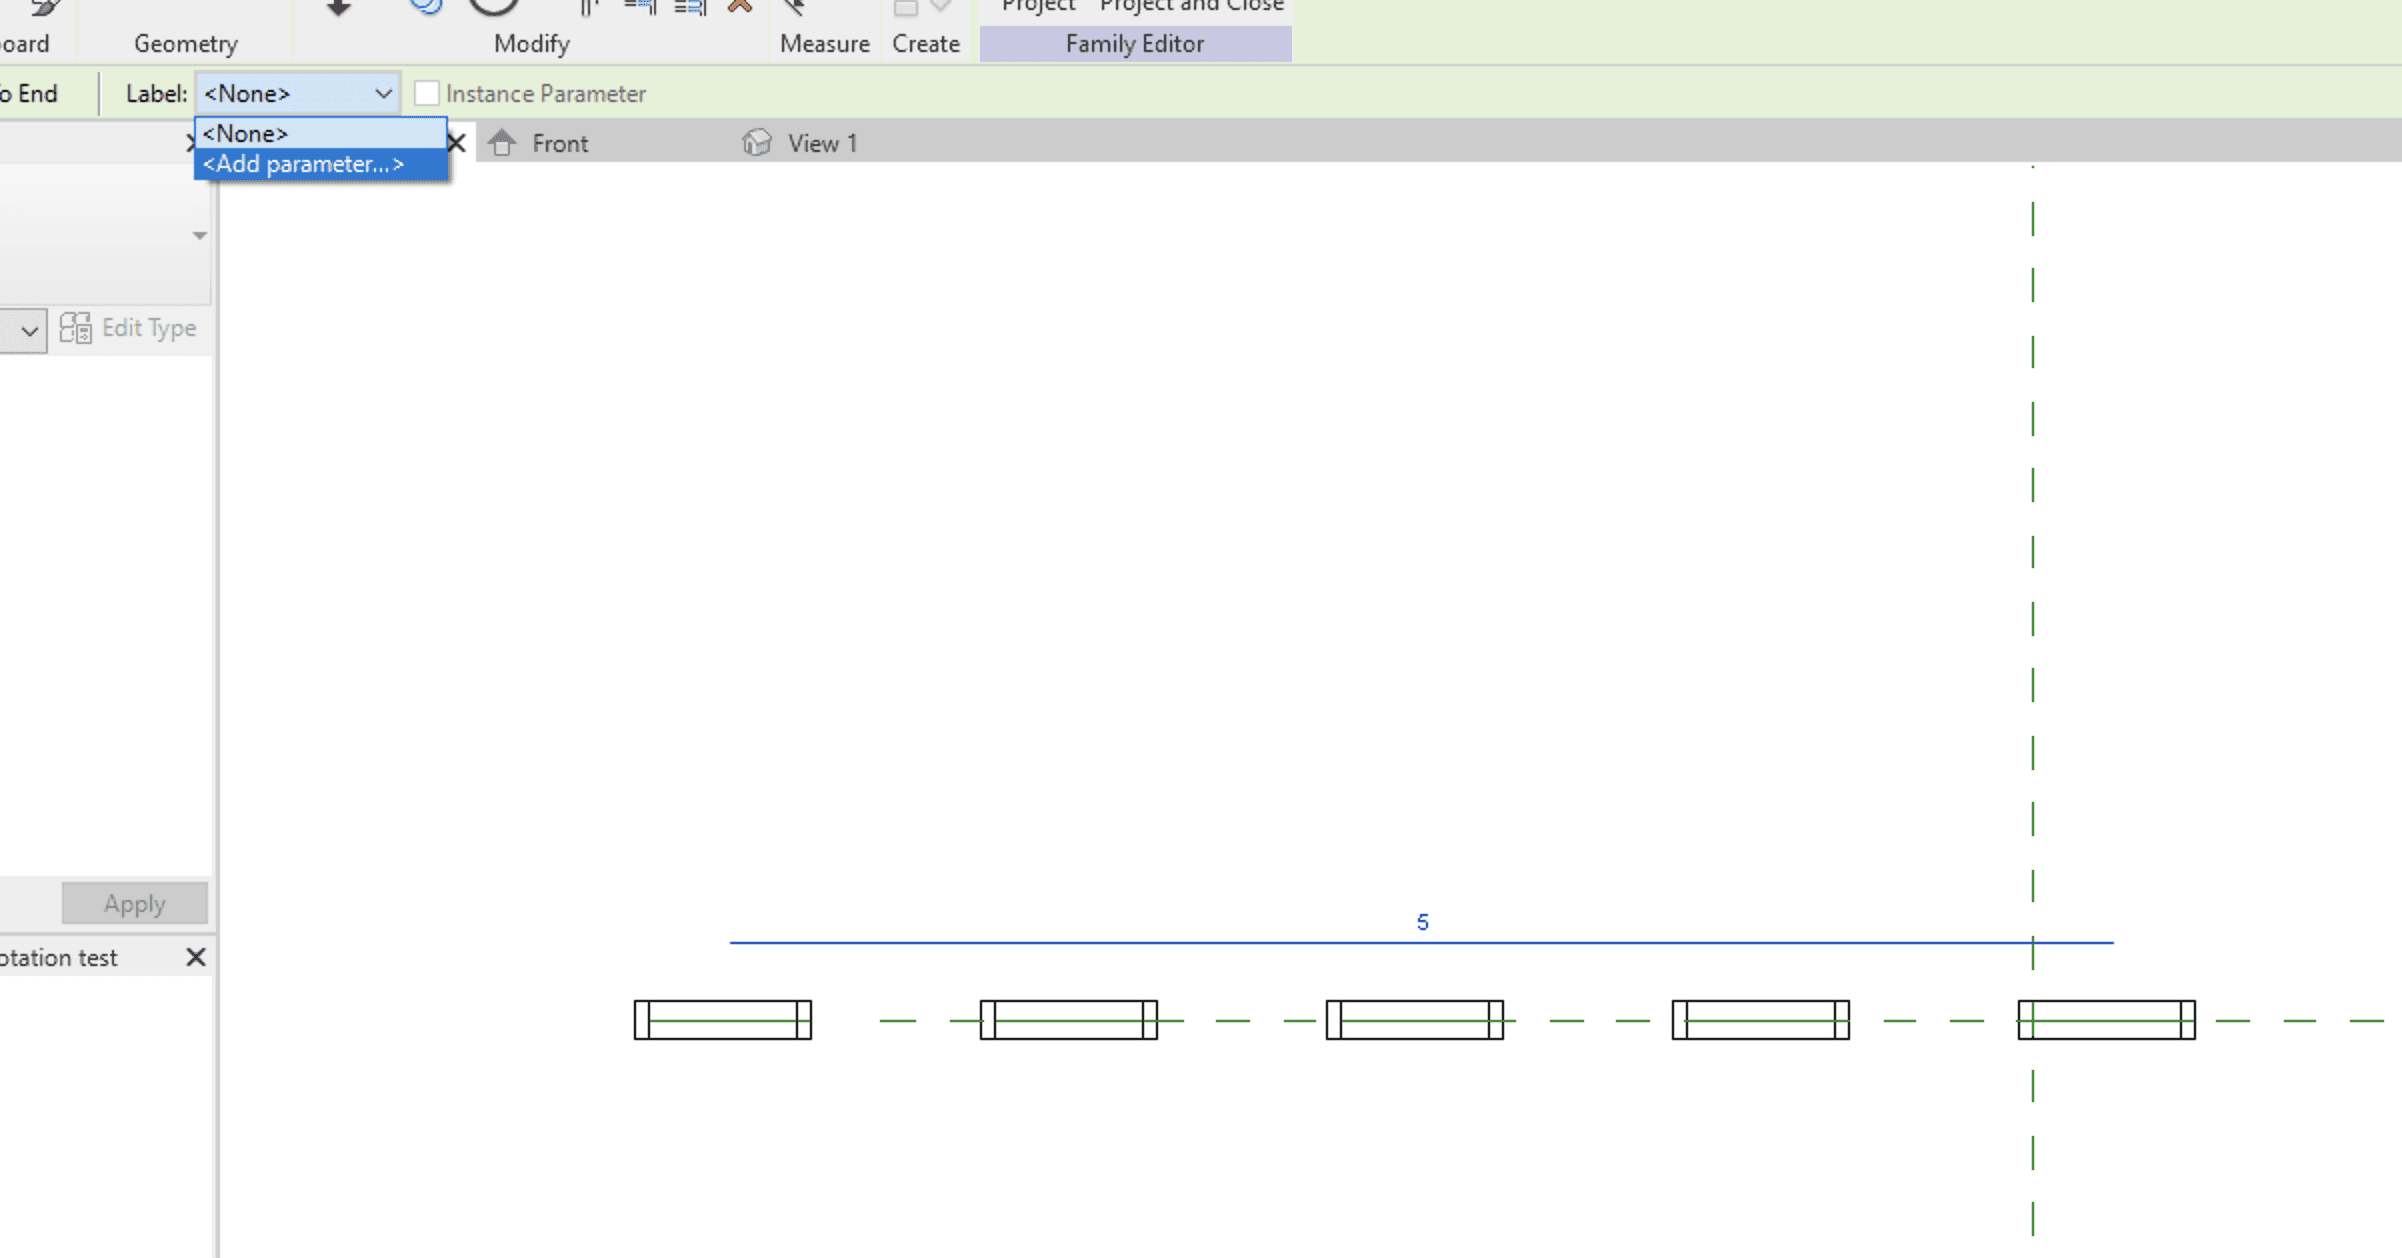
Plan view showing arrayed geometry and reference line.
Everything at first seems to be ok in the plan view. But when adding a parameter to control the number in the array, the geometry flips.
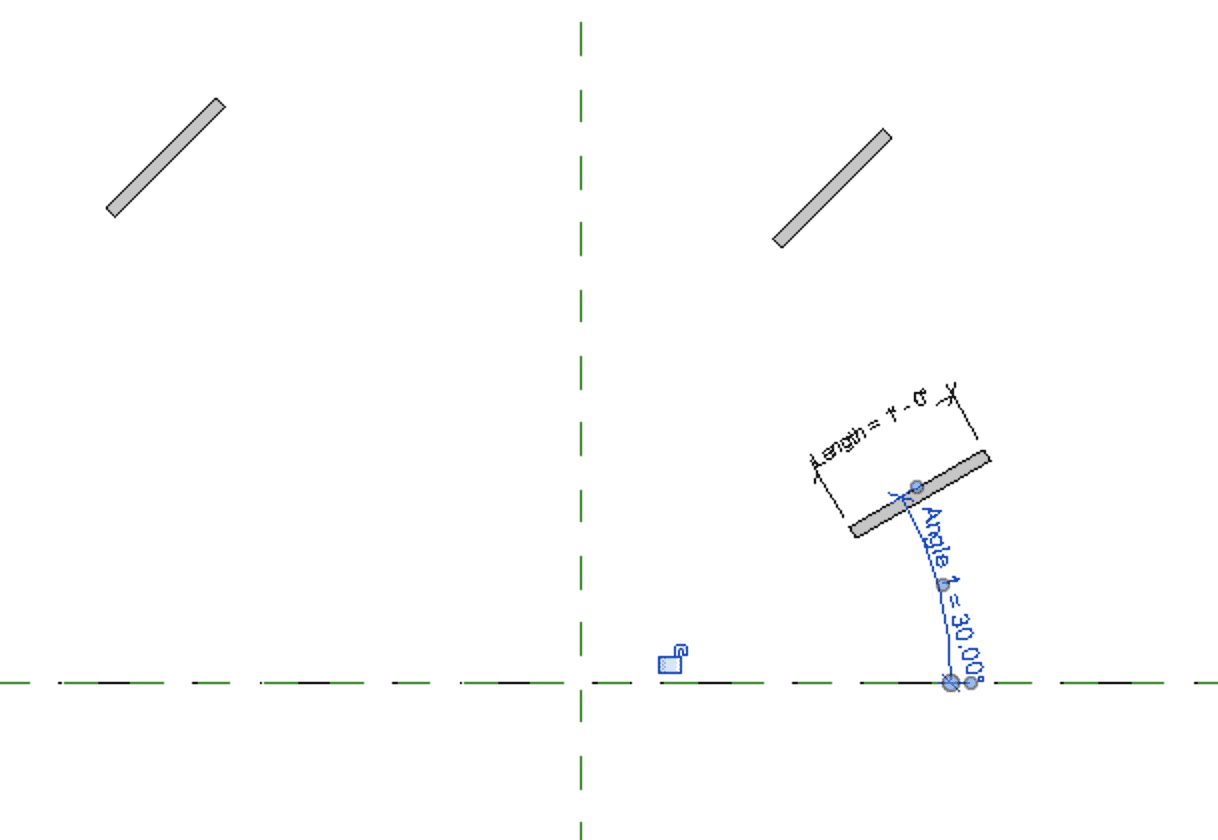
Front view showing the first geometry has flipped.

After adding a parameter to control the count, the geometry flips and the array collectively moves.
Trying to make this work is just beating your head against a generic OOTB wall.

Aligning and locking the array.
You can align and lock the arrays using the geometry itself, but the problem still remains because changing the rotation or length of the geometry breaks the array.
Nesting a family is the only safe way to array flexible and rotating elements.
Some examples from our own work.
Below is an image of our Revit family for the Cabero dry air cooler. We were asked to create this family by B-Global Tech when the family they were provided with didn’t meet their needs.
There are 24 fans on top of the unit. The fan is a nested element. In this instance, we didn’t array the fan because there is only one type. Even though the manufacturer may make models with a higher or lower number of fans, the number of rows is always two, so an array in two directions isn’t justified. Also, an array would make this family heavier in file size, and this is always an important consideration.
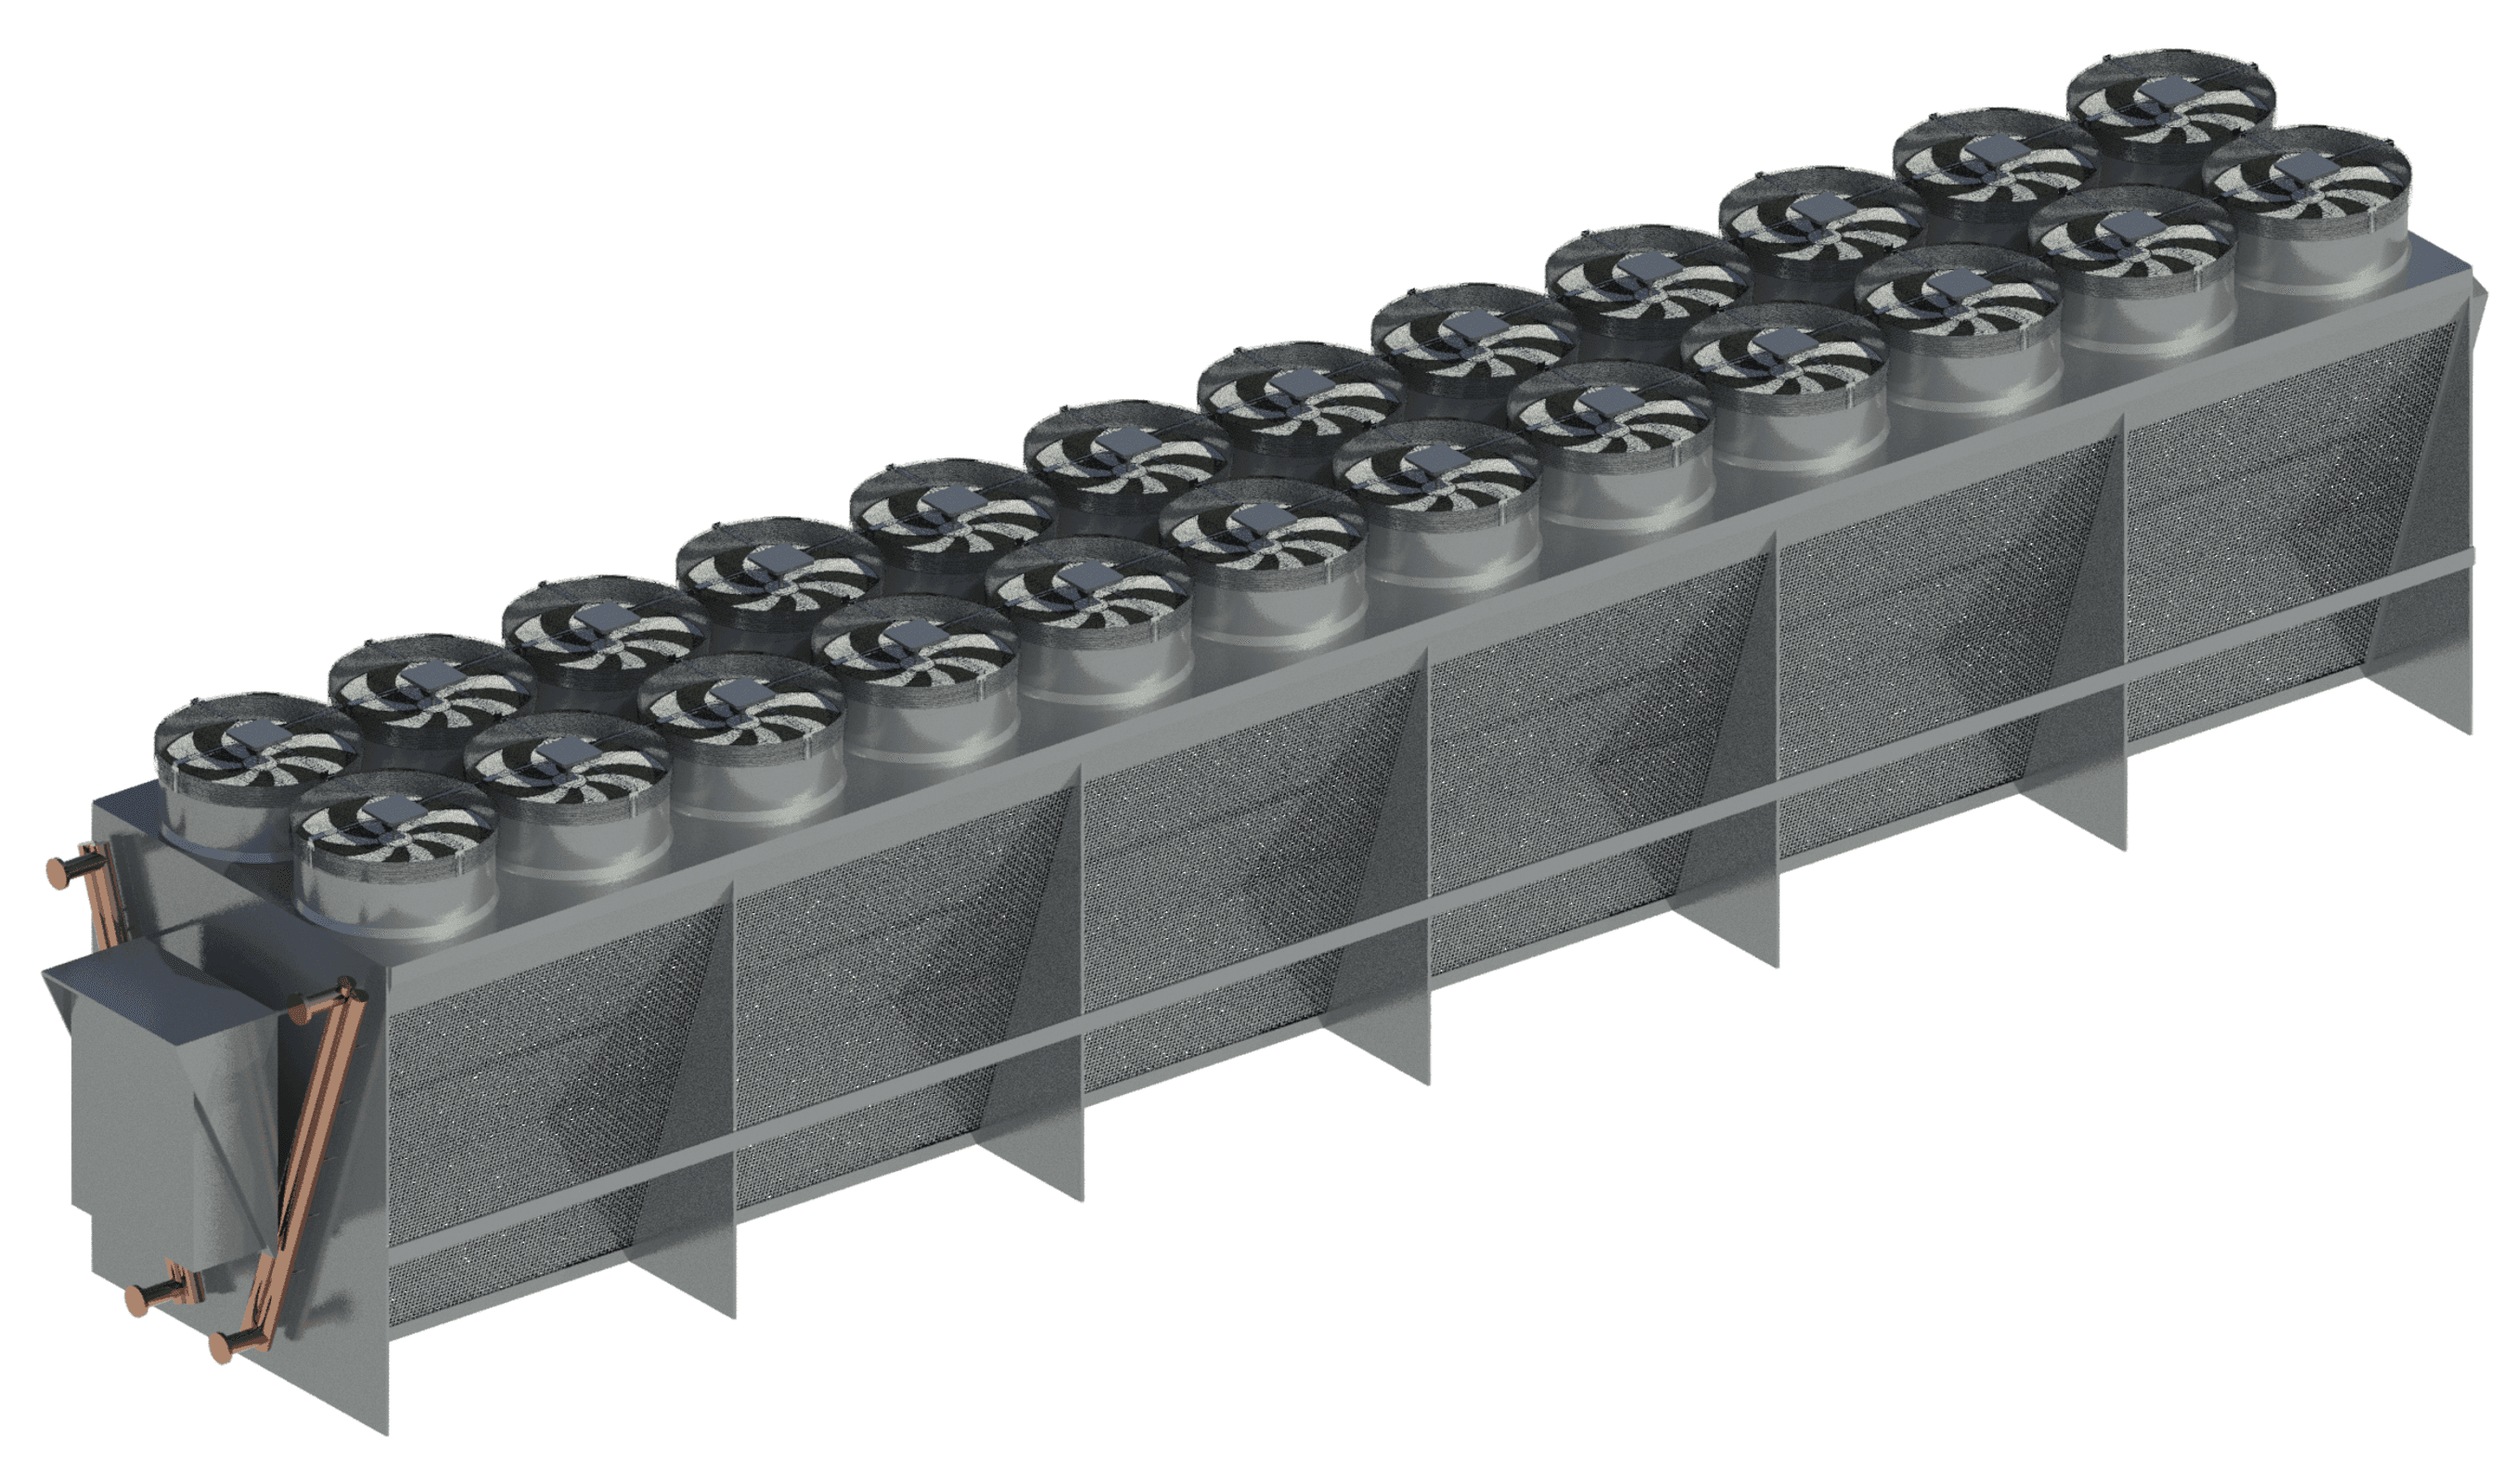
Cabero dry air cooler with nested and copied fan.
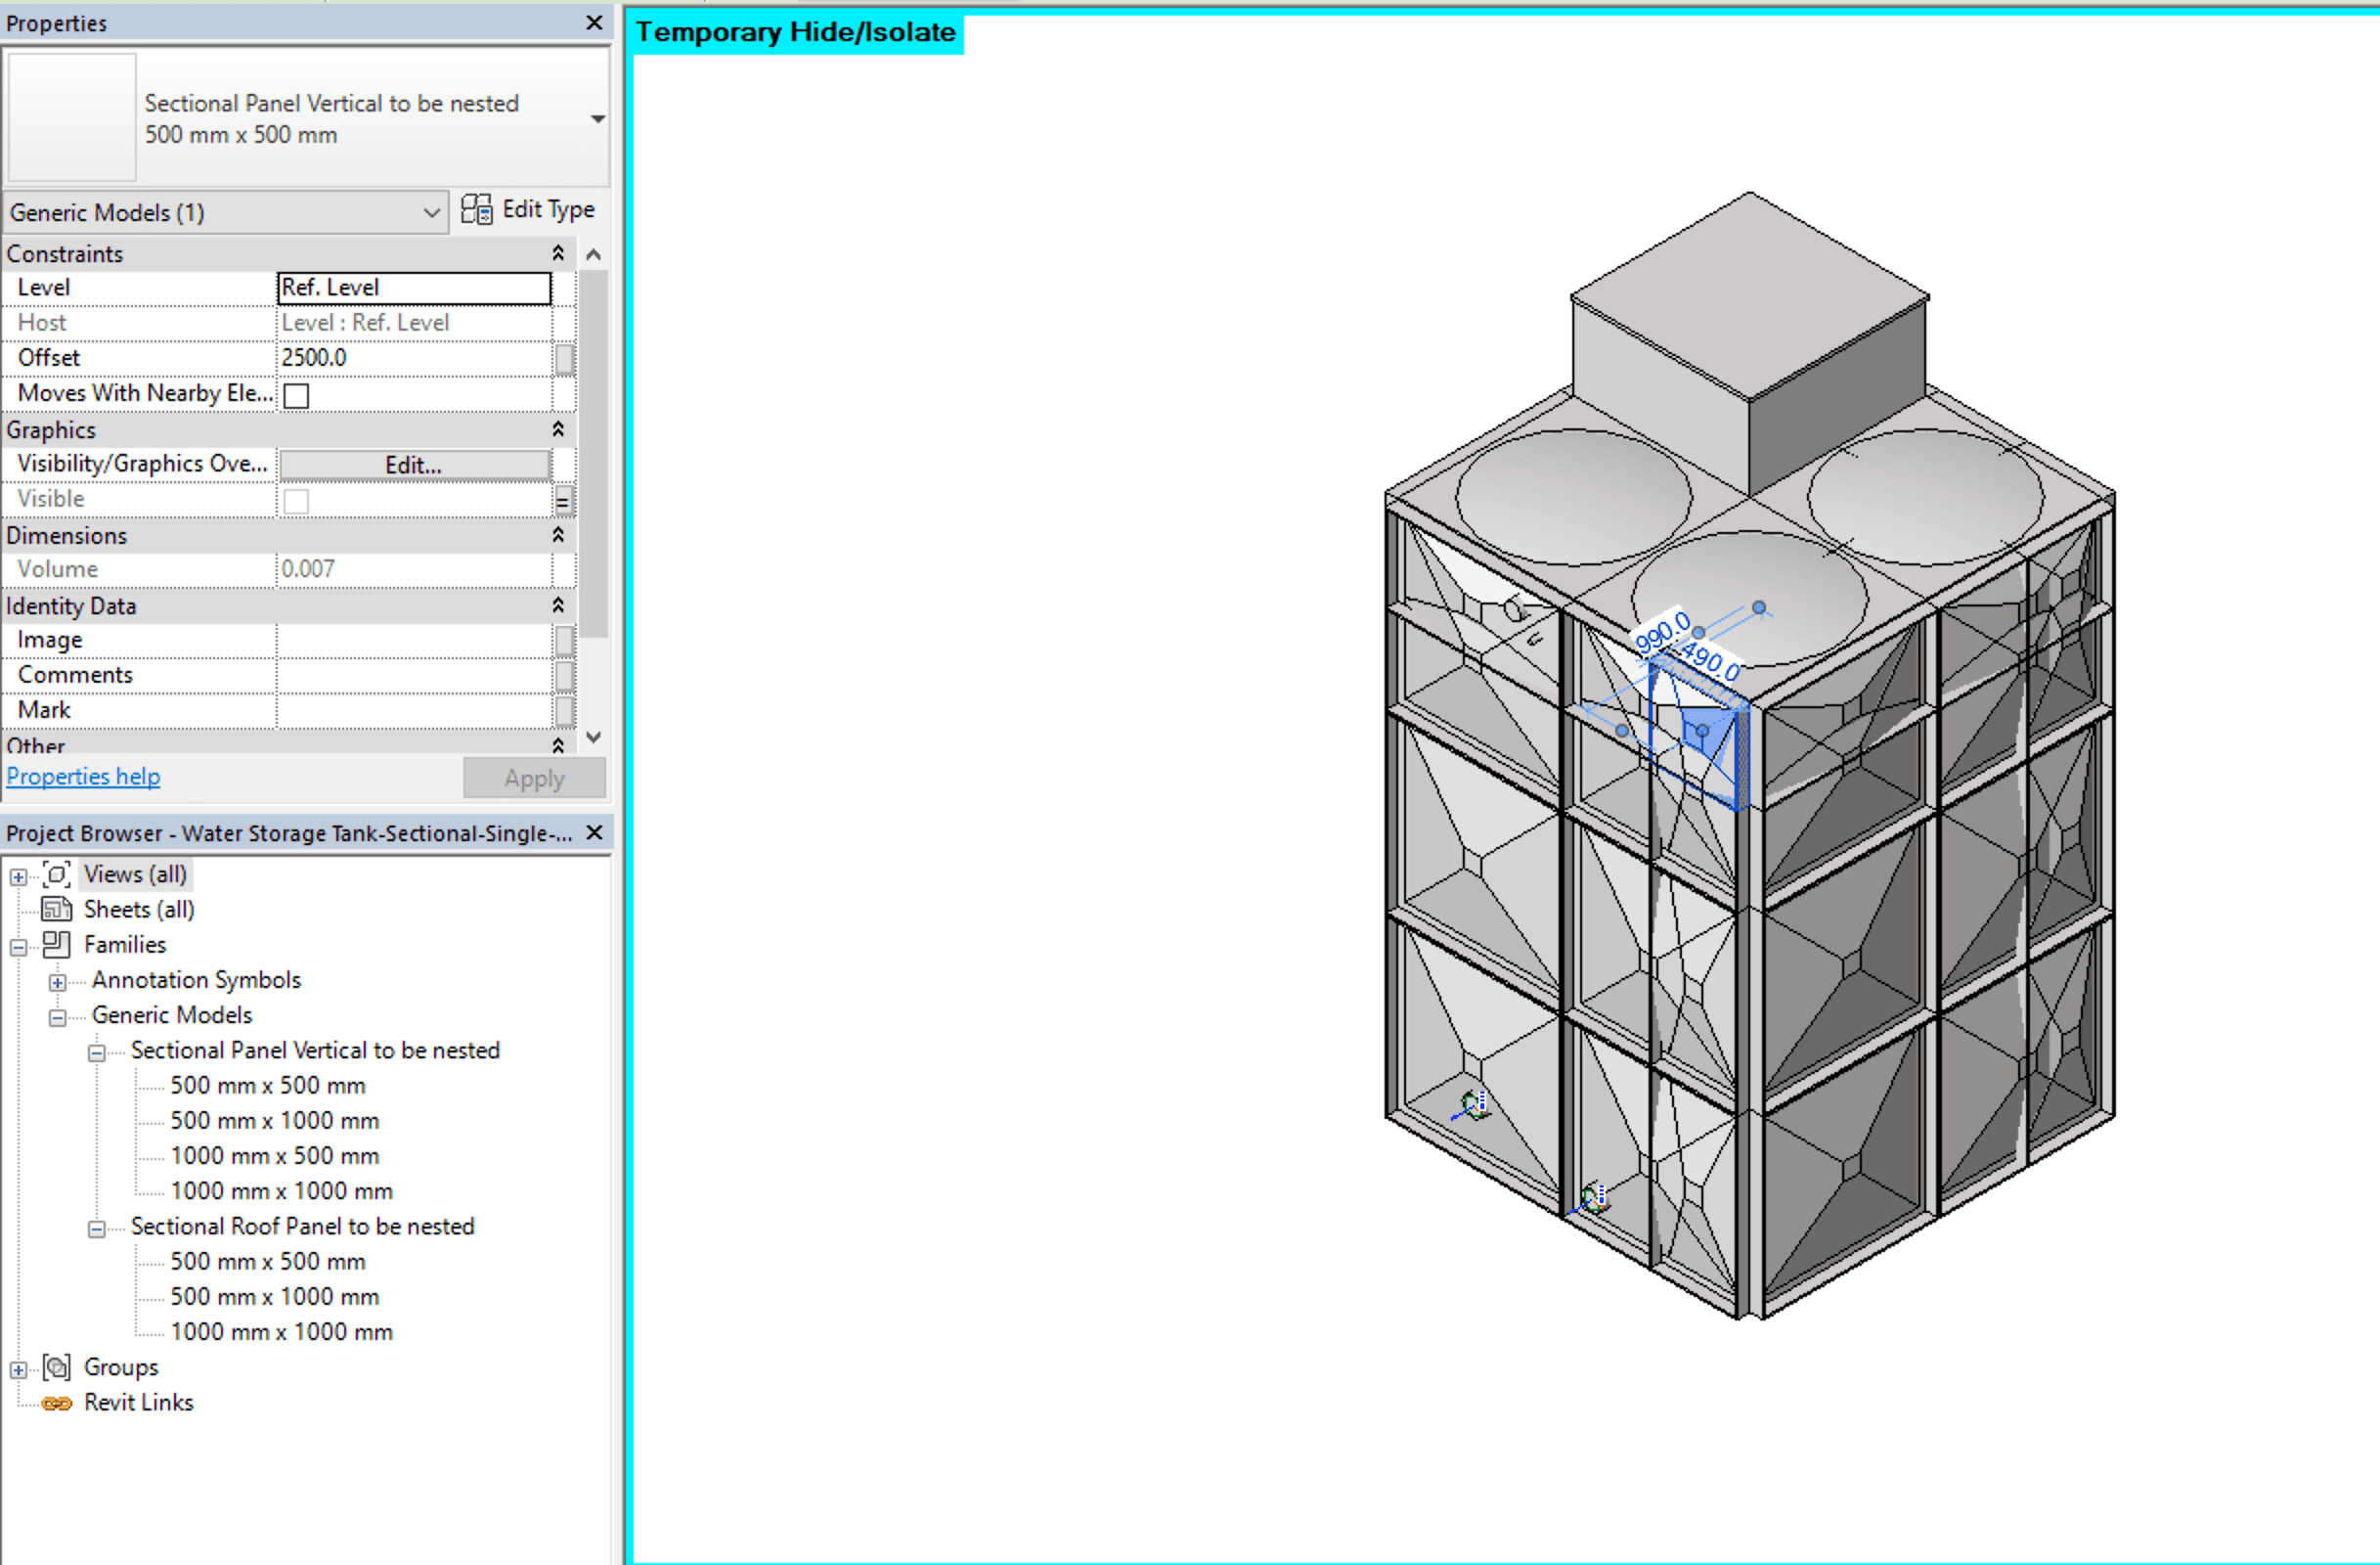
Now, let's take a look at some of the Revit families we’ve created that do use arrays. First up is a sectional water tank we created back in 2011 that has always been one of my favorites. We work with quite a few engineering companies, and this sectional water tank and its split tank version are a key part of the design for domestic water and fire protection systems.
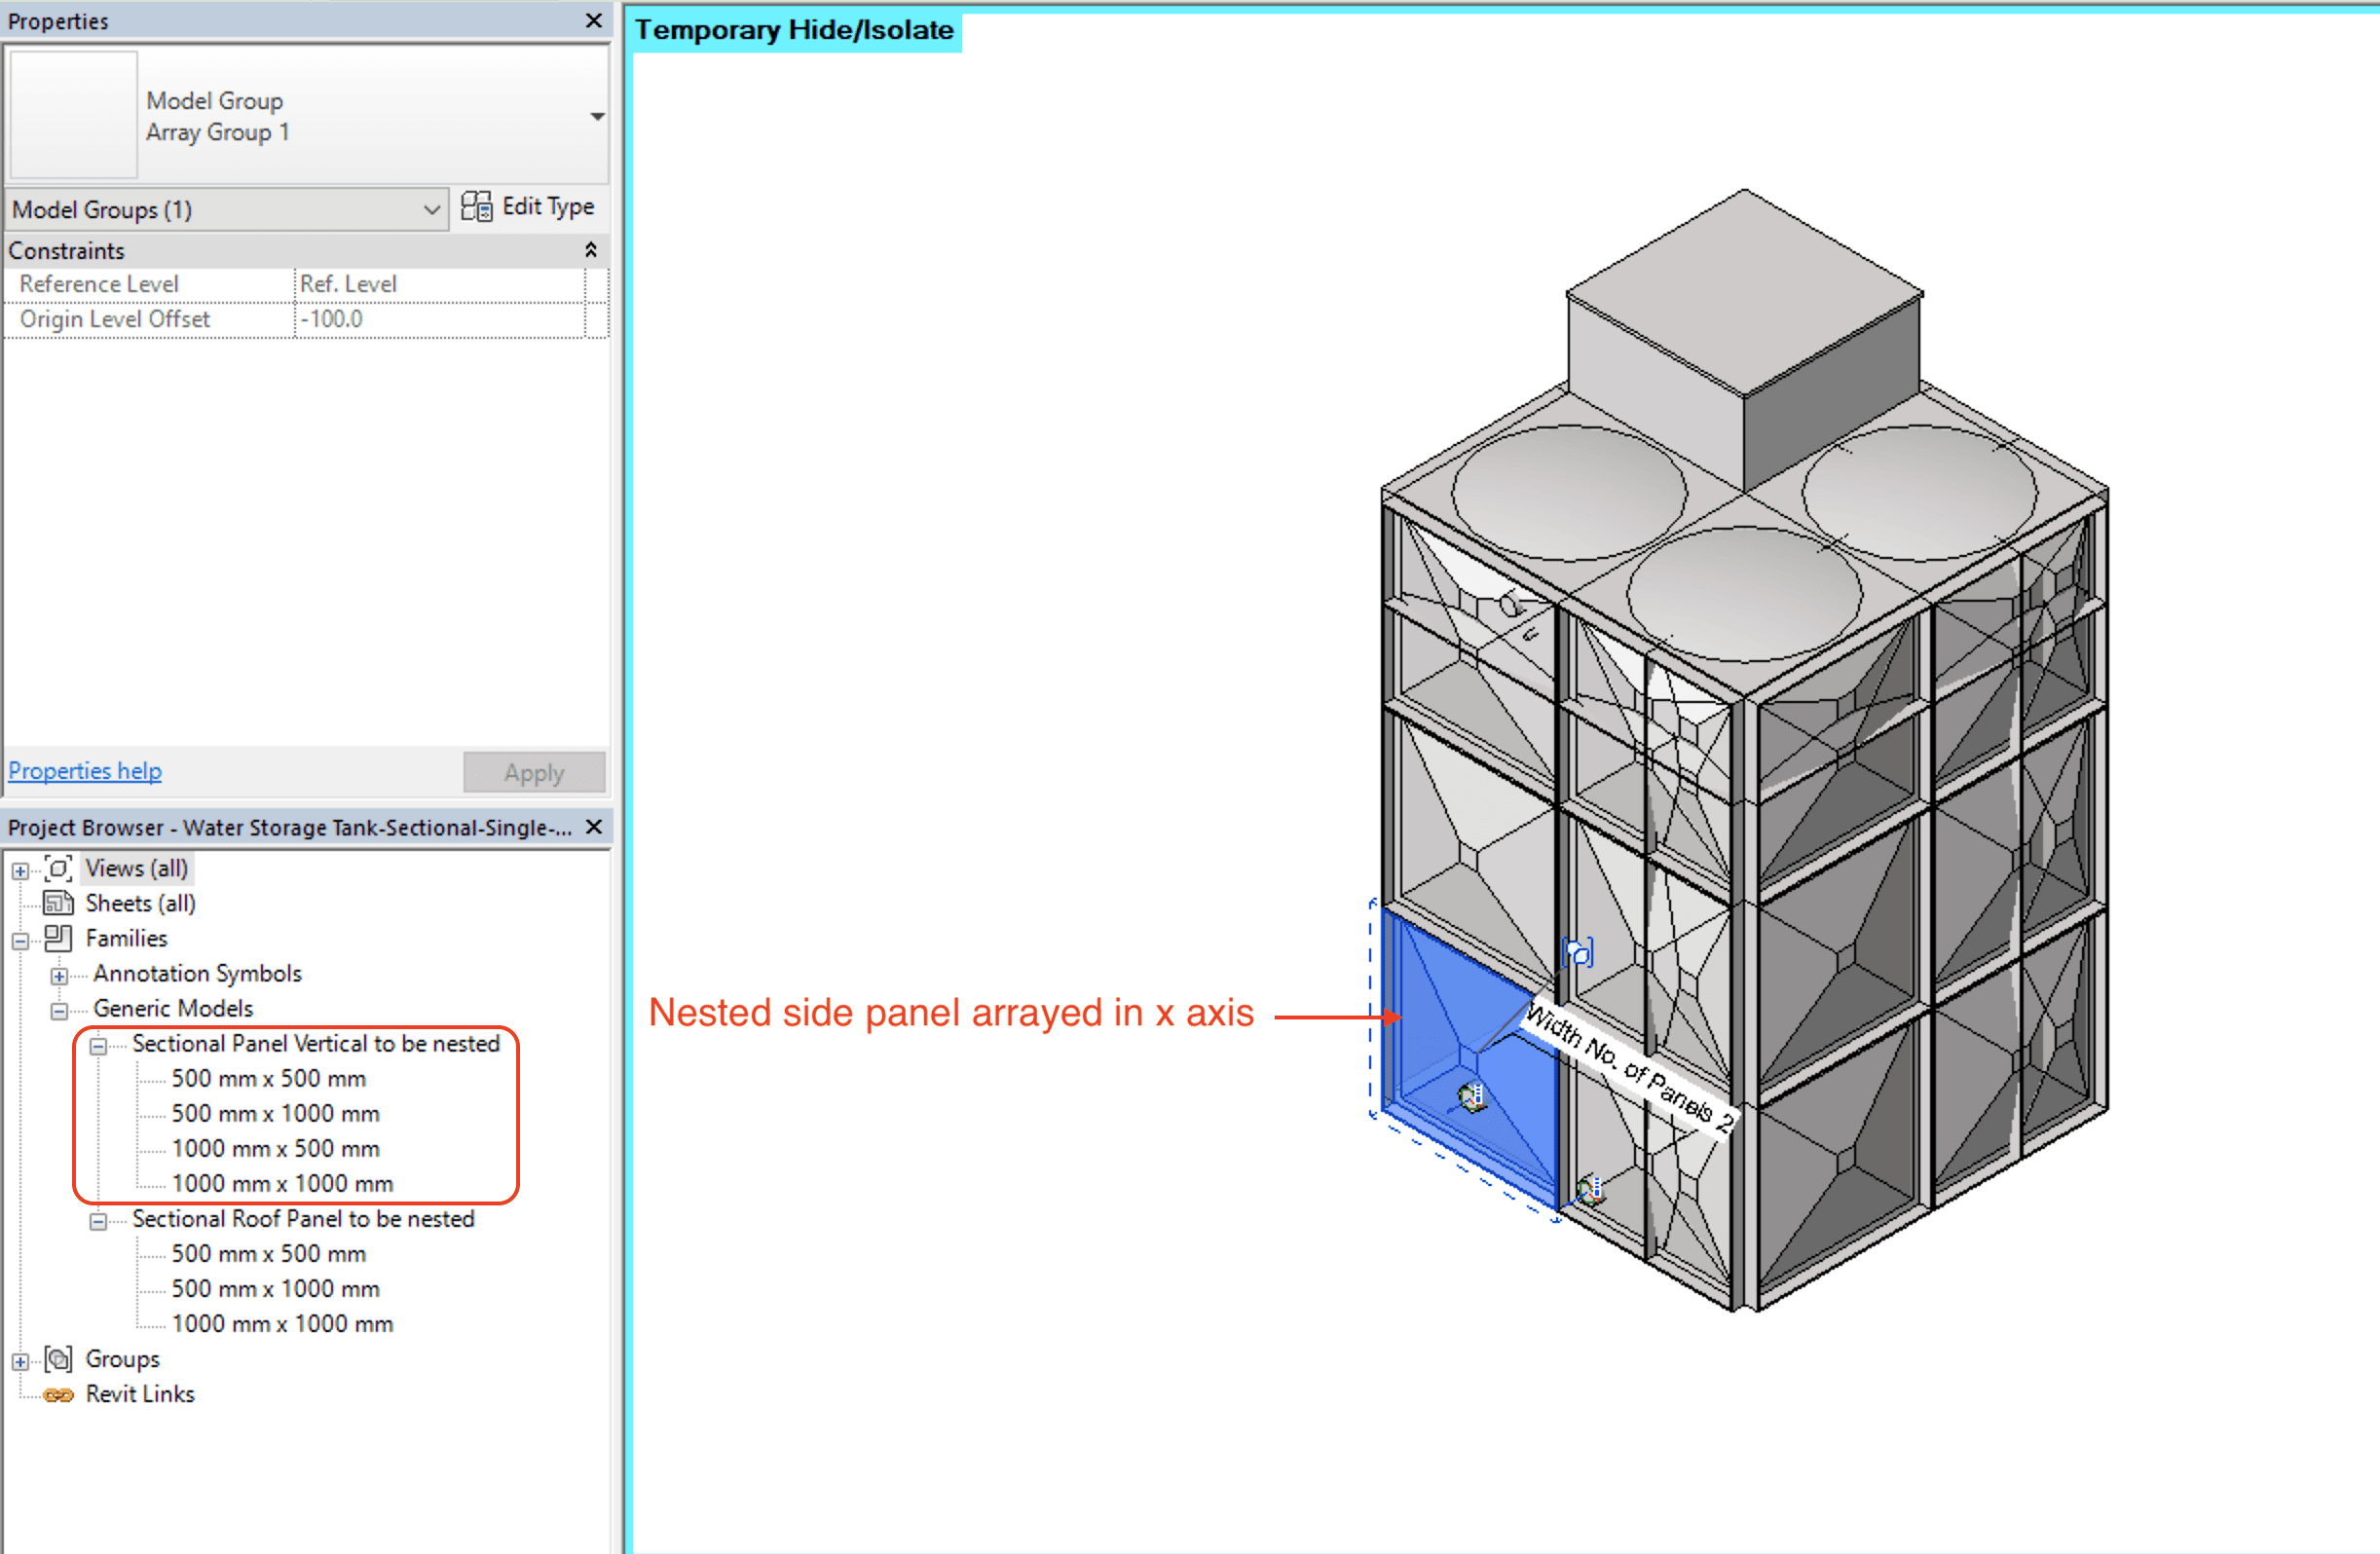
Nested side panel arrayed in one axis.
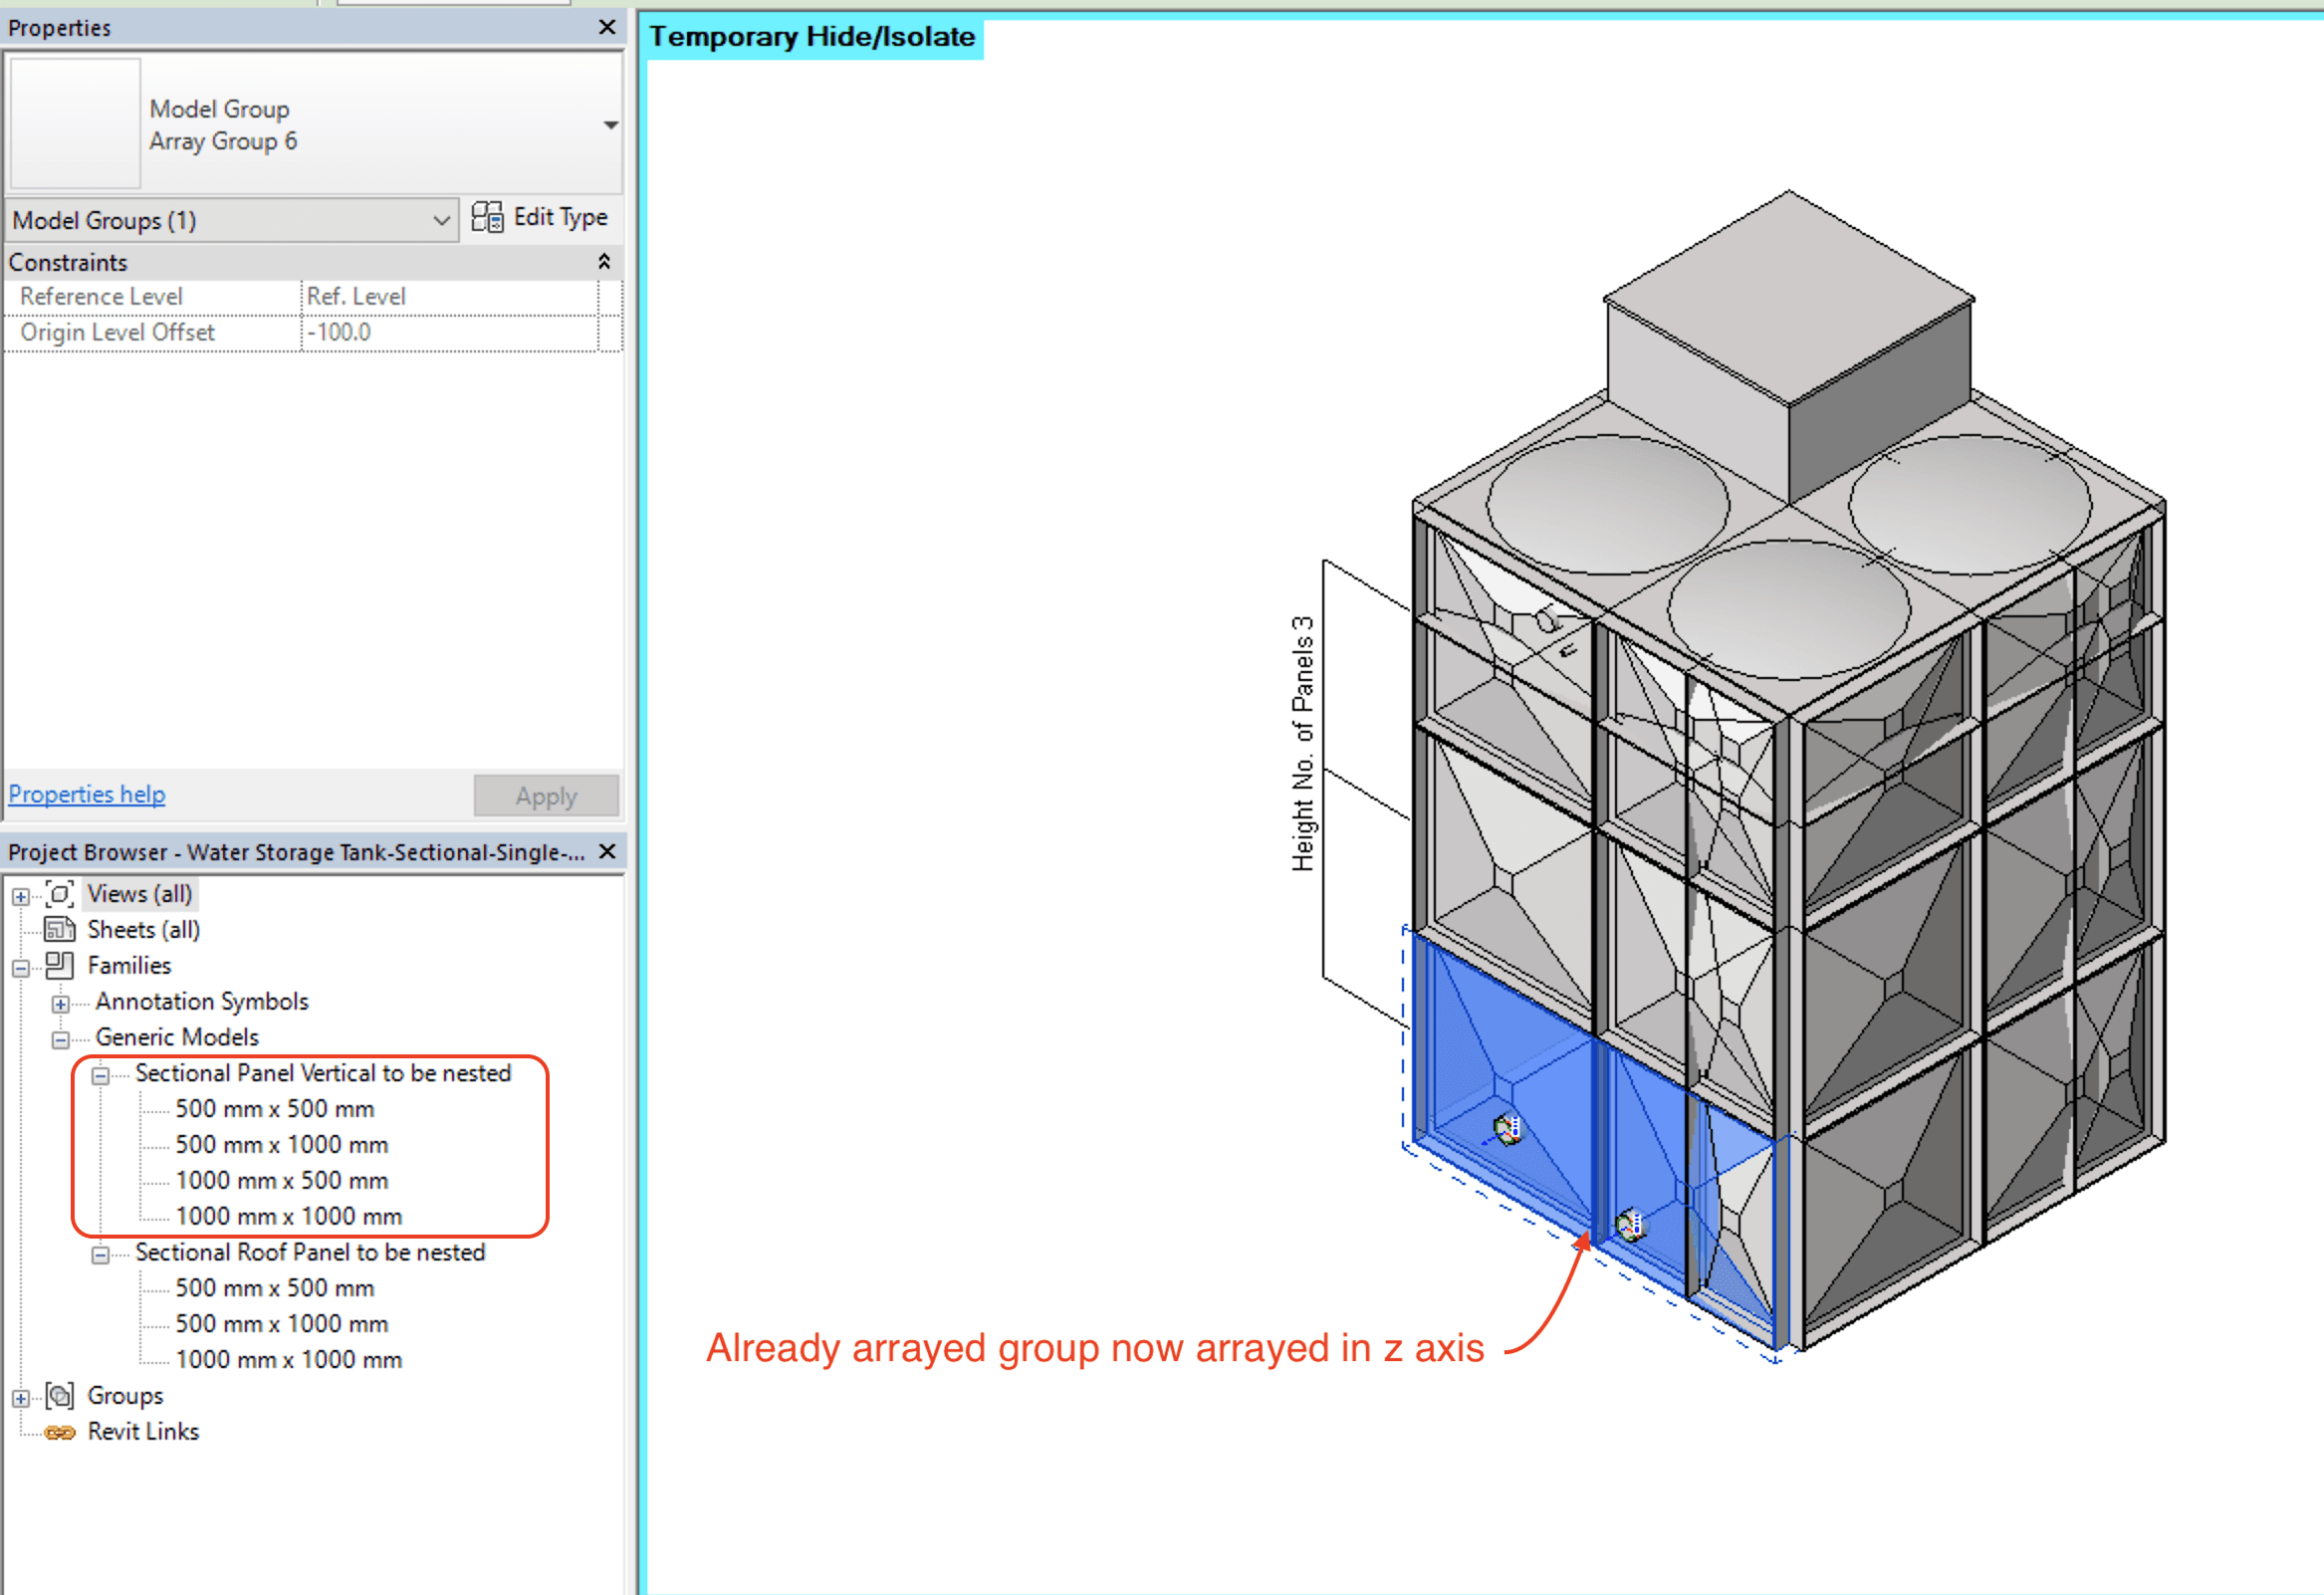
Arrayed group now arrayed in vertical axis.
The bulk of the work comes from one nested panel that includes types for 1m and 0.5m sizes and different installation methods. Each side is arrayed in one axis and then that group is arrayed vertically along the Z axis. Each side then has an array of half-panel types to allow for 0.5m tank intervals.
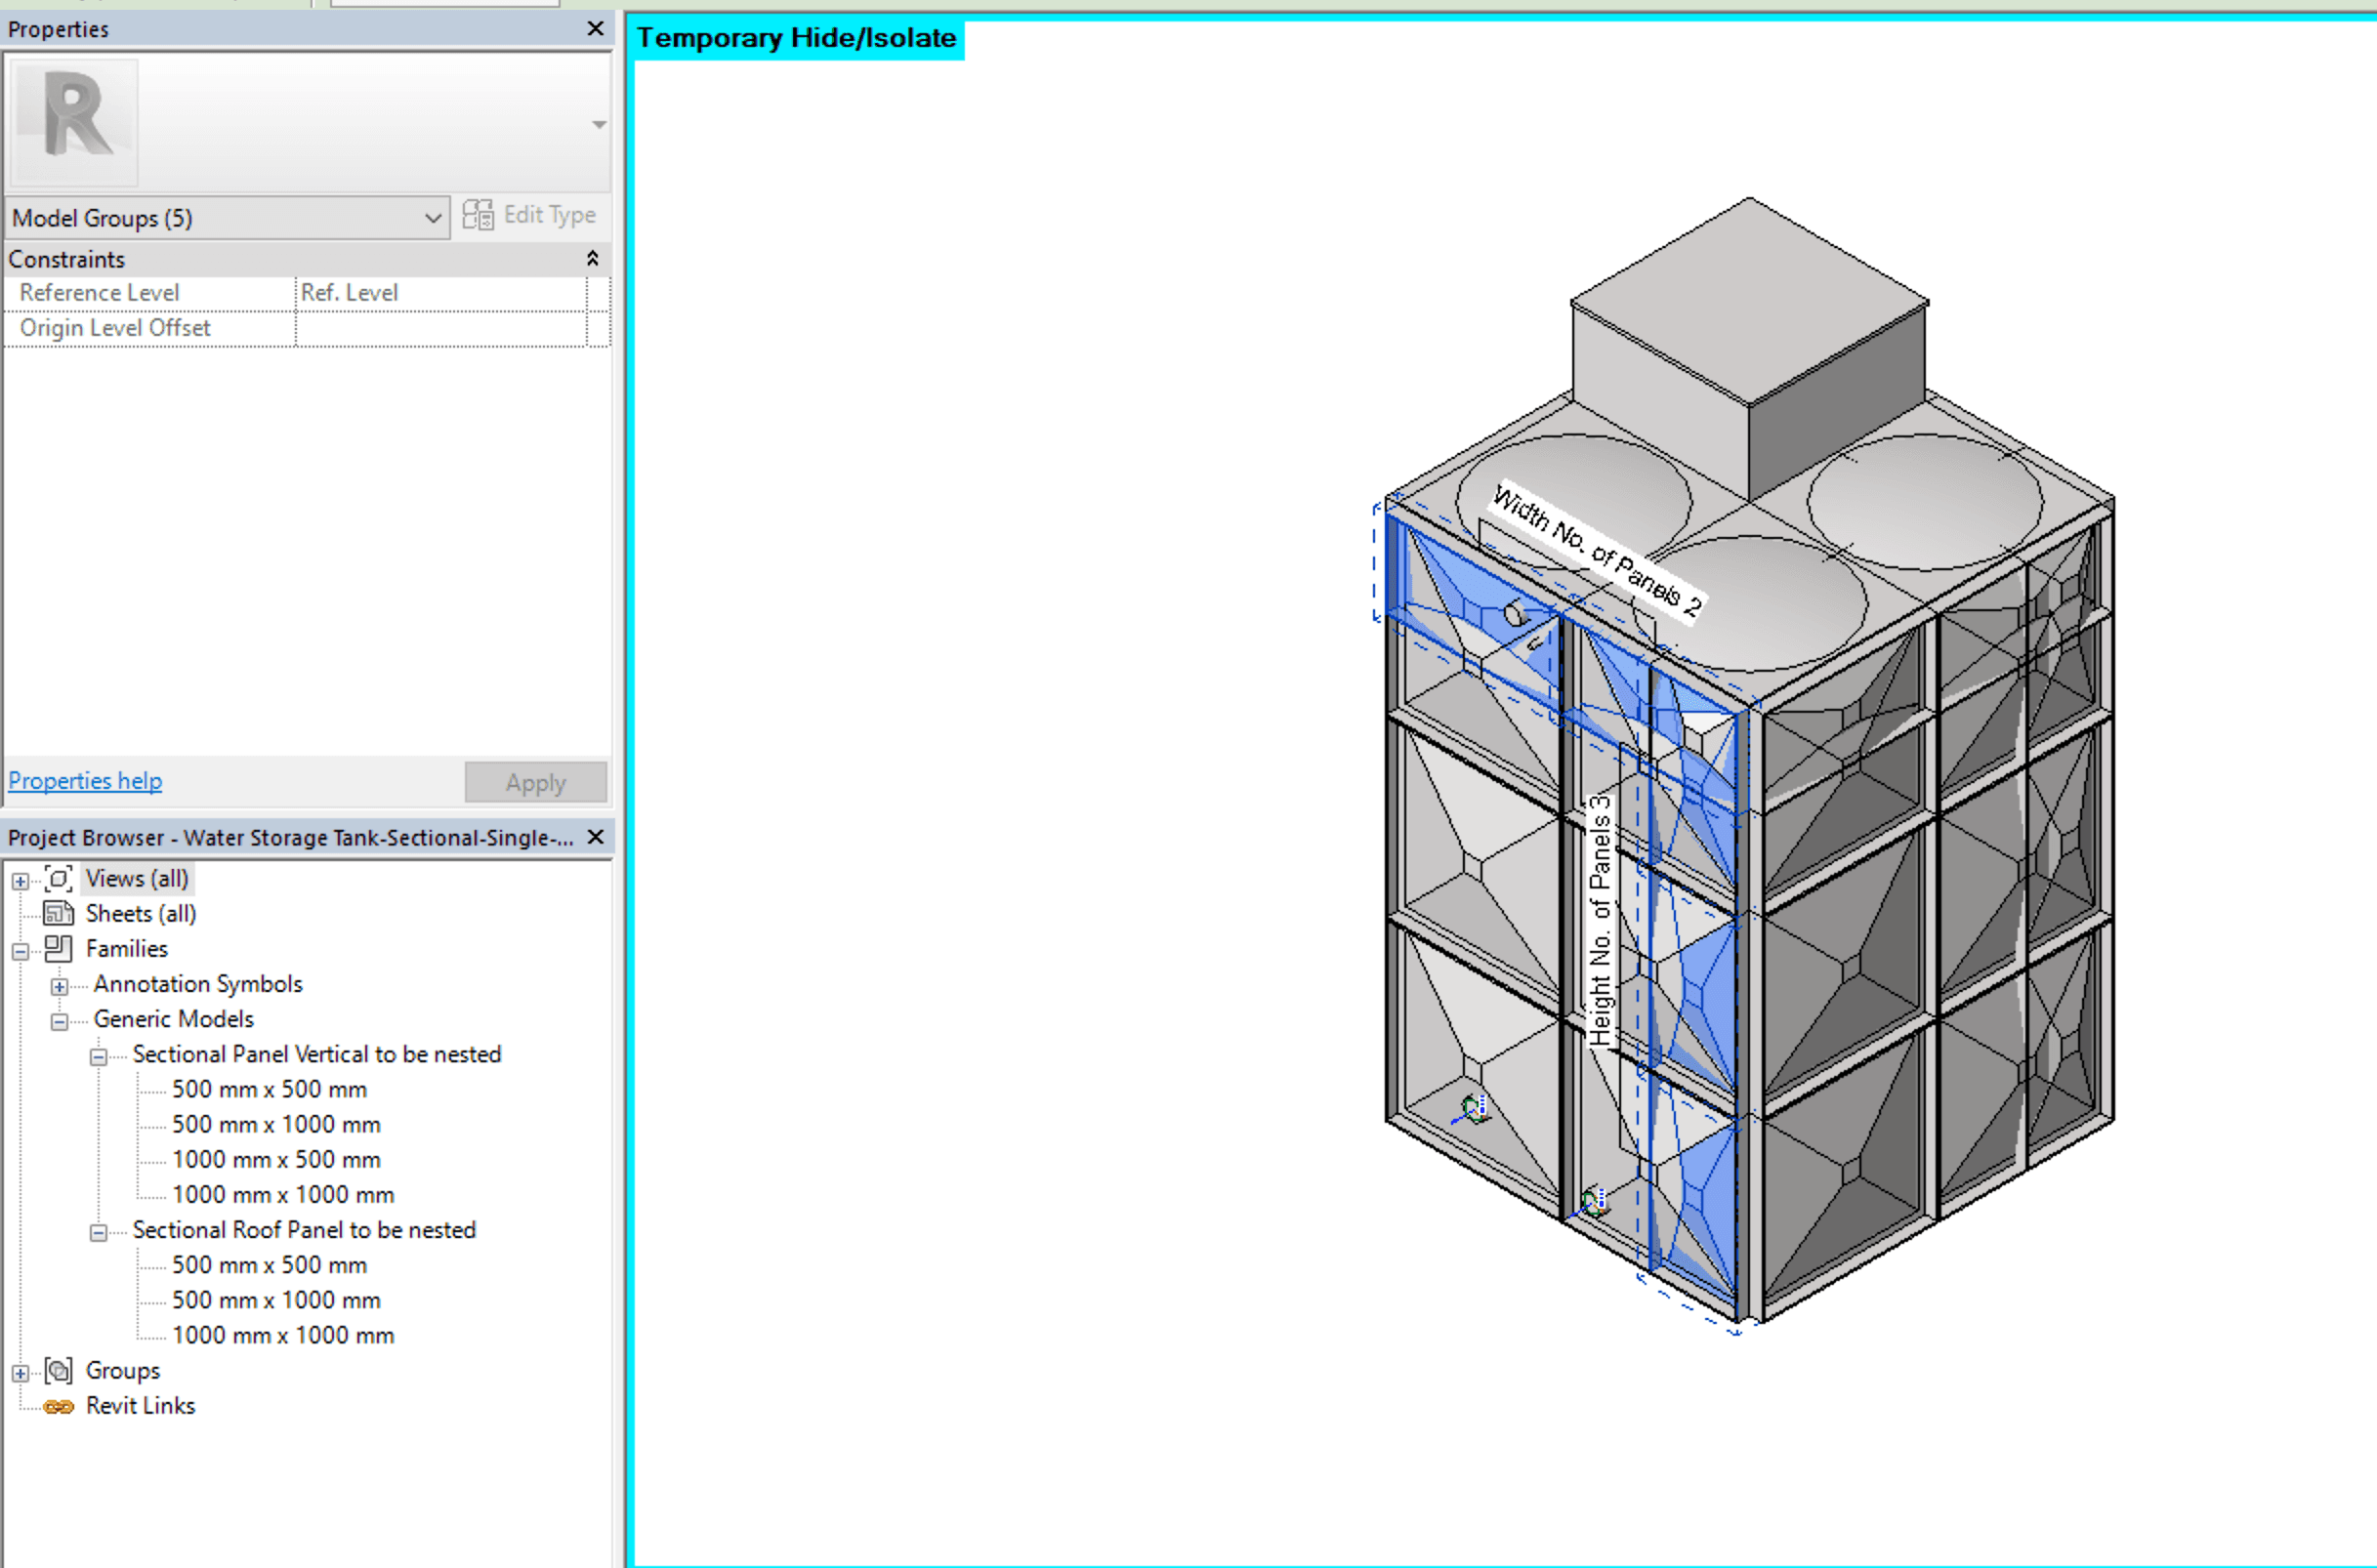
Separate arrayed half panels.
Separate instance of half panel.
We first created the solar panel array shown below back in 2017 and then adapted it to manufacturer specifics in 2021. This family emphasizes the need for nested elements because the panels can change pitch.
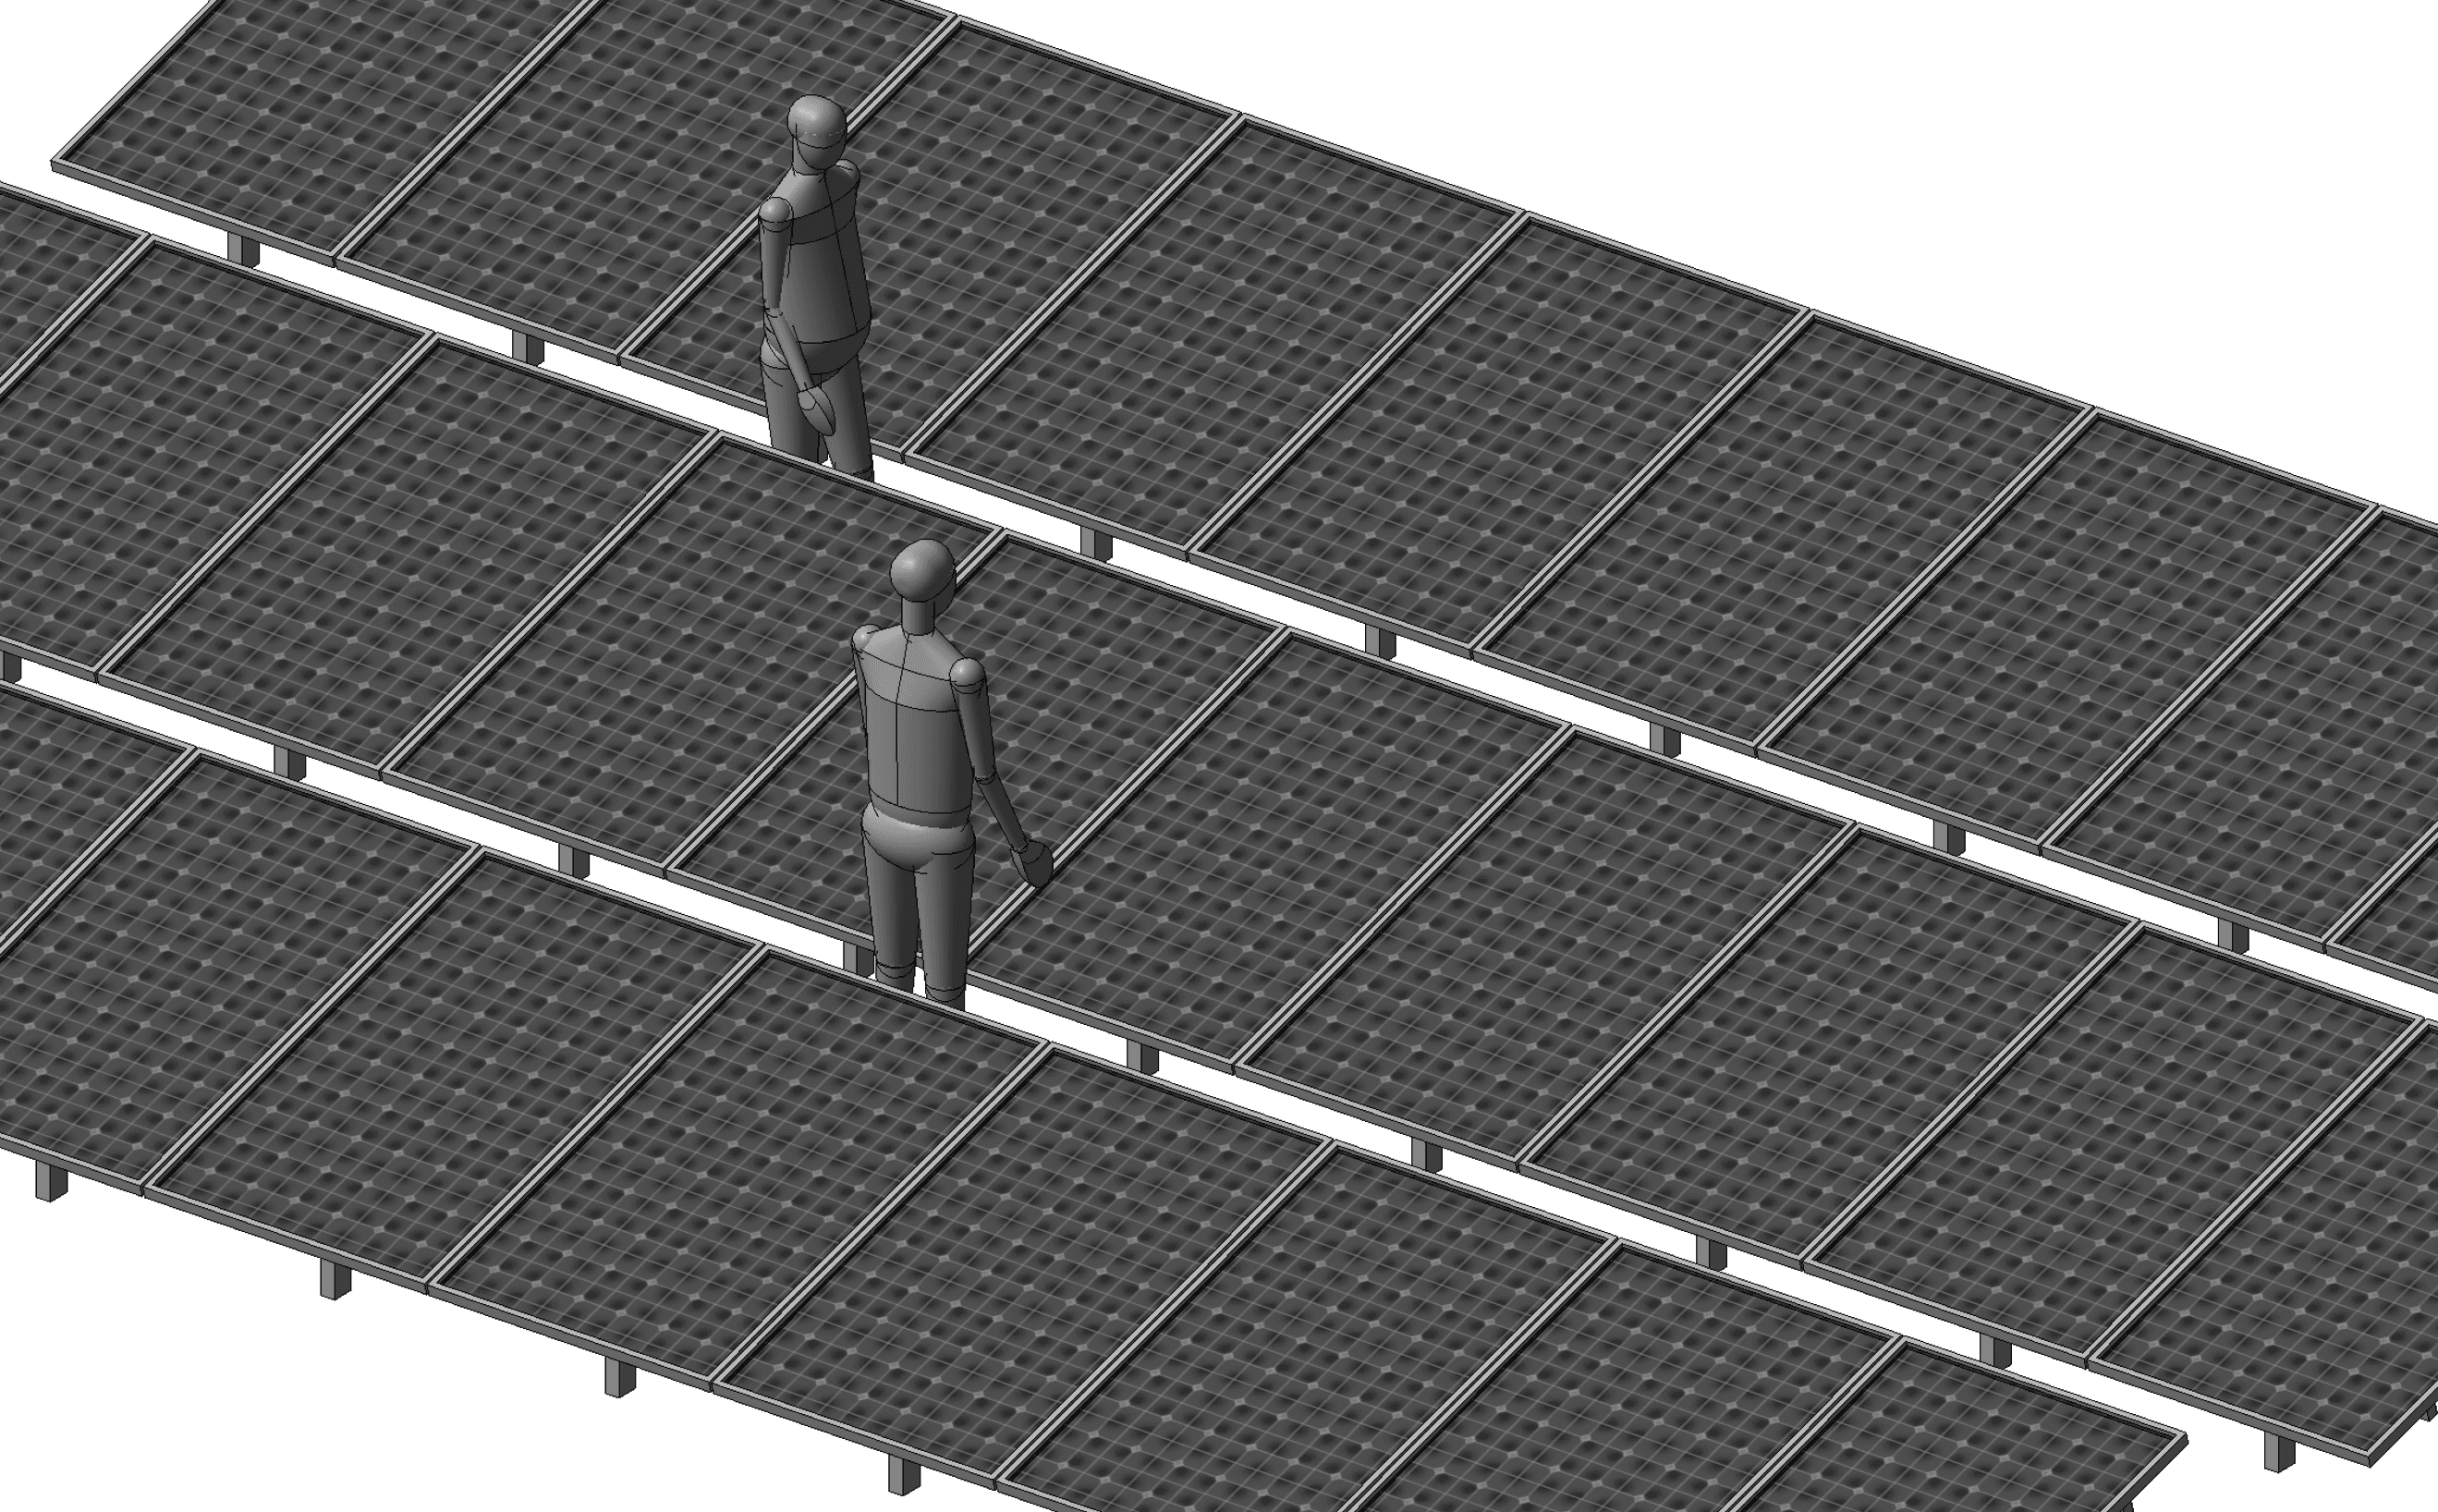
Solar panel array — a combination of Optigreen framing and LG panels.
The following chair array system is from one of our secondary school collections of free Revit content. Here we can look at the basic parameters that drive the array: the separation distance in the X and Y axis, and the array count in both directions. The length and width are then calculated from these values.
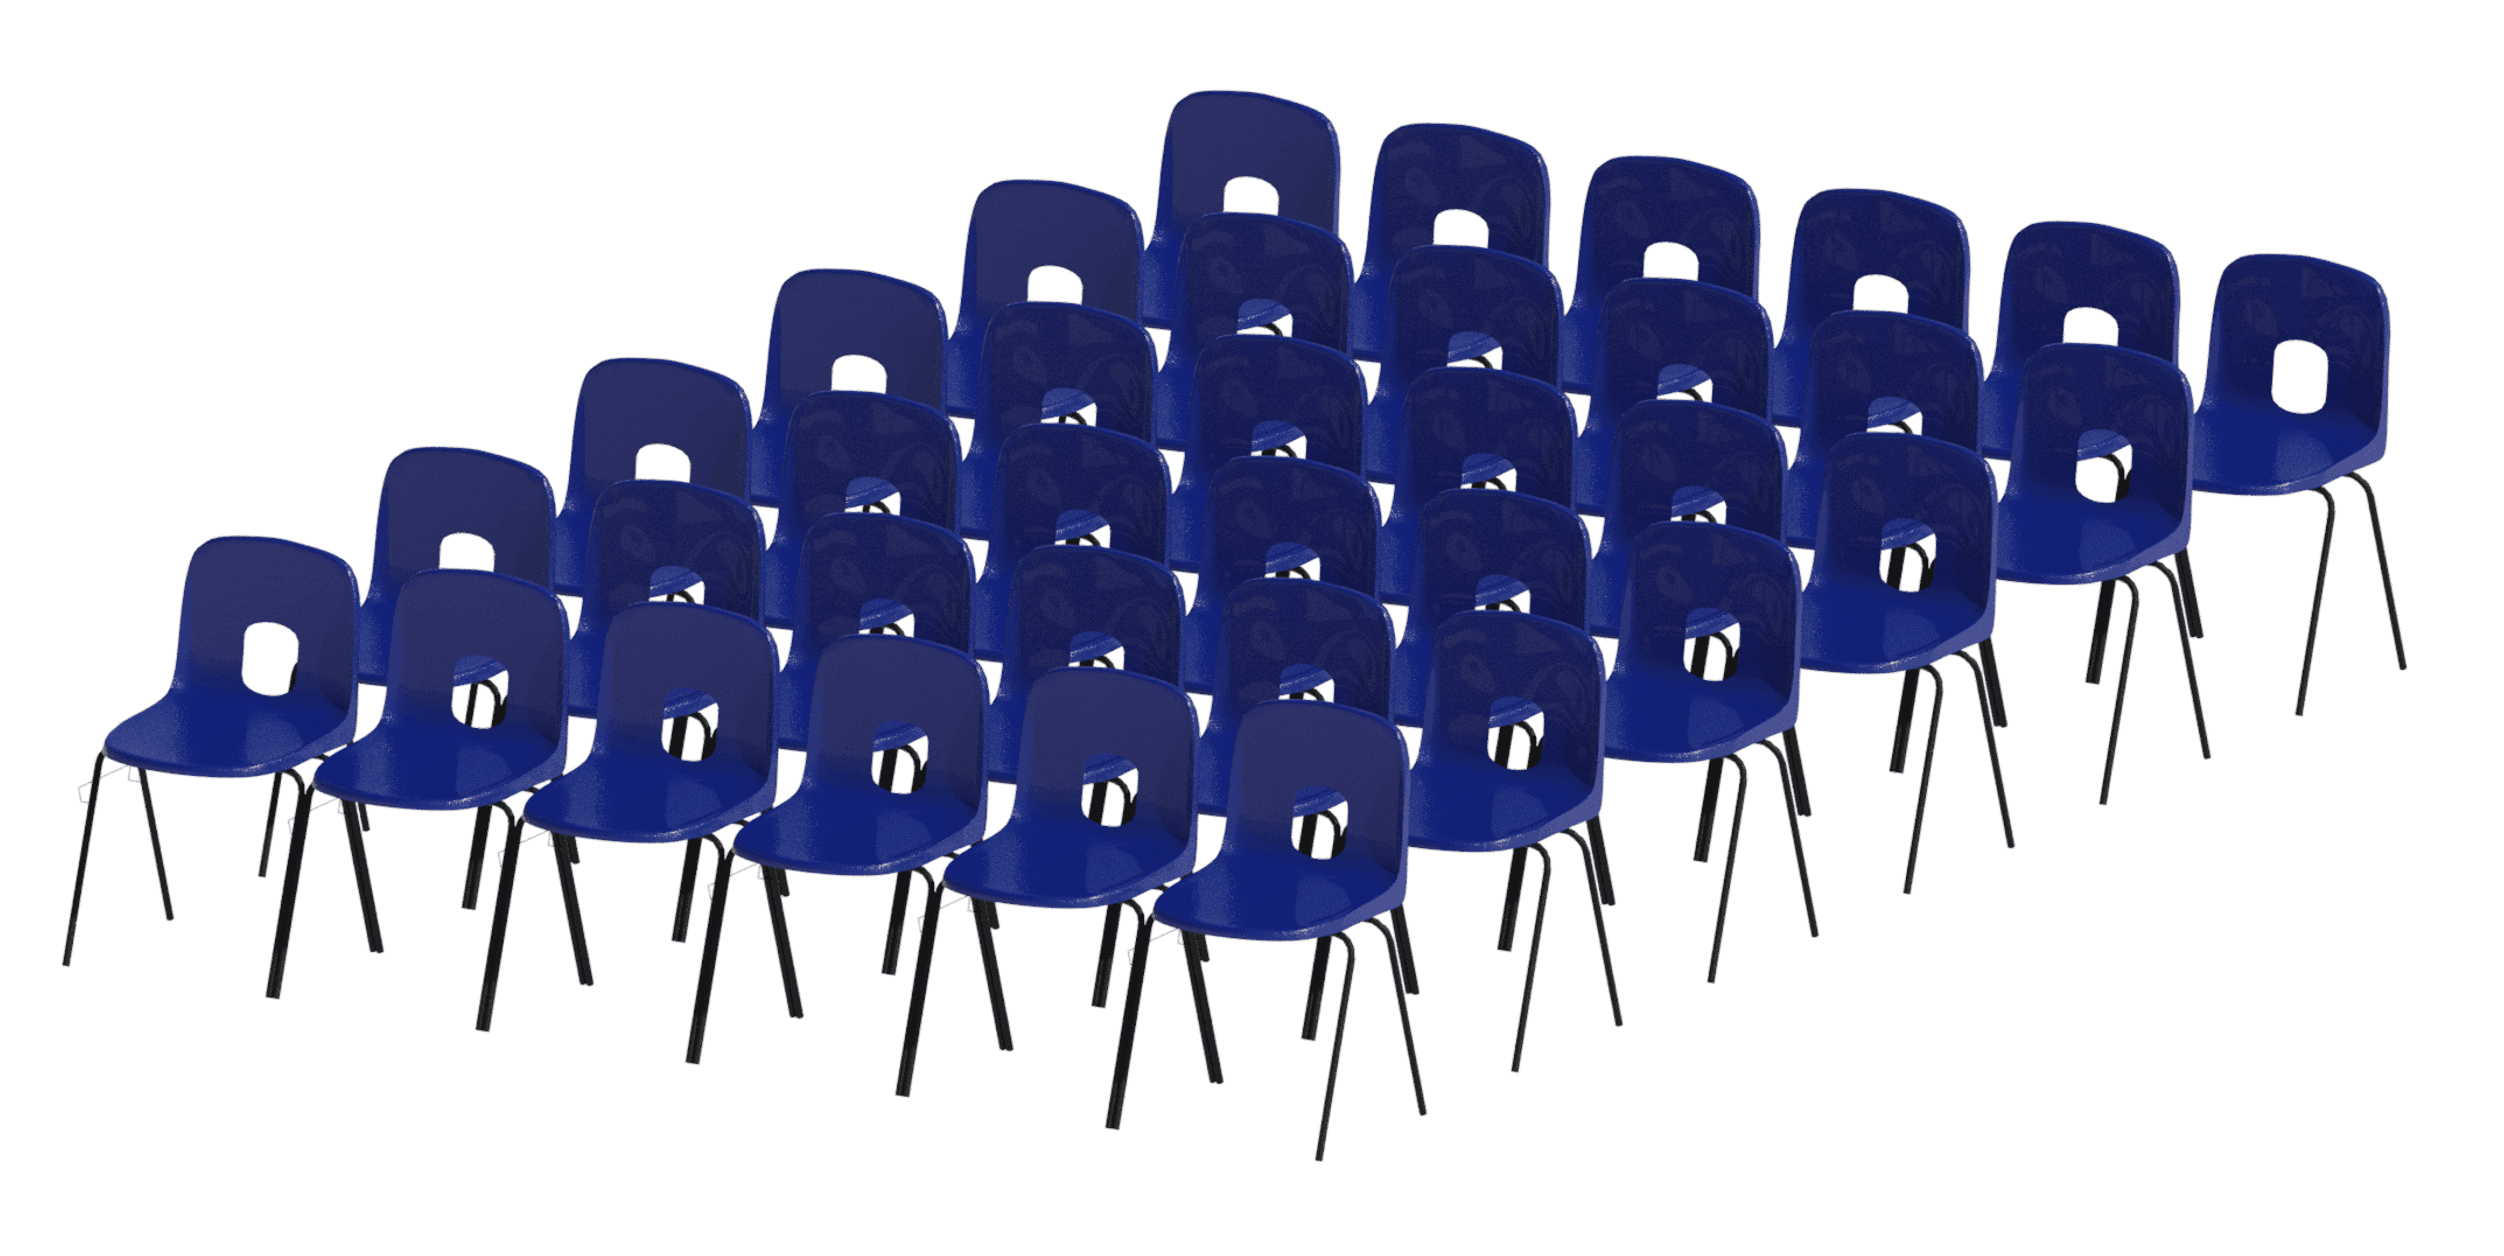
Chair array system can quickly populate an area.
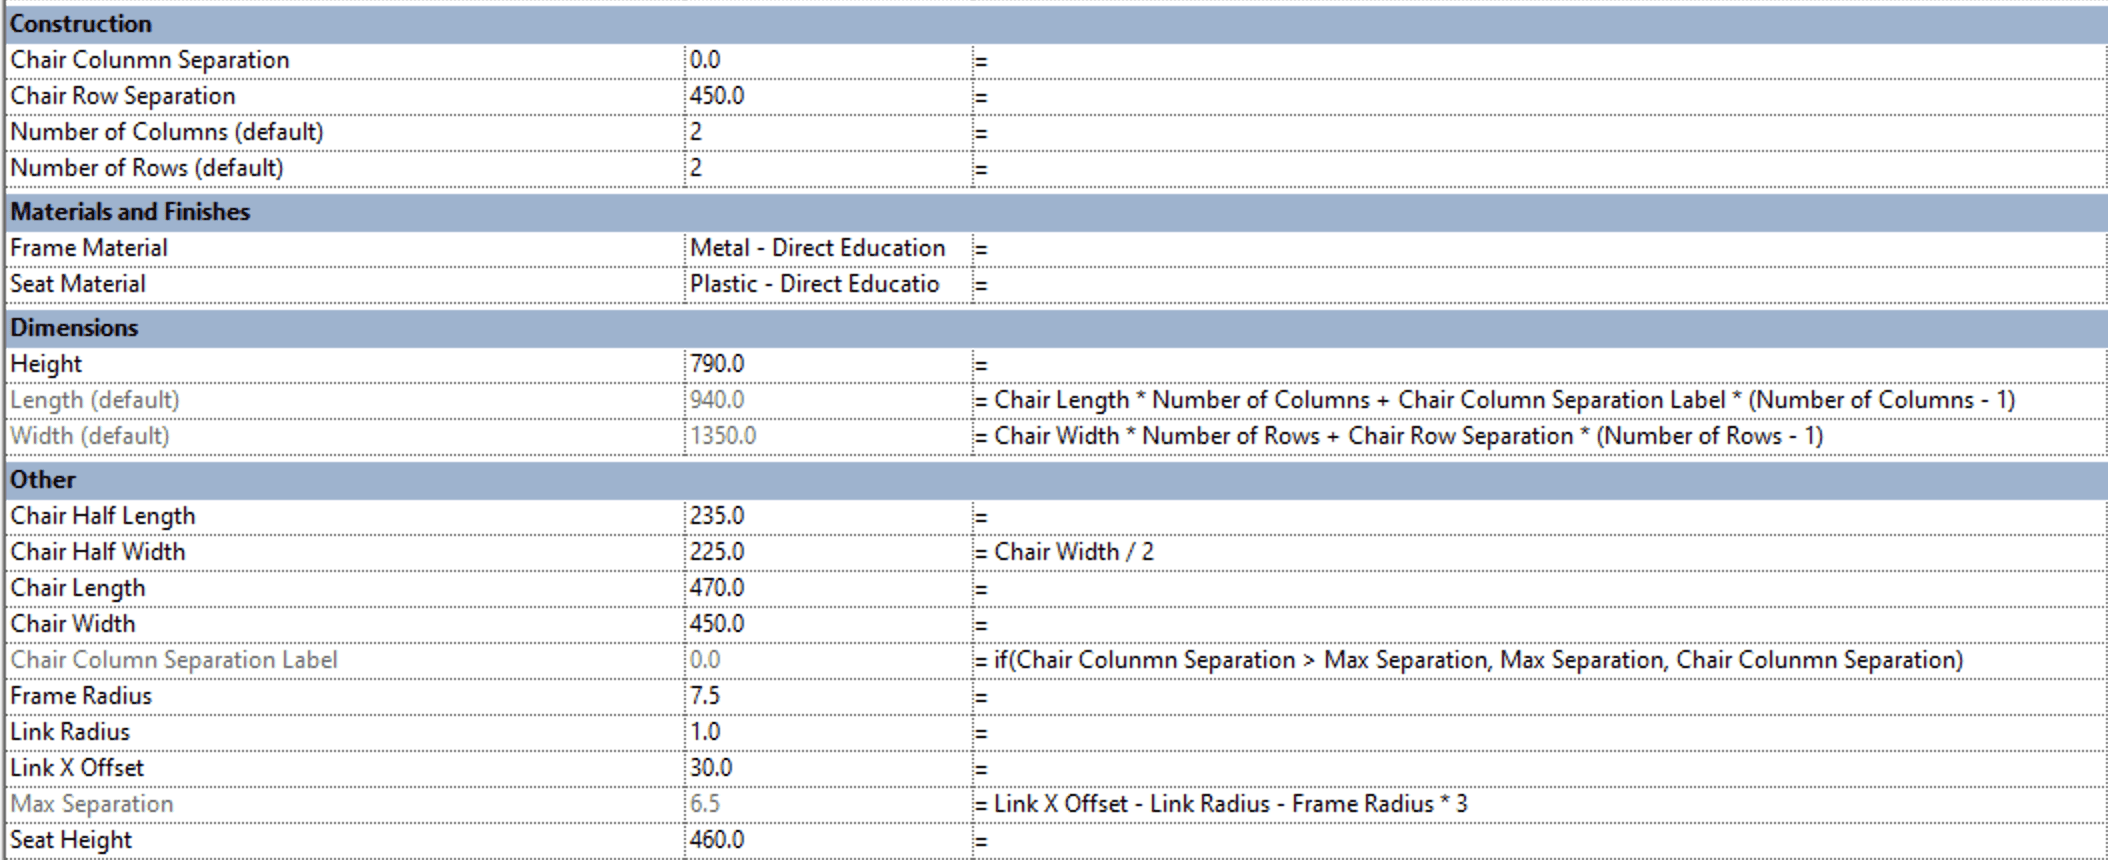
Chair array formulas driving parameters.
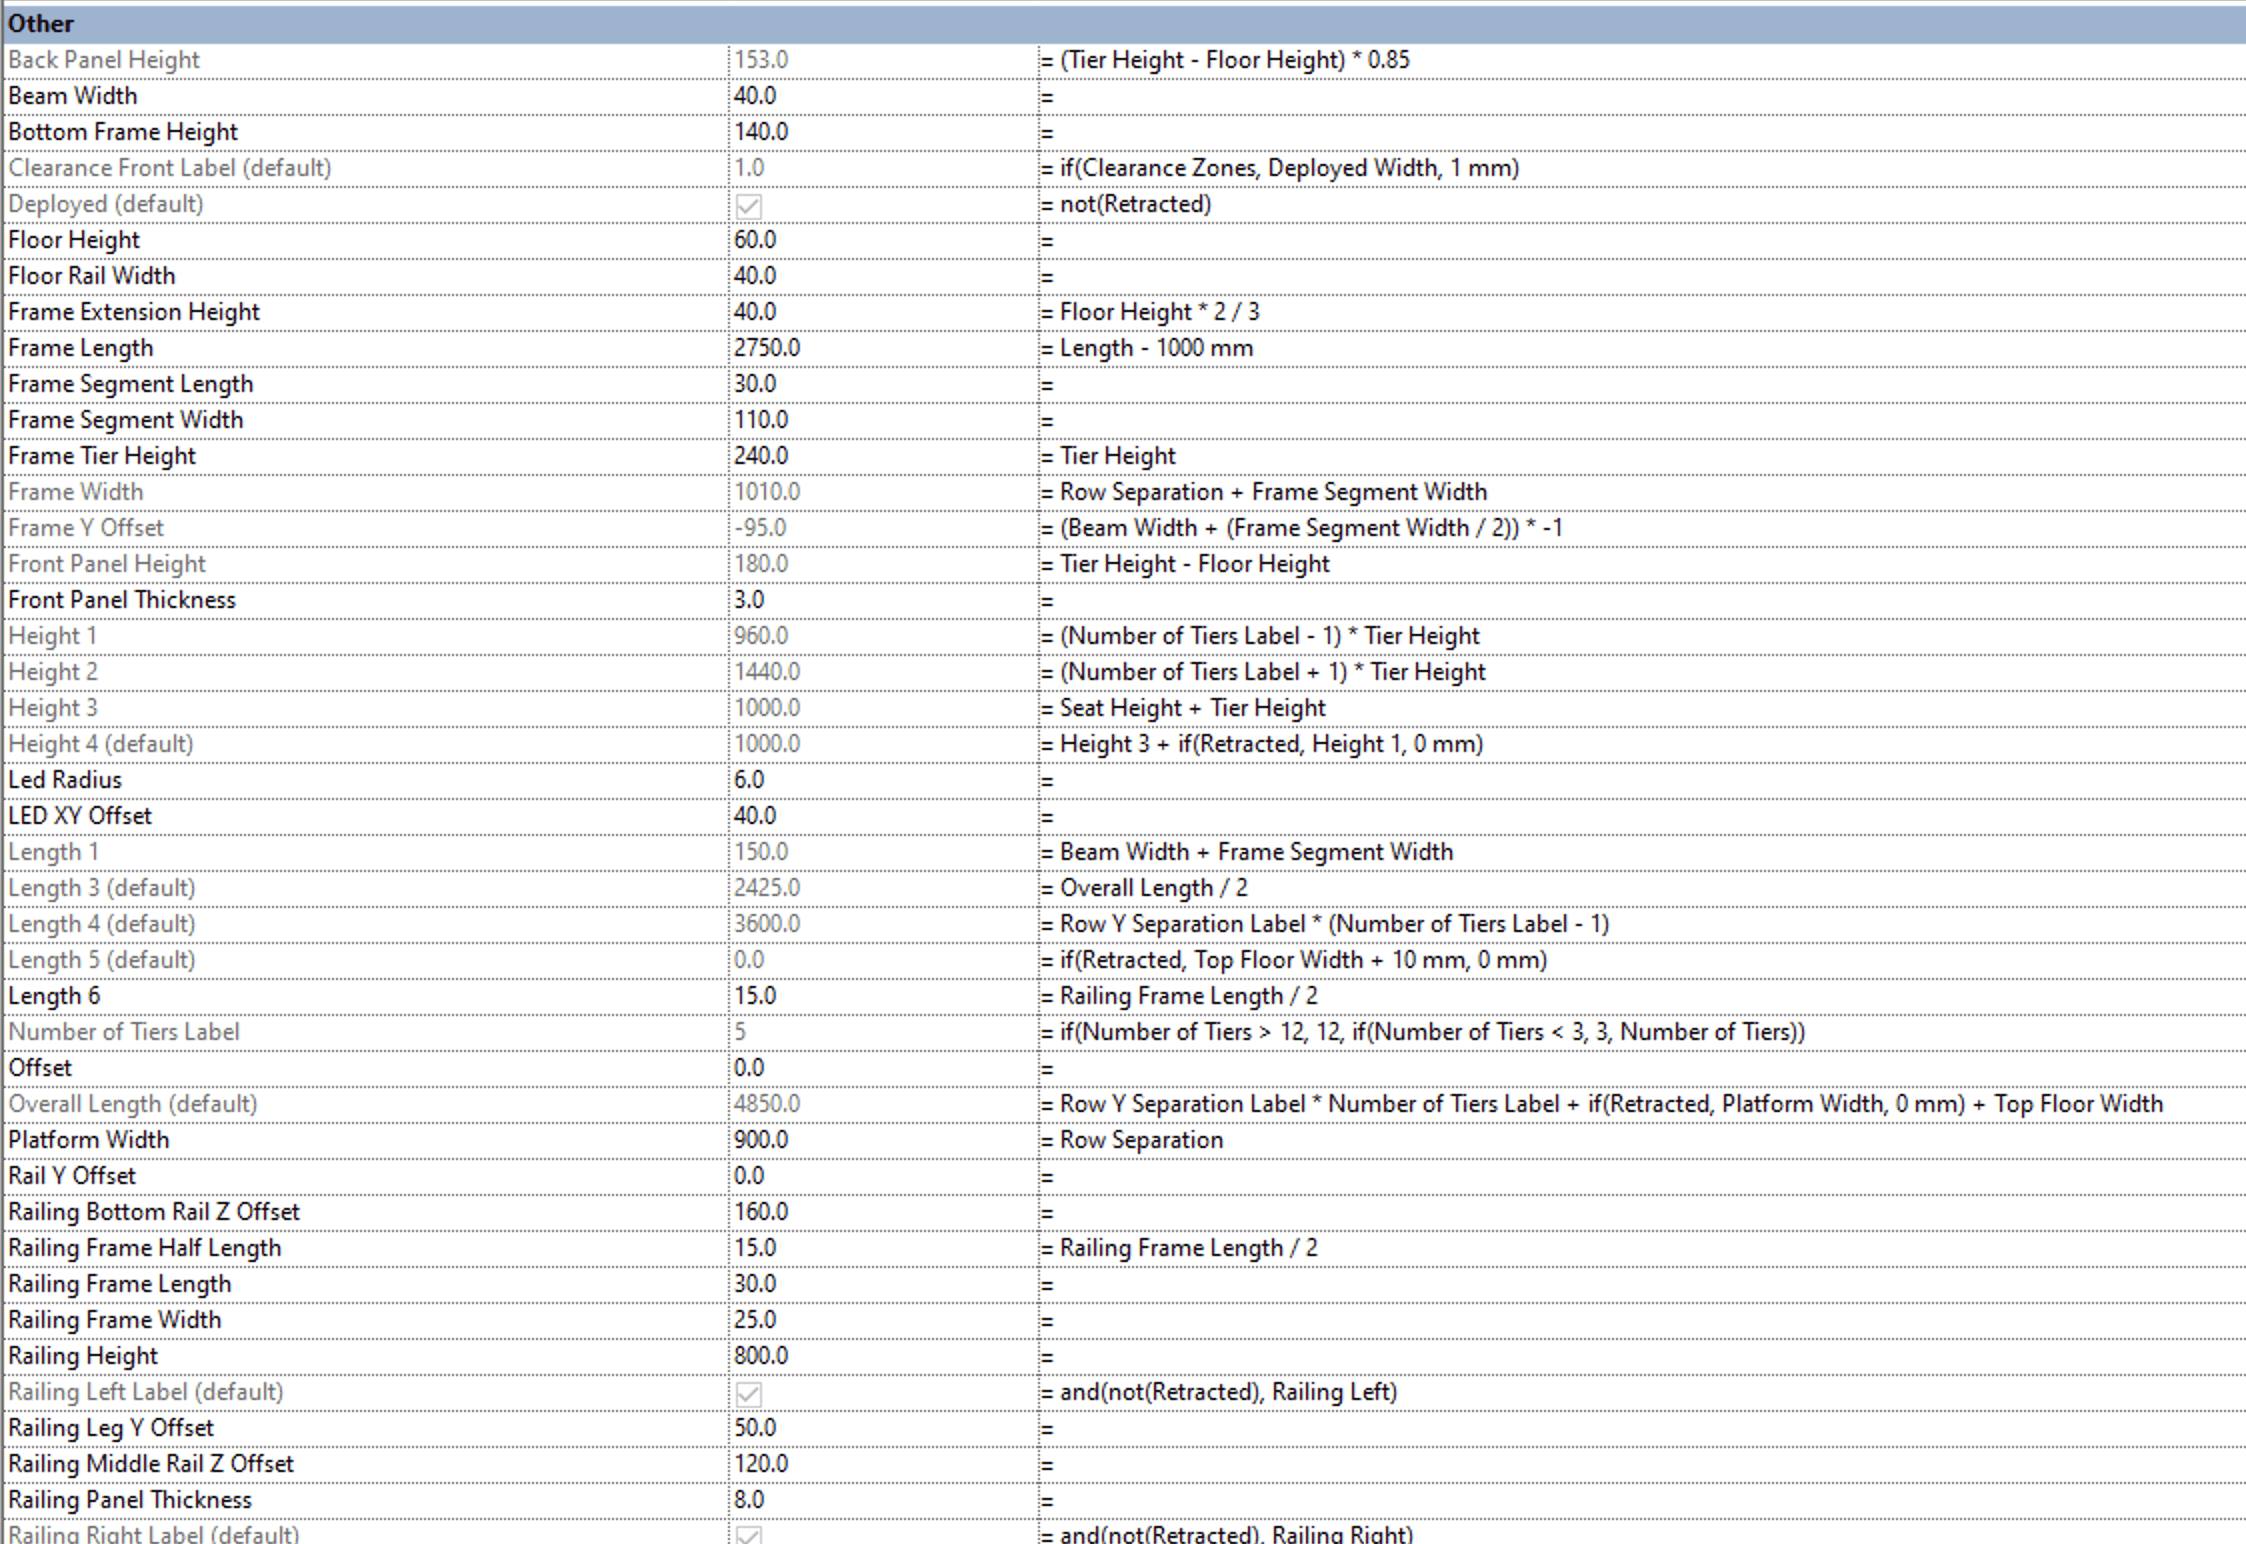
From the same collection, the retractable seating family shown below works slightly differently. We had to work with certain constraints set by the manufacturer, so this family uses predefined types and then instance options to change construction aspects such as handing and row separation. As opposed to the chair array previously mentioned, here the length is a set type value that now drives formulas and other values within the family.
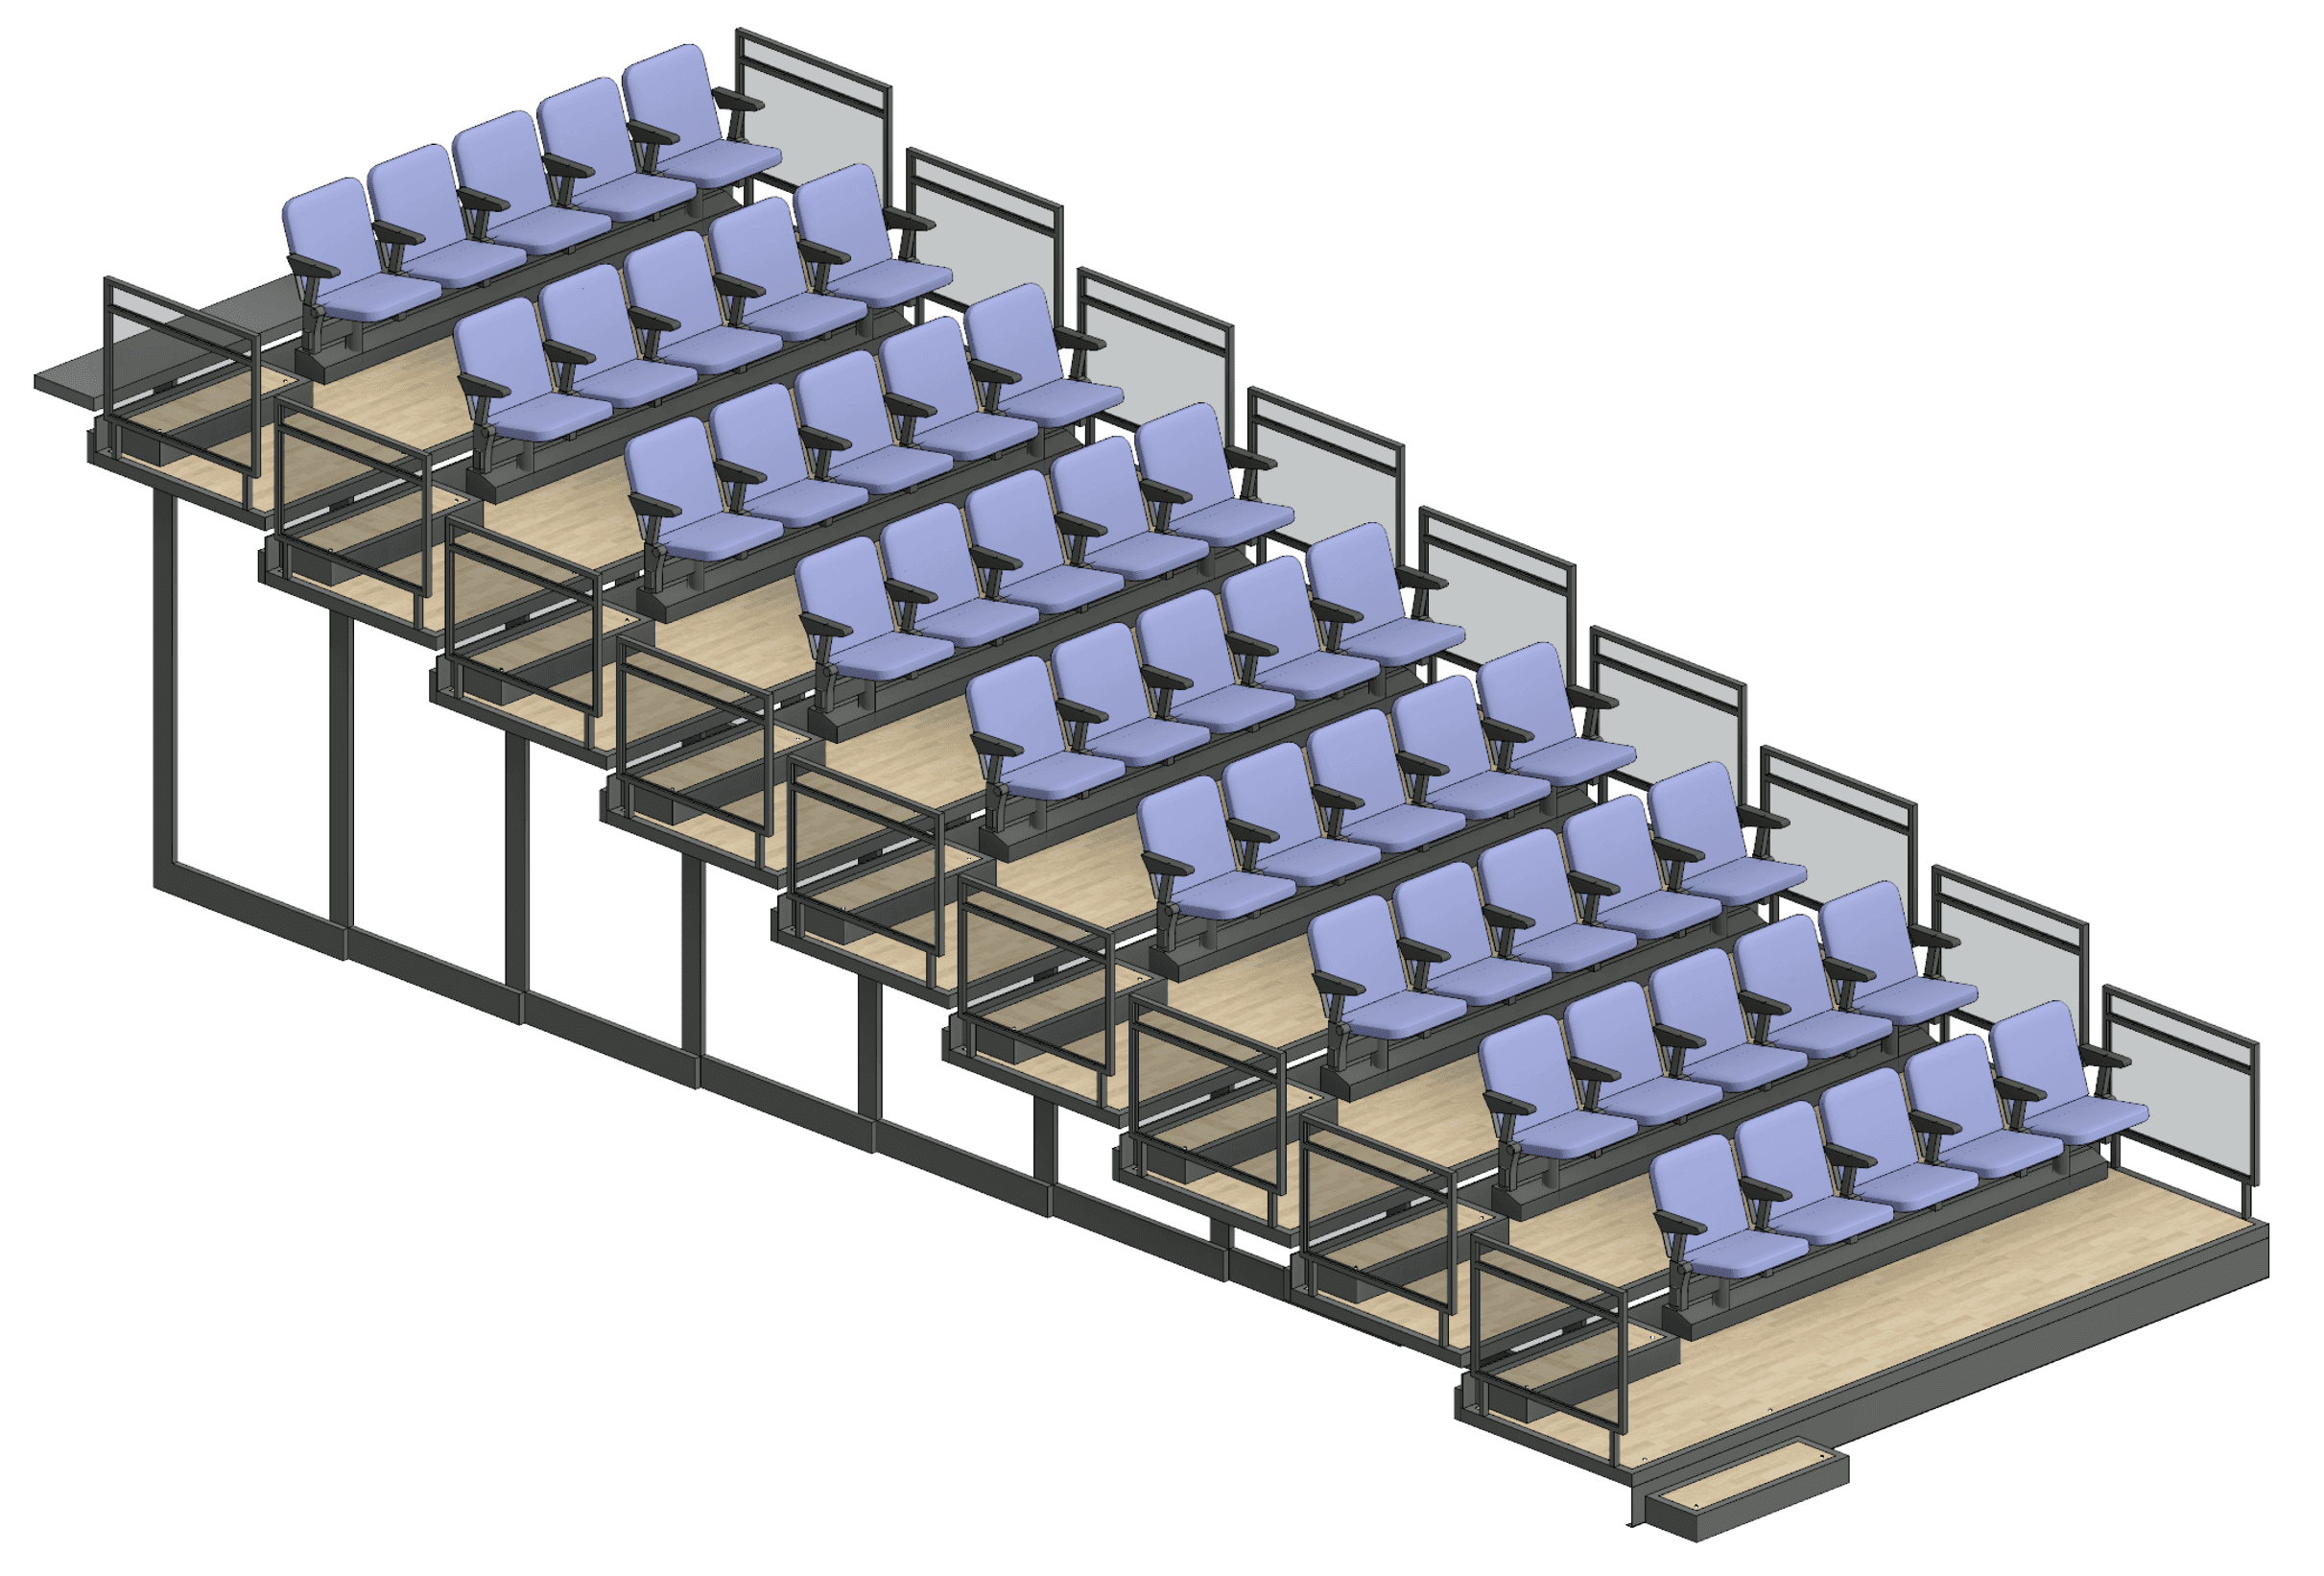
Retractable seating family with instance-based design options.
Retractable seating family with instance-based design options.
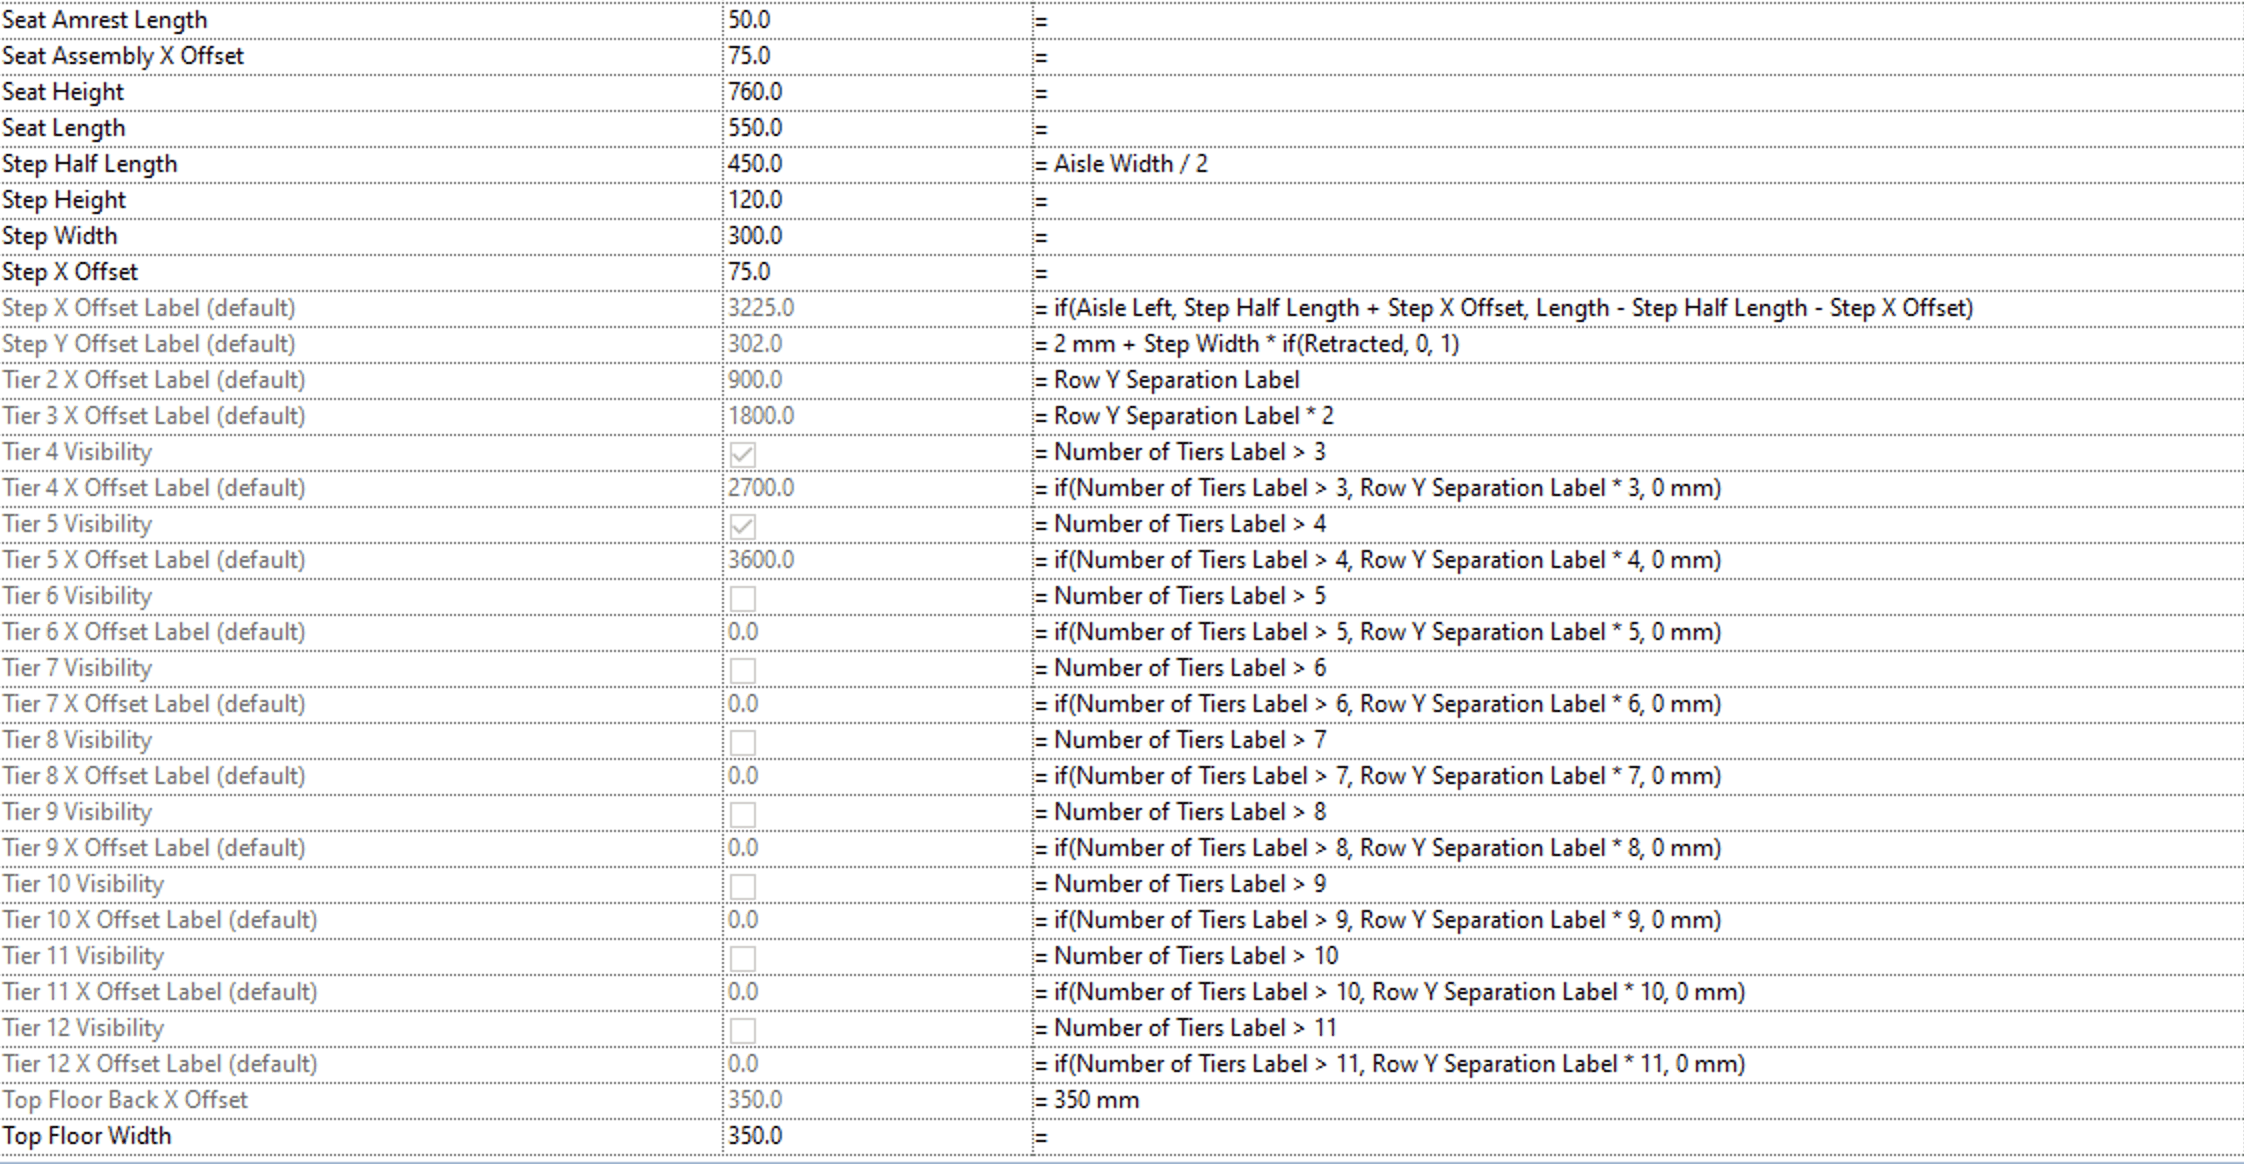
Retractable seating parameters with more complex formulas.
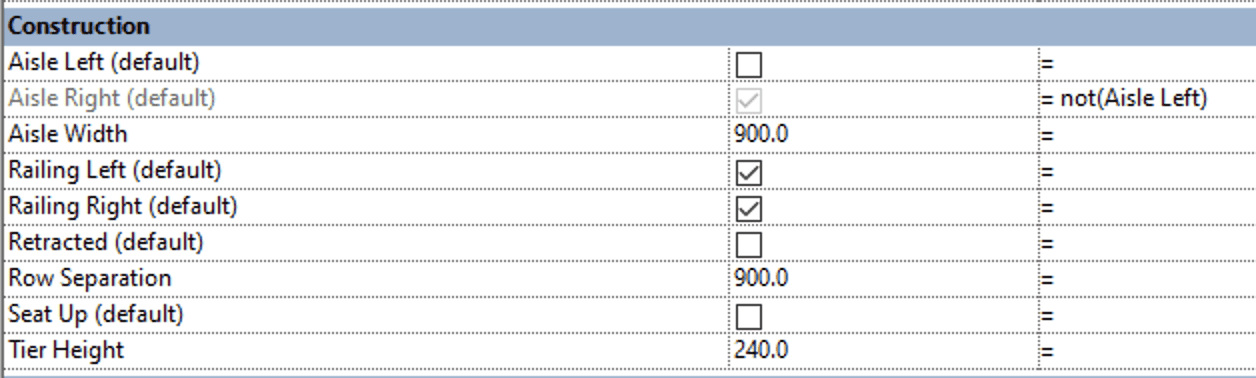
Instance based design options.
So there we have it. As you can see, arrays are a crucial part of building flexible Revit families. But it pays to think carefully about when and how to use them to achieve your desired results.
There are different ways of approaching arrays in Revit. When it comes to using arrays within Revit families, often the quickest and easiest options will end up restricting your content’s flexibility and functionality within Revit projects.
Here we take a look at when it makes sense to use arrays in Revit content, how to avoid some common mistakes with arrays, and a behind-the-scenes view of some decisions we’ve made in the past when working with arrays in Revit families we’ve created.
When not to array.
First it’s important to consider when it actually makes sense to use an array within a Revit family.
The whole point of an array is to achieve flexibility in the count and spacing of an item. If you need the count of an item to match just one or two specific numbers, then it probably makes sense just to copy that item and use visibility settings rather than go to the trouble of creating an array.
Remember: You can’t have the value of an array count equal to one. The minimum value is two.
In addition, the justification for building an array is directly proportional to its frequency of use. If you make an array that’s only going to be used twice in five years, then you could argue whether it’s worth making it in the first place.
If you’re going to array, do it the right way.
It's often tempting to take a shortcut and try to array an in-place component. When doing this, the option for grouping is turned on by default.
Grouping option is selected by default when arraying an in-place component.
But be careful. If you group in-place components, you'll run into several problems. The main one is not having the option to add masking regions to the group, with symbolic lines left as the only option.
Plan view in family editor showing symbolic lines as the only available option for 2D geometry.
So if you want to have 2D geometry, you'll need to make additional arrays for front and side views. Before you know it, the family will start to get quite muddled. Then the more you flex (and possibly array in two directions), the more chance you'll have of losing association with reference planes and alignment. Instead of saving yourself time, you’ll end up wasting time trying to manage this mess.
If arrayed elements need to flex, use nested families.
Over the past 15 years of content creation, we've always tried hard to limit the use of nested elements.
However, arrays are one area where nesting is often the best approach. Nesting provides a “layer” where family attributes, such as rotating elements or 2D geometry, can live and function safely without the array breaking them.
For example, see the basic rotating reference line below. The angle and length of this line are constrained by parameters and can flex easily. The line itself is locked to the reference planes so it will always rotate around the same point of origin.
Reference line locked in position and constrained.
Reference line flexes in length and rotation.
Below we’ve added an extrusion hosted by the reference plane:
Geometry hosted by reference line.
Geometry still flexes.
Everything flexes fine. Next, we turn to arraying this built-in-place item.
Without selecting the reference line in the array, you will get this error message.
Error message when arraying an in-place element without its associated reference line.
This is happening because the geometry is hosted to the reference lines which are not part of the array, so the geometry loses its hosting and constraint.
Now we array both the reference line and geometry together.
Plan view showing arrayed geometry and reference line.
Everything at first seems to be ok in the plan view. But when adding a parameter to control the number in the array, the geometry flips.
Front view showing the first geometry has flipped.
After adding a parameter to control the count, the geometry flips and the array collectively moves.
Trying to make this work is just beating your head against a generic OOTB wall.
Aligning and locking the array.
You can align and lock the arrays using the geometry itself, but the problem still remains because changing the rotation or length of the geometry breaks the array.
Nesting a family is the only safe way to array flexible and rotating elements.
Some examples from our own work.
Below is an image of our Revit family for the Cabero dry air cooler. We were asked to create this family by B-Global Tech when the family they were provided with didn’t meet their needs.
There are 24 fans on top of the unit. The fan is a nested element. In this instance, we didn’t array the fan because there is only one type. Even though the manufacturer may make models with a higher or lower number of fans, the number of rows is always two, so an array in two directions isn’t justified. Also, an array would make this family heavier in file size, and this is always an important consideration.
Cabero dry air cooler with nested and copied fan.
Now, let's take a look at some of the Revit families we’ve created that do use arrays. First up is a sectional water tank we created back in 2011 that has always been one of my favorites. We work with quite a few engineering companies, and this sectional water tank and its split tank version are a key part of the design for domestic water and fire protection systems.
Nested side panel arrayed in one axis.
Arrayed group now arrayed in vertical axis.
The bulk of the work comes from one nested panel that includes types for 1m and 0.5m sizes and different installation methods. Each side is arrayed in one axis and then that group is arrayed vertically along the Z axis. Each side then has an array of half-panel types to allow for 0.5m tank intervals.
Separate arrayed half panels.
Separate instance of half panel.
We first created the solar panel array shown below back in 2017 and then adapted it to manufacturer specifics in 2021. This family emphasizes the need for nested elements because the panels can change pitch.
Solar panel array — a combination of Optigreen framing and LG panels.
The following chair array system is from one of our secondary school collections of free Revit content. Here we can look at the basic parameters that drive the array: the separation distance in the X and Y axis, and the array count in both directions. The length and width are then calculated from these values.
Chair array system can quickly populate an area.
Chair array formulas driving parameters.
From the same collection, the retractable seating family shown below works slightly differently. We had to work with certain constraints set by the manufacturer, so this family uses predefined types and then instance options to change construction aspects such as handing and row separation. As opposed to the chair array previously mentioned, here the length is a set type value that now drives formulas and other values within the family.
Retractable seating family with instance-based design options.
Retractable seating family with instance-based design options.
Retractable seating parameters with more complex formulas.
Instance based design options.
So there we have it. As you can see, arrays are a crucial part of building flexible Revit families. But it pays to think carefully about when and how to use them to achieve your desired results.


Kinship
The best way to manage Revit content
Kinship
The best way to manage Revit content
Kinship
The best way to manage Revit content
Similar Articles


Never miss an update with our monthly newsletter
Get the latest company news, product updates, blog posts and free Revit content from Kinship. Delivered directly to your inbox no more than once a month.
By submitting your email, you agree to receive newsletter emails.
Support
Never miss an update with our monthly newsletter
Get the latest company news, product updates, blog posts and free Revit content from Kinship. Delivered directly to your inbox no more than once a month.
By submitting your email, you agree to receive newsletter emails.
Support
Never miss an update with our monthly newsletter
Get the latest company news, product updates, blog posts and free Revit content from Kinship. Delivered directly to your inbox no more than once a month.
By submitting your email, you agree to receive newsletter emails.
Support